0%

备份数据

  • 输出目录格式的归档

这个方式备份可以避免操作系统对单个文件的大小的限制

1
pg_dump  -U postgres -F -O d -f  /home/back mydb

备份完成后,会生成一个备份文件夹

  • tar格式的归档(在用pg_resotre恢复时不支持并行恢复)
1
pg_dump -U postgres -F t postgres > mydb.tar
  • 生成sql脚本(不支持pg_restore 恢复)
1
pg_dump -U postgres -F p postgres > mydb.sql
  • 生成自定格式的归档
1
pg_dump -U postgres -F c postgres > mydb.bin

恢复数据

  • 恢复前,创建目标数据库
1
 create database mydb;
  • 恢复数据
1
pg_restore -U postgres -d mydb -j 4 /home/back.dump
1
pg_restore -U postgres -d mydb -n schema  -t table_name -a -O -j 4 /home/back.dump
  • 恢复结构
1
pg_restore -U postgres -d mydb --section=pre-data -j 4 /home/back.dump

-j 4 是并行执行线程 其中tar格式备份不支持并行恢复

附录

pg_restore

用法:
pg_restore [选项]… [文件名]

一般选项:

  • -d, --dbname=名字 连接数据库名字
  • -f, --file=文件名 输出文件名(- 对于stdout)
  • -F, --format=c|d|t 备份文件格式(应该自动进行)
  • -l, --list 打印归档文件的 TOC 概述
  • -v, --verbose 详细模式
  • -V, --version 输出版本信息, 然后退出
  • -?, --help 显示此帮助, 然后退出

恢复控制选项:

  • -a, --data-only 只恢复数据, 不包括模式
  • -c, --clean 在重新创建之前,先清除(删除)数据库对象
  • -C, --create 创建目标数据库
  • -e, --exit-on-error 发生错误退出, 默认为继续
  • -I, --index=NAME 恢复指定名称的索引
  • -j, --jobs=NUM 执行多个并行任务进行恢复工作
  • -L, --use-list=FILENAME 从这个文件中使用指定的内容表排序输出
  • -n, --schema=NAME 在这个模式中只恢复对象
  • -N, --exclude-schema=NAME 不恢复此模式中的对象
  • -O, --no-owner 不恢复对象所属者
  • -P, --function=NAME(args) 恢复指定名字的函数
  • -s, --schema-only 只恢复模式, 不包括数据
  • -S, --superuser=NAME 使用指定的超级用户来禁用触发器
  • -t, --table=NAME 恢复命名关系(表、视图等)
  • -T, --trigger=NAME 恢复指定名字的触发器
  • -x, --no-privileges 跳过处理权限的恢复 (grant/revoke)
  • -1, --single-transaction 作为单个事务恢复
  • --disable-triggers 在只恢复数据的过程中禁用触发器
  • --enable-row-security 启用行安全性
  • --if-exists 当删除对象时使用IF EXISTS
  • --no-comments 不恢复注释
  • --no-data-for-failed-tables 对那些无法创建的表不进行 数据恢复
  • --no-publications 不恢复发行
  • --no-security-labels 不恢复安全标签信息
  • --no-subscriptions 不恢复订阅
  • --no-tablespaces 不恢复表空间的分配信息
  • --section=SECTION 恢复命名节 (数据前、数据及数据后)
  • --strict-names 要求每个表和(或)schema包括模式以匹配至少一个实体
  • --use-set-session-authorization 使用 SESSION AUTHORIZATION 命令代替 ALTER OWNER 命令来设置所有权

联接选项:

  • -h, --host=主机名 数据库服务器的主机名或套接字目录
  • -p, --port=端口号 数据库服务器的端口号
  • -U, --username=名字 以指定的数据库用户联接
  • -w, --no-password 永远不提示输入口令
  • -W, --password 强制口令提示 (自动)
  • --role=ROLENAME 在恢复前执行SET ROLE操作

选项 -I, -n, -N, -P, -t, -T, 以及 –section 可以组合使用和指定多次用于选择多个对象.

pg_dump

用法:
pg_dump [选项]… [数据库名字]

一般选项:

  • -f, --file=FILENAME 输出文件或目录名
  • -F, --format=c|d|t|p 输出文件格式 (定制, 目录, tar) 明文 (默认值))
  • -j, --jobs=NUM 执行多个并行任务进行备份转储工作
  • -v, --verbose 详细模式
  • -V, --version 输出版本信息,然后退出
  • -Z, --compress=0-9 被压缩格式的压缩级别
  • --lock-wait-timeout=TIMEOUT 在等待表锁超时后操作失败
  • --no-sync do not wait for changes to be written safely to disk
  • -?, --help 显示此帮助, 然后退出

控制输出内容选项:

  • -a, --data-only 只转储数据,不包括模式
  • -b, --blobs 在转储中包括大对象
  • -B, --no-blobs exclude large objects in dump
  • -c, --clean 在重新创建之前,先清除(删除)数据库对象
  • -C, --create 在转储中包括命令,以便创建数据库
  • -E, --encoding=ENCODING 转储以ENCODING形式编码的数据
  • -n, --schema=SCHEMA 只转储指定名称的模式
  • -N, --exclude-schema=SCHEMA 不转储已命名的模式
  • -o, --oids 在转储中包括 OID
  • -O, --no-owner 在明文格式中, 忽略恢复对象所属者
  • -s, --schema-only 只转储模式, 不包括数据
  • -S, --superuser=NAME 在明文格式中使用指定的超级用户名
  • -t, --table=TABLE 只转储指定名称的表
  • -T, --exclude-table=TABLE 不转储指定名称的表
  • -x, --no-privileges 不要转储权限 (grant/revoke)
  • --binary-upgrade 只能由升级工具使用
  • --column-inserts 以带有列名的INSERT命令形式转储数据
  • --disable-dollar-quoting 取消美元 (符号) 引号, 使用 SQL 标准引号
  • --disable-triggers 在只恢复数据的过程中禁用触发器
  • --enable-row-security 启用行安全性(只转储用户能够访问的内容)
  • --exclude-table-data=TABLE 不转储指定名称的表中的数据
  • --if-exists 当删除对象时使用IF EXISTS
  • --inserts 以INSERT命令,而不是COPY命令的形式转储数据
  • --no-publications do not dump publications
  • --no-security-labels 不转储安全标签的分配
  • --no-subscriptions do not dump subscriptions
  • --no-synchronized-snapshots 在并行工作集中不使用同步快照
  • --no-tablespaces 不转储表空间分配信息
  • --no-unlogged-table-data 不转储没有日志的表数据
  • --quote-all-identifiers 所有标识符加引号,即使不是关键字
  • --section=SECTION 备份命名的节 (数据前, 数据, 及 数据后)
  • --serializable-deferrable 等到备份可以无异常运行
  • --snapshot=SNAPSHOT 为转储使用给定的快照
  • --strict-names 要求每个表和/或schema包括模式以匹配至少一个实体
  • --use-set-session-authorization 使用 SESSION AUTHORIZATION 命令代替 ALTER OWNER 命令来设置所有权

联接选项:

  • -d, --dbname=DBNAME 对数据库 DBNAME备份
  • -h, --host=主机名 数据库服务器的主机名或套接字目录
  • -p, --port=端口号 数据库服务器的端口号
  • -U, --username=名字 以指定的数据库用户联接
  • -w, --no-password 永远不提示输入口令
  • -W, --password 强制口令提示 (自动)
  • --role=ROLENAME 在转储前运行SET ROLE

如果没有提供数据库名字,

本文地址: https://github.com/maxzhao-it/blog/post/88ab1115/

问题

主键 Long 型返回到前端丢失精度问题

两种简单的解决方式:

  1. @JSONField(serializeUsing = ToStringSerializer.class)

2.@JsonSerialize(using = LongToStringSerializer.class)

fastjson中的ToStringSerializer
1
2
3
4
5
6
7
8
9
10
11
12
13
14
15
16
public class ToStringSerializer implements ObjectSerializer {

public static final ToStringSerializer instance = new ToStringSerializer();

@Override
public void write(JSONSerializer serializer, Object object, Object fieldName, Type fieldType,
int features) throws IOException {
SerializeWriter out = serializer.out;
if (object == null) {
out.writeNull();
return;
}
String strVal = object.toString();
out.writeString(strVal);
}
}
自定义类 LongToStringSerializer
1
2
3
4
5
6
7
8
9
10
public class LongToStringSerializer extends JsonSerializer<Long> {
@Override
public void serialize(Long value, JsonGenerator gen, SerializerProvider serializers) throws IOException {
if (value == null) {
gen.writeNull();
return;
}
gen.writeString(value.toString());
}
}

一劳永逸的解决方式(序列化、反序列化)

此解决方案是 springboot 中使用jackson

WebMvcConfigurer中,配置 objectMapperbean
1
2
3
4
5
6
7
8
9
10
11
12
13
14
15
16
17
18
19
20
21
22
23
24
25
26
27
28
29
30
31
32
33
34
35
36
37
38
39
/**
* WebMvcConfigurer
*
* @author maxzhao
* @date 2020-03-05 14:23
*/
@Component
public class BootWebMvcConfigurer implements WebMvcConfigurer {
/**
* Json序列化和反序列化转换器,用于转换Post请求体中的json以及将我们的对象序列化为返回响应的json
*/
@Bean
public ObjectMapper objectMapper() {
ObjectMapper objectMapper = new ObjectMapper();
objectMapper.disable(SerializationFeature.WRITE_DATES_AS_TIMESTAMPS);
objectMapper.disable(DeserializationFeature.ADJUST_DATES_TO_CONTEXT_TIME_ZONE);

/*LocalDateTime系列序列化和反序列化模块,继承自jsr310,我们在这里修改了日期格式
* 在这里修改之后,就不用再去全局序列化了*/
JavaTimeModule javaTimeModule = new JavaTimeModule();
javaTimeModule.addSerializer(LocalDateTime.class
, new LocalDateTimeSerializer(DateTimeFormatter.ofPattern(DateBootUtil.DEFAULT_DATETIME_FORMAT)));
javaTimeModule.addSerializer(LocalDate.class
, new LocalDateSerializer(DateTimeFormatter.ofPattern(DateBootUtil.DEFAULT_DATE_FORMAT)));
javaTimeModule.addSerializer(LocalTime.class
, new LocalTimeSerializer(DateTimeFormatter.ofPattern(DateBootUtil.DEFAULT_TIME_FORMAT)));
javaTimeModule.addDeserializer(LocalDateTime.class
, new LocalDateTimeDeserializer(DateTimeFormatter.ofPattern(DateBootUtil.DEFAULT_DATETIME_FORMAT)));
javaTimeModule.addDeserializer(LocalDate.class
, new LocalDateDeserializer(DateTimeFormatter.ofPattern(DateBootUtil.DEFAULT_DATE_FORMAT)));
javaTimeModule.addDeserializer(LocalTime.class
, new LocalTimeDeserializer(DateTimeFormatter.ofPattern(DateBootUtil.DEFAULT_TIME_FORMAT)));
javaTimeModule.addSerializer(Long.class
, new LongToStringSerializer());
/*Date序列化和反序列化 jackson-datatype-jsr310 包中已经存在 这里就不用再次写了*/
objectMapper.registerModule(javaTimeModule);
return objectMapper;
}
}

本文地址: https://github.com/maxzhao-it/blog/post/45ed5038/

前端向后端转换的类BootConverters

webMvc

1
2
3
4
5
6
7
8
9
10

@Component
public class BootWebMvcConfigurer implements WebMvcConfigurer {

@Override
public void addFormatters(FormatterRegistry registry) {
/*常用类型转换(前端传过来的转换之后使用)*/
BootConverters.getConverterToRegister().forEach(registry::addConverter);
}
}
1
2
3
4
5
6
7
8
9
10
11
12
13
14
15
16
17
18
19
20
21
22
23
24
25
26
27
28
29
30
31
32
33
34
35
36
37
38
39
40
41
42
43
44
45
46
47
48
49
50
51
52
53
54
55
56
57
58
59
60
61
62
63
64
65
66
67
68
69
70
71
72
73
74
75
76
77
78
79
80
81
82
83

/**
* 数据传输的格式转换
*
* @author maxzhao
* @date 2020-03-05 14:14
*/
public class BootConverters {
/**
* 当前 JDK8+ 才有 java。time 包
* <p>兼容JDK8以下</p>
*/
private static final boolean JAVA_8_IS_PRESENT = ClassUtils.isPresent("java.time.LocalDateTime",
Jsr310Converters.class.getClassLoader());

public static Collection<Converter<?, ?>> getConverterToRegister() {
if (!JAVA_8_IS_PRESENT) {
return Collections.emptySet();
}
List<Converter<?, ?>> converters = new ArrayList<>();
/*LocalDate 格式转换*/
converters.add(LocalDateConverter.INSTANCE);
/*LocalDateTime 格式转换*/
converters.add(LocalDateTimeConverter.INSTANCE);
/*String 格式转换*/
converters.add(StringConverter.INSTANCE);
return converters;
}

/**
* LocalDate 格式转换
* 这里枚举通过 INSTANCE 可以直接创建对象
*/
enum LocalDateConverter implements Converter<String, LocalDate> {
INSTANCE;

@Override
public LocalDate convert(String oldValue) {
if (oldValue.isEmpty()) {
return null;
} else if (Pattern.matches(DateBootUtil.DEFAULT_DATE_REGEX, oldValue)) {
return LocalDate.parse(oldValue, DateTimeFormatter.ofPattern(DateBootUtil.DEFAULT_DATE_FORMAT));
} else if (Pattern.matches(DateBootUtil.DEFAULT_DATETIME_FORMAT, oldValue)) {
return LocalDateTime.parse(oldValue, DateTimeFormatter.ofPattern(DateBootUtil.DEFAULT_DATETIME_FORMAT))
.toLocalDate();
} else {
return null;
}
}
}

enum LocalDateTimeConverter implements Converter<String, LocalDateTime> {
INSTANCE;

@Override
public LocalDateTime convert(String oldValue) {
if (oldValue.isEmpty()) {
return null;
} else if (Pattern.matches(DateBootUtil.DEFAULT_DATETIME_REGEX, oldValue)) {
return LocalDateTime.parse(oldValue, DateTimeFormatter.ofPattern(DateBootUtil.DEFAULT_DATETIME_FORMAT));
} else if (Pattern.matches(DateBootUtil.DEFAULT_DATE_REGEX, oldValue)) {
return LocalDate.parse(oldValue, DateTimeFormatter.ofPattern(DateBootUtil.DEFAULT_DATE_FORMAT)).atStartOfDay();
} else {
return null;
}
}
}

enum StringConverter implements Converter<String, String> {
INSTANCE;

@Override
public String convert(String oldValue) {
if (oldValue.isEmpty()) {
return null;
} else if ("undefined".equals(oldValue)) {
return null;
} else {
return oldValue;
}
}
}
}

本文地址: https://github.com/maxzhao-it/blog/post/6a411b93/

前言

都说MySql8.x5.7快两倍,可以参考一下。
但不支持从 MySQL 8.0 降级到 MySQL 5.7(或从某个 MySQL 8.0 版本降级到任意一个更早的 MySQL 8.0 版本)。数据备份方式还是可以的。

  • 注意MySql8 的用户安全策略的改变
  • 注意MySql8 编码格式
  • 支撑内网服务器安装

准备

架构设计

主从

服务器配置

  • 192.168.2.31 master server_id=31
  • 192.168.2.32 slave server_id=32

安装

MySQL

Centos7 RPM安装MYSQL8
Centos7 解压安装MYSQL8

关闭防火墙

1
2
systemctl stop firewalld
systemctl disable firewalld

配置

1、MySQL

1
vim /etc/my.cnf

2、主备配置

  • master :server_id=31 `log-bin=mysql-bin`
  • slave:server_id=32 `log-bin=mysql-bin`
1
2
3
4
5
6
7
8
9
10
11
12
13
14
15
16
17
18
19
20
21
22
23
24
25
26
27
28
29
30
31
32
33
[mysql]
# 设置mysql客户端默认字符集
default-character-set=utf8mb4
socket=/opt/db/mysql_data/mysql.sock
[mysqld]
skip-name-resolve
#设置3306端口
port=3306
datadir=/opt/db/mysql_data
socket=/opt/db/mysql_data/mysql.sock
log-error=/opt/db/mysql_log/mysqld.log
pid-file=/opt/db/mysqld/mysqld.pid
# 服务ID,集群中唯一
server-id=31
# 二进制日志
log-bin=mysql-bin
# 密码认证插件
default_authentication_plugin=mysql_native_password
# 允许最大连接数
max_connections=200
# 服务端使用的字符集默认为8比特编码的latin1字符集
character-set-server=utf8mb4
#排序规则
collation-server=utf8mb4_0900_ai_ci
#utf8mb4_0900_ai_ci 排序规则:ai 口音不敏感 ci 不区分大小写 ,默认支持表情符号
#utf8mb4_0900_ai_ci 属于 utf8mb4_unicode_ci 中的一种
#utf8mb4_general_ci 没有实现utf8mb4_unicode_ci 的排序规则。没有utf8mb4_unicode_ci 准备。但是比较和排序的时候更快
# 创建新表时将使用的默认存储引擎,innodb支持事物
default-storage-engine=INNODB
# 数据库不区分大小写
lower_case_table_names=1
max_allowed_packet=16M
lc-messages-dir=/usr/share/mysql-8.0

重启 masterslave

1
2
3
4
systemctl restart mysqld
systemctl status mysqld
# 查看日志
cat /opt/db/mysql_log/mysqld.log

SQL命令:

1
2
3
4
5
6
7
8
# 查询默认认证插件
show variables like 'default_authentication_plugin';
# 查询master slave 保证不重复
show variables like '%server_id%';
# 查询master slave,如果是复制的数据库data,则 uuid有可能一样
show variables like '%server_uuid%';
# 查询账号认证模式
select host,user,plugin from mysql.user;

3、master库配置

master配置同步账号

SQL命令:

1
2
3
4
5
6
7
8
# 这里创建账号不指定地址,一般情况下,需要指定 slave 账号的 IP
create user sync@'192.168.2.32' identified by 'sync';
grant replication slave on *.* to sync@'192.168.2.32';
# 使用 mysql_native_password 认证码模式
alter user sync@'192.168.2.32' identified with mysql_native_password by 'sync';
flush privileges;
# 查询账号认证模式
select host,user,plugin from mysql.user;

4、slave库配置

查看master

master SQL命令:

1
show master status;

image-20210826090146083

slave写入 master的配置

slave SQL命令:

1
2
3
4
5
6
7
8
-- 停止slave 库
stop slave;
-- 写入配置
CHANGE MASTER TO MASTER_HOST='192.168.2.31',MASTER_USER='sync',MASTER_PASSWORD='sync',MASTER_LOG_FILE='mysql-bin.000006',MASTER_LOG_POS=156;
-- 启动从库
start slave;
-- 查看从库状态
SHOW SLAVE STATUS\G;

启动

启动MySQL

1
systemctl start mysqld

slave 启动

SQL命令:

1
2
3
4
-- 启动从库
start slave;
-- 查看从库状态
SHOW SLAVE STATUS\G;

测试

登录

1
mysql -uroot -p

master

SQL命令:

1
show processlist\G

Command: Binlog Dump状态为成功。

slave

SQL命令:

1
2
-- 查看从库状态
SHOW SLAVE STATUS\G;

image-20210826085655710

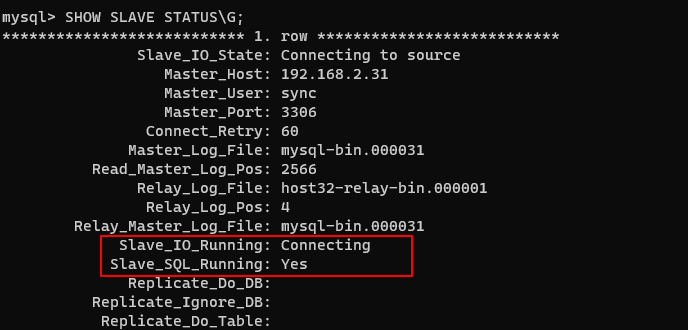
这两项都为 Yes则为成功,否则看错误日志,有错误。

查看错误日志

1
cat /opt/db/mysql_log/mysqld.log

这是因为的 mysql_data 是复制的,只要修改 auto.cnf 中的

1
2
[auto]
server-uuid=f2c4ab17-01ce-11ec-9d35-000c29d3bb32

重启服务

1
systemctl restart mysqld

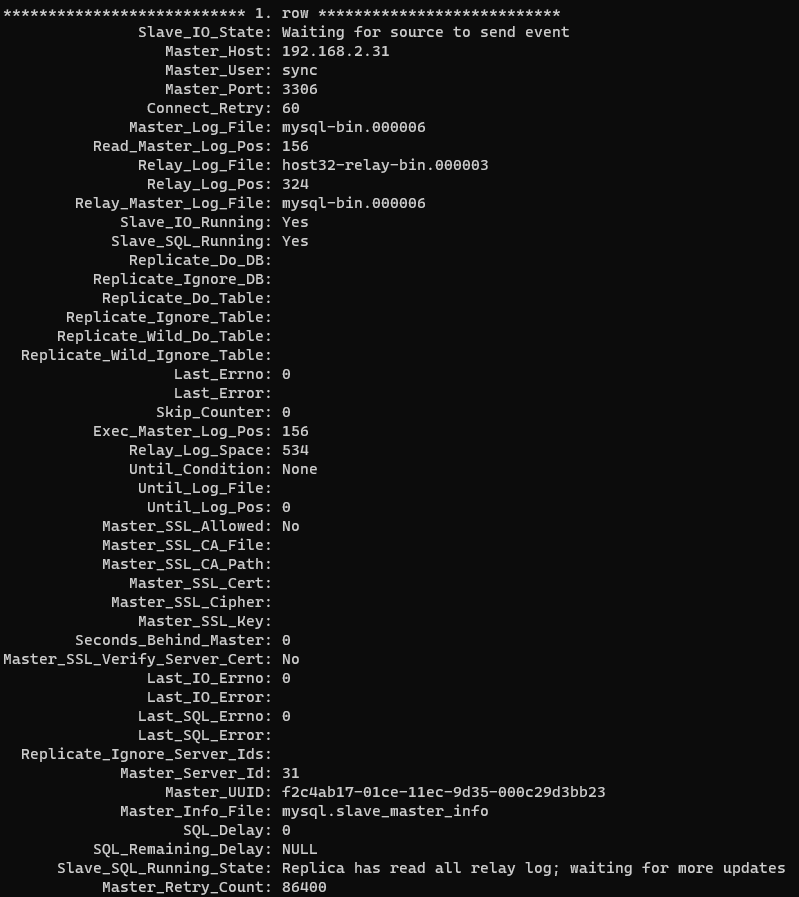
正确的 slave结果

数据测试

master插入数据

SQL命令:

1
2
3
4
5
6
7
8
show databases;
create database test_db;
use test_db;
create table test_table(
id int
);
insert into test_table values(1);
select * from test_table;

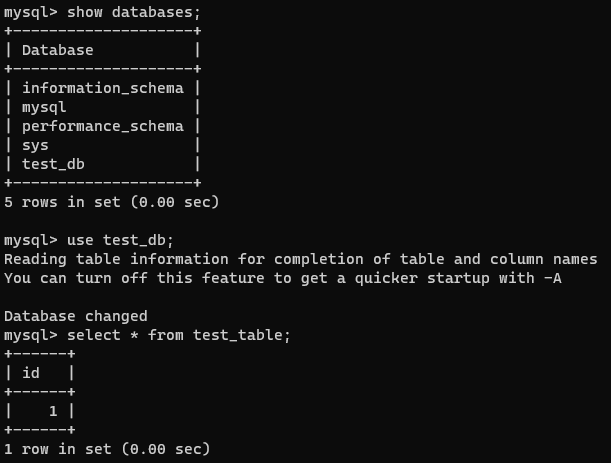
slave查询数据

SQL命令:

1
2
3
show databases;
use test_db;
select * from test_table;

slave插入数据

1
insert into test_table values(2);

主库是不会增加数据的。

操作

同步

  1. master锁表

    1
    2
    FLUSH TABLES WITH READ LOCK;
    show master status;
  2. slave从库

    1
    2
    3
    4
    5
    6
    -- 写入配置
    CHANGE MASTER TO MASTER_HOST='192.168.2.31',MASTER_USER='sync',MASTER_PASSWORD='sync',MASTER_LOG_FILE='mysql-bin.000006',MASTER_LOG_POS=156;
    -- 启动从库
    start slave;
    -- 查看从库状态
    SHOW SLAVE STATUS\G;
  3. master解锁

    1
    unlock tables;

推荐

MySQL8.0创建用户及其配置
MySQL8.0新特性-新的索引方式
MySQL8.0新特性-通用表表达式(CTE)
MySQL8.0新特性-窗口函数
MySQL8.0新特性-InnoDB增强
MySQL8.0新特性-JSON增强
[官方介绍]([https://dev.mysql.com/doc/refman/8.0/en/create-index.html#create-index-functional-key-parts

本文地址: https://github.com/maxzhao-it/blog/post/f34de611/

前言

都说MySql8.x5.7快两倍,可以参考一下。
但不支持从 MySQL 8.0 降级到 MySQL 5.7(或从某个 MySQL 8.0 版本降级到任意一个更早的 MySQL 8.0 版本)。数据备份方式还是可以的。

  • 注意MySql8 的用户安全策略的改变
  • 注意MySql8 编码格式
  • 支撑内网服务器安装

准备

架构设计

主主

服务器配置

  • 192.168.2.33 master33 server_id=33
  • 192.168.2.34 master34 server_id=34

对于目前的状况,很少使用 MySQL 自增主键,解决主键冲突问题的最简单的方式,就是错开主键,可以在 my.cnf 文件中配置。

安装

MySQL

Centos7 RPM安装MYSQL8
Centos7 解压安装MYSQL8

关闭防火墙

1
2
systemctl stop firewalld
systemctl disable firewalld

配置

1、MySQL

1
vim /etc/my.cnf

2、配置

  • master33 :server_id=33 `log-bin=mysql-bin`
  • master34 :server_id=34 `log-bin=mysql-bin`
1
2
3
4
5
6
7
8
9
10
11
12
13
14
15
16
17
18
19
20
21
22
23
24
25
26
27
28
29
30
31
32
33
34
35
36
37
38
39
40
41
[mysql]
# 设置mysql客户端默认字符集
default-character-set=utf8mb4
socket=/opt/db/mysql_data/mysql.sock
[mysqld]
skip-name-resolve
#设置3306端口
port=3306
datadir=/opt/db/mysql_data
socket=/opt/db/mysql_data/mysql.sock
log-error=/opt/db/mysql_log/mysqld.log
pid-file=/opt/db/mysqld/mysqld.pid
# 服务ID,集群中唯一
server-id=33
# 二进制日志
log-bin=mysql-bin
# 指定mysql的binlog日志记录哪个db,如果复制多个数据库,重复设置这个选项即可
# binlog-do-db:
# 参数是在slave上配置,指定slave要同步的数据库,默认所有库,如果复制多个数据库,重复设置这个选项即可
# replicate-do-db=aa
# 自增主键步值auto_imcrement。一般有n台主MySQL就填n,保证主键不冲突
auto_increment_increment=2
# 自增起始值。一般填第n台主MySQL。此时为第一台主MySQL
auto_increment_offset=1
# 密码认证插件
default_authentication_plugin=mysql_native_password
# 允许最大连接数
max_connections=200
# 服务端使用的字符集默认为8比特编码的latin1字符集
character-set-server=utf8mb4
#排序规则
collation-server=utf8mb4_0900_ai_ci
#utf8mb4_0900_ai_ci 排序规则:ai 口音不敏感 ci 不区分大小写 ,默认支持表情符号
#utf8mb4_0900_ai_ci 属于 utf8mb4_unicode_ci 中的一种
#utf8mb4_general_ci 没有实现utf8mb4_unicode_ci 的排序规则。没有utf8mb4_unicode_ci 准备。但是比较和排序的时候更快
# 创建新表时将使用的默认存储引擎,innodb支持事物
default-storage-engine=INNODB
# 数据库不区分大小写
lower_case_table_names=1
max_allowed_packet=16M
lc-messages-dir=/usr/share/mysql-8.0

重启 master33master34

1
2
3
4
systemctl restart mysqld
systemctl status mysqld
# 查看日志
cat /opt/db/mysql_log/mysqld.log

master33 master34 SQL命令:

1
2
3
4
5
6
7
8
9
10
11
# 查询默认认证插件
show variables like 'default_authentication_plugin';
# 查询master slave 保证不重复
show variables like '%server_id%';
# 查询master slave,如果是复制的数据库data,则 uuid有可能一样
show variables like '%server_uuid%';
# 查询账号认证模式
select host, user, plugin
from mysql.user;
# 重置数据库slave信息
reset slave;

3、master33为主库

主备配置

master33配置同步账号

SQL命令:

1
2
3
4
5
6
7
8
9
10
11
# 这里创建账号不指定地址,一般情况下,需要指定 slave 账号的 IP
create user sync@'192.168.2.34' identified by 'sync';
grant replication slave on *.* to sync@'192.168.2.34';
# 使用 mysql_native_password 认证码模式
alter user sync@'192.168.2.34' identified with mysql_native_password by 'sync';
flush privileges;
# 查询账号认证模式
select host, user, plugin
from mysql.user;
# 查看配置
show master status;

image-20210826090146083

master34写入 master33的配置

master34 SQL命令:

1
2
3
4
5
6
7
8
-- 停止 slave 库
stop slave;
-- 写入配置
CHANGE MASTER TO MASTER_HOST ='192.168.2.33',MASTER_USER ='sync',MASTER_PASSWORD ='sync',MASTER_LOG_FILE ='mysql-bin.000009',MASTER_LOG_POS =156;
-- 启动从库
start slave;
-- 查看从库状态
SHOW SLAVE STATUS\G;

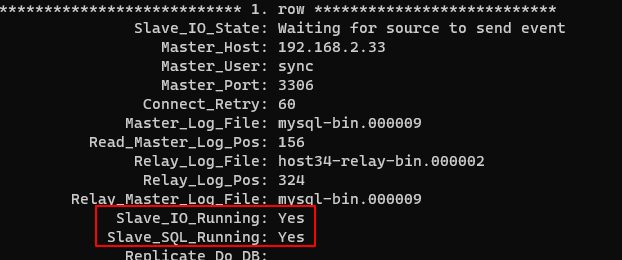
两个都为 Yes 则为成功。

测试 master33为主库

登录

1
mysql -uroot -p

查看主库状态

master33 SQL命令:

1
2
3
show processlist
\
G

Command: Binlog Dump状态为成功。

插入数据

1
2
3
4
5
6
7
8
show databases;
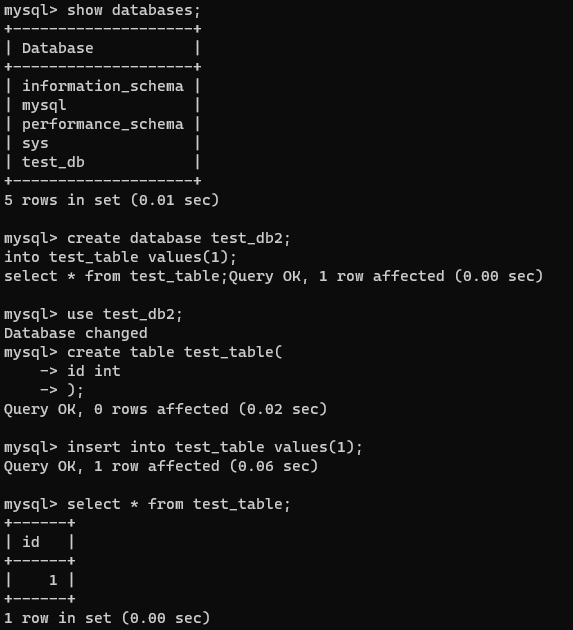
create database test_db2;
use test_db2;
create table test_table(
id int
);
insert into test_table values(1);
select * from test_table;

image-20210826143802988

master34 查询数据

SQL命令:

1
2
3
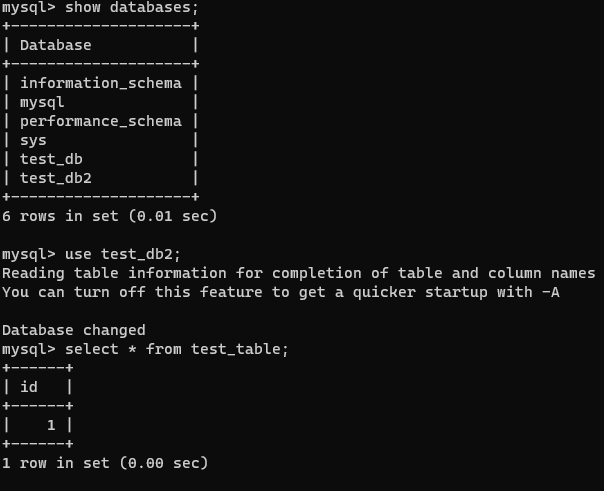
show databases;
use test_db2;
select * from test_table;

image-20210826143849915

master34插入数据

1
insert into test_table values (2);

master33 上数据没有增加。

4、master34为主库

与步骤 3、master33 为主库步骤一样。

master34 SQL命令

1
2
3
4
5
6
7
8
9
10
# 这里创建账号不指定地址,一般情况下,需要指定 slave 账号的 IP
create user sync@'192.168.2.33' identified by 'sync';
grant replication slave on *.* to sync@'192.168.2.33';
# 使用 mysql_native_password 认证码模式
alter user sync@'192.168.2.33' identified with mysql_native_password by 'sync';
flush privileges;
# 查询账号认证模式
select host,user,plugin from mysql.user;
# 查看配置
show master status;

master33 SQL 命令:

1
2
3
4
5
6
7
8
-- 停止 slave 库
stop slave;
-- 写入配置
CHANGE MASTER TO MASTER_HOST='192.168.2.34',MASTER_USER='sync',MASTER_PASSWORD='sync',MASTER_LOG_FILE='mysql-bin.000009',MASTER_LOG_POS=1916;
-- 启动从库
start slave;
-- 查看从库状态
SHOW SLAVE STATUS\G;

错误处理

查看错误日志

1
cat /opt/db/mysql_log/mysqld.log

这是因为的 mysql_data 是复制的,只要修改 auto.cnf 中的

1
2
[auto]
server-uuid=f2c4ab17-01ce-11ec-9d35-000c29d3bb32

重启服务

1
systemctl restart mysqld

正确的 slave结果

操作

同步

  1. master锁表

    1
    2
    FLUSH TABLES WITH READ LOCK;
    show master status;
  2. slave从库

    1
    2
    3
    4
    5
    6
    -- 写入配置
    CHANGE MASTER TO MASTER_HOST='192.168.2.31',MASTER_USER='sync',MASTER_PASSWORD='sync',MASTER_LOG_FILE='mysql-bin.000006',MASTER_LOG_POS=156;
    -- 启动从库
    start slave;
    -- 查看从库状态
    SHOW SLAVE STATUS\G;
  3. master解锁

    1
    unlock tables;

推荐

MySQL8.0创建用户及其配置
MySQL8.0新特性-新的索引方式
MySQL8.0新特性-通用表表达式(CTE)
MySQL8.0新特性-窗口函数
MySQL8.0新特性-InnoDB增强
MySQL8.0新特性-JSON增强
[官方介绍]([https://dev.mysql.com/doc/refman/8.0/en/create-index.html#create-index-functional-key-parts

本文地址: https://github.com/maxzhao-it/blog/post/3b97adfc/

前言

Nacos支持三种部署模式:

  • 单机模式 - 用于测试和单机试用。
  • 集群模式 - 用于生产环境,确保高可用。
  • 多集群模式 - 用于多数据中心场景。

强烈推荐文档](https://nacos.io/zh-cn/docs/quick-start.html):很详细了。但是集群只描述了直连模式,不适用可扩展`Nacos` 服务的生产环境。

这里主要描述一下 VIP 模式以及 VIP 模式的安装、配置。

准备

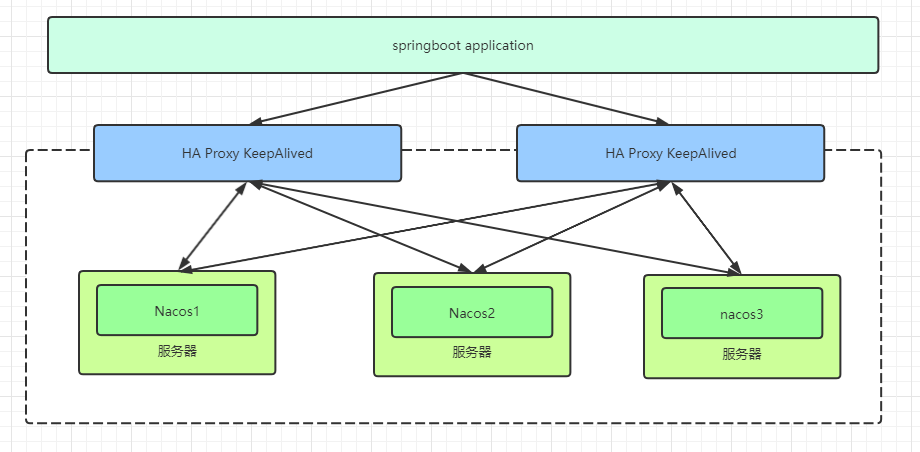
VIP模式架构图

概述

Haproxy负载均衡

这里使用 HaProxy实现负载均衡,这里使用两台 HaProxy服务器,能够自动进行故障转移,当前解决方案为 Keepalived

Keepalived高可用

Keepalived具有高可用、主从热备、秒级切换等特点。KeepAlived 采用 VRRP (Virtual Router Redundancy Protocol,虚拟路由冗余协议)
来解决单点失效的问题,它通常由一组一备两个节点组成,同一时间内只有主节点会提供对外服务,并同时提供一个虚拟的 IP 地址 (Virtual Internet Protocol Address ,简称 VIP) 。
如果主节点故障,那么备份节点会自动接管 VIP 并成为新的主节点 ,直到原有的主节点恢复。

服务器部署方案

  • nacos1:192.168.2.43
  • nacos2:192.168.2.44
  • nacos3:192.168.2.45
  • HaProxyKeepAlived:192.168.2.41/192.168.2.42
    • 192.168.2.41 KeepAlived master
    • 192.168.2.42KeepAlived slave

关闭防火墙或开放端口

1
2
systemctl stop firewalld
systemctl disable firewalld

默认已经拥有一台MySQL8+数据库服务。

Centos7 RPM安装MYSQL8
Centos7 解压安装MYSQL8

安装

我这里以我的安装路径为准~/tools/

1、预备环境准备

Nacos 依赖 Java
环境来运行。如果您是从代码开始构建并运行Nacos,还需要为此配置 Maven环境,请确保是在以下版本环境中安装使用:

  1. Centos7,支持 Linux/Unix/Mac/Windows,推荐选用 Linux/Unix/Mac。
  2. 64 bit JDK 1.8+下载 & 配置
  3. Maven 3.2.x+下载 & 配置,如果不编译Nacos源码,可以不用下载
  4. Nacos 2.1.2下载 & 配置

2、从 Github 上下载安装包

Releases 地址

1
2
3
4
5
6
mkdir ~/tools && cd ~/tools
# 直接获取 nacos-server-2.1.2
wget https://github.com/alibaba/nacos/releases/download/2.1.2/nacos-server-2.1.2.tar.gz
# 解压
tar -zxvf nacos-server-2.1.2.tar.gz -C ../
cd nacos/

3、MySQL数据库

1
2
# 查询 nacos-mysql.sql 脚本文件
cat ~/tools/nacos/conf/nacos-mysql.sql

MySQL中新建数据库并执行当前文件。

4、配置 NacosMySQL 驱动

1
mkdir -p ~/tools/nacos/plugins/mysql/

下载 mysql-connector-java-8.0.26.jar 驱动,放入到前目录中。

5、安装 HaProxy

1
2
3
4
5
6
7
8
9
yum install haproxy -y
# 查看系统服务
systemctl list-unit-files |grep haproxy
# 服务状态
systemctl status haproxy
# 启动
systemctl start haproxy
# 设置为开机自启
systemctl enable haproxy

6、安装 KeepAlived

下载

官方下载地址

这里选择 2.2.2版本

1
2
3
mkdir /root/tools
cd /root/tools/
wget https://www.keepalived.org/software/keepalived-2.2.2.tar.gz

安装

VMware 中注意,需要挂载ISO镜像,参考 VMWare配置CentOS7网络

1
2
3
4
5
6
yum -y install openssl-devel gcc gcc-c++
tar -xvf keepalived-2.2.2.tar.gz
cd keepalived-2.2.2
./configure --prefix=/usr/local/keepalived
make && make install
mkdir /etc/keepalived

安装后的目录

1
2
yum install tree -y
tree -l /usr/local/keepalived/etc

目录结构:

1
2
3
4
5
6
7
8
9
10
11
/usr/local/keepalived/etc
├── keepalived
│   ├── keepalived.conf
│   └── samples
│   ├── client.pem
│   ├── dh1024.pem
│   ├── keepalived.conf.conditional_conf
│   ├── ***********************************
│   └── sample_notify_fifo.sh
└── sysconfig
└── keepalived

目录分别对应配置路径

1
2
/etc/keepalived/keepalived.conf
/etc/sysconfig/keepalived

创建启动文件

1
2
3
4
5
6
#将keepalived配置文件拷贝到etc下
cp /usr/local/keepalived/etc/keepalived/keepalived.conf /etc/keepalived/keepalived.conf
#将keepalived文件拷贝到etc下,加入网卡配置
cp /usr/local/keepalived/etc/sysconfig/keepalived /etc/sysconfig/keepalived
#命令
ln -s /usr/local/keepalived/sbin/keepalived /usr/sbin

查看系统服务

1
systemctl list-unit-files |grep keepalived

配置

1、Nacos集群文件

所有节点都需要当前配置

1
2
3
4
5
6
7
cd ~/tools/nacos/conf
# 拷贝集群配置文件
cp cluster.conf.example cluster.conf
# 写入配置
echo "192.168.2.43:8848" > ~/tools/nacos/conf/cluster.conf
echo "192.168.2.44:8848" >> ~/tools/nacos/conf/cluster.conf
echo "192.168.2.45:8848" >> ~/tools/nacos/conf/cluster.conf

2、Nacosapplication.properties配置

所有节点都需要当前配置

1
vim ~/tools/nacos/conf/application.properties

按需编写配置

1
2
3
4
5
6
7
8
9
10
11
12
13
14
15
16
17
18
19
20
21
22
23
24
25
26
27
28
29
30
31
32
33
34
35
36
37
38
39
40
41
42
43
44
### Default web context path:
server.servlet.contextPath=/nacos
server.port=8848
#*************** Network Related Configurations ***************#
### If prefer hostname over ip for Nacos server addresses in cluster.conf:
# nacos.inetutils.prefer-hostname-over-ip=false
### Specify local server's IP:
# nacos.inetutils.ip-address=
#*************** Config Module Related Configurations ***************#
### If use MySQL as datasource:
spring.datasource.platform=mysql
### Count of DB:
db.num=1
### Connect URL of DB:
db.url.0=jdbc:mysql://192.168.2.1:3306/nacos_db?charset=utf8mb4&connectTimeout=1000&socketTimeout=3000&autoReconnect=true&serverTimezone=GMT%2B8&useUnicode=true&useSSL=false
db.user.0=nacos
db.password.0=nacos
### Connection pool configuration: hikariCP
db.pool.config.connectionTimeout=30000
db.pool.config.validationTimeout=10000
db.pool.config.maximumPoolSize=20
db.pool.config.minimumIdle=2
### will be removed and replaced by `nacos.naming.clean` properties
nacos.naming.empty-service.auto-clean=true
nacos.naming.empty-service.clean.initial-delay-ms=50000
nacos.naming.empty-service.clean.period-time-ms=30000
### Since 2.1.2
### The expired time for inactive client, unit: milliseconds.
# nacos.naming.client.expired.time=180000
#*************** CMDB Module Related Configurations ***************#
### The interval to dump external CMDB in seconds:
nacos.cmdb.dumpTaskInterval=3600
### The interval of polling data change event in seconds:
nacos.cmdb.eventTaskInterval=10
### The interval of loading labels in seconds:
nacos.cmdb.labelTaskInterval=300
### If turn on data loading task:
nacos.cmdb.loadDataAtStart=false
# 激活Prometheus监控采集Exporter
management.endpoints.web.exposure.include=*
### The auth system to use, currently only 'nacos' and 'ldap' is supported:
nacos.core.auth.system.type=nacos
### If turn on auth system:
nacos.core.auth.enabled=false

3、Nacos服务

1
vim ~/tools/nacos.service

写入配置

1
2
3
4
5
6
7
8
9
10
11
12
13
Description=nacos-server
# 在 network 服务后启动
After=

[Service]
Type=forking
ExecStart=~/tools/nacos/bin/startup.sh
ExecStop=~/tools/nacos/bin/shutdown.sh
Restart=always
PrivateTmp=true

[Install]
WantedBy=multi-user.target

启动服务

1
2
3
4
5
6
7
cp nacos.service /usr/lib/systemd/system/
# 启动 nacos 服务
systemctl start nacos
# 查看服务状态
systemctl status nacos.service
# 设置开机自启
systemctl enable nacos

4、配置 HaProxy

配置

基本配置haproxy.cfg

参考附录 /etc/haproxy/haproxy.cfg

1
vim /etc/haproxy/haproxy.cfg

日志配置 rsyslog

1
2
3
mkdir /var/log/haproxy
vim /etc/rsyslog.conf
#写入 local2.* /var/log/haproxy.log

检查配置

1
2
haproxy -f /etc/haproxy/haproxy.cfg -c
#Configuration file is valid

5、配置KeepAlived

Keepalived 启动时,不会检查配置文件的语法。

配置文件修改

1
vim /etc/keepalived/keepalived.conf

master 192.168.2.41服务器

1
2
hostnamectl set-hostname host41
vim /etc/keepalived/keepalived.conf

写入配置

1
2
3
4
5
6
7
8
9
10
11
12
13
14
15
16
17
18
19
20
21
22
23
24
25
26
global_defs { ## 全局定义块 
router_id host41 ## 标识本节点的字条串,通常为hostname
}
vrrp_script check_haproxy {
script "/etc/keepalived/haproxy_chk.sh" #执行脚本位置
interval 5 ##检查时间间隔
weight -20 ##如果条件成立则权重减20
}
vrrp_instance VI_1 { #VRRP 实例定义块
state MASTER ##主节点为MASTER,备份节点为BACKUP
interface ens33 ##绑定虚拟ip的网络接口(网卡)
virtual_router_id 40 ##虚拟路由id号,主备节点相同
mcast_src_ip 192.168.2.41 ##本机ip地址
priority 100 ##优先级(0-254)
advert_int 1 ##组播信息发送间隔,两个节点必须一致,默认1s
authentication { ##认证匹配
auth_type PASS
auth_pass 1111
}
virtual_ipaddress {
192.168.2.49/24 ##虚拟ip,可以指定多个
}
track_script {
check_haproxy
}
}

slave 192.168.2.42

1
2
hostnamectl set-hostname host42
vim /etc/keepalived/keepalived.conf

写入配置

1
2
3
4
5
6
7
8
9
10
11
12
13
14
15
16
17
18
19
20
21
22
23
24
25
26
global_defs { ## 全局定义块 
router_id host42 ## 标识本节点的字条串,通常为hostname
}
vrrp_script check_haproxy {
script "/etc/keepalived/haproxy_chk.sh" #执行脚本位置
interval 5 ##检查时间间隔
weight -20 ##如果条件成立则权重减20
}
vrrp_instance VI_1 { #VRRP 实例定义块
state MASTER ##主节点为MASTER,备份节点为BACKUP
interface ens33 ##绑定虚拟ip的网络接口(网卡)
virtual_router_id 40 ##虚拟路由id号,主备节点相同
mcast_src_ip 192.168.2.42 ##本机ip地址
priority 50 ##优先级(0-254)
advert_int 1 ##组播信息发送间隔,两个节点必须一致,默认1s
authentication { ##认证匹配
auth_type PASS
auth_pass 1111
}
virtual_ipaddress {
192.168.2.49/24 ##虚拟ip,可以指定多个
}
track_script {
check_haproxy
}
}

日志配置

1
2
3
4
5
6
vim /etc/sysconfig/keepalived
#写入 KEEPALIVED_OPTIONS="-D -d -S 0"
vim /etc/rsyslog.conf
#写入 local0.* /var/log/keepalived.log
systemctl restart rsyslog.service
systemctl restart keepalived

健康检查脚本

健康检查脚本的目的,判断 HaProxy 是否存活,如不存活,则同时关闭 Keepalived,释放资源。

1
vim /etc/keepalived/haproxy_chk.sh
1
2
3
4
5
6
7
8
9
systemctl status haproxy.service &>/dev/null
if [ $? -ne 0 ];then
systemctl start haproxy.service &>/dev/null
sleep 5
systemctl status haproxy.service &>/dev/null
if [ $? -ne 0 ];then
systemctl stop keepalived
fi
fi
1
chmod 755 /etc/keepalived/haproxy_chk.sh

启动

Nacos基础命令

启动

1
sh ~/tools/nacos/bin/startup.sh

查看当前是否执行

1
jps -mV |grep nacos

关闭

1
sh ~/tools/nacos/bin/shutdown.sh

Nacos服务命令

启动

1
systemctl start nacos

停止

1
systemctl stop nacos

HaProxy服务命令

1
2
3
4
5
6
7
8
# 重启系统日志
systemctl restart rsyslog.service
# 启动 ha代理
systemctl start haproxy
# 设置为开机自启
systemctl enable haproxy
# 重启 ha代理
systemctl restart haproxy

问题 nacos_cluster: cannot bind socket [0.0.0.0:8848]

设置策略

1
2
3
4
5
6
7
# 方式一
setsebool -P haproxy_connect_any=1
# 方式二
vim /etc/sysctl.conf
# 添加 net.ipv4.ip_nonlocal_bind=1
sysctl -p
reboot

重新启动就可以了.

Keepalived服务命令

1
2
3
4
useradd  keepalived_script
systemctl start keepalived
systemctl enable keepalived
systemctl status keepalived

测试

服务注册

1
curl -X POST 'http://127.0.0.1:8848/nacos/v1/ns/instance?serviceName=nacos.naming.serviceName&ip=20.18.7.10&port=8080'

服务发现

1
curl -X GET 'http://127.0.0.1:8848/nacos/v1/ns/instances?serviceName=nacos.naming.serviceName'

发布配置

1
curl -X POST "http://127.0.0.1:8848/nacos/v1/cs/configs?dataId=nacos.cfg.dataId&group=test&content=HelloWorld"

获取配置

1
curl -X GET "http://127.0.0.1:8848/nacos/v1/cs/configs?dataId=nacos.cfg.dataId&group=test"

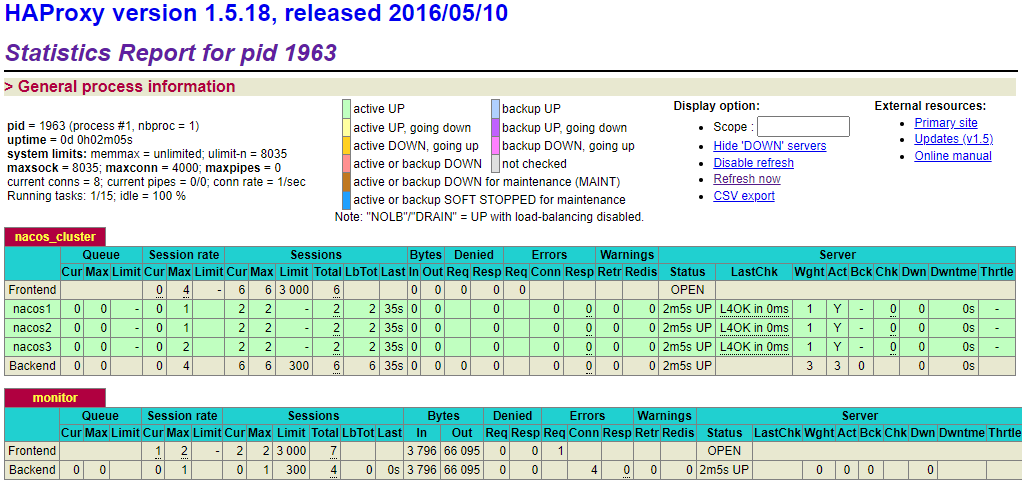
测试 HaProxy

测试 HaProxy 下的Nacos

测试 Keepalived

查看进程

keepalived正常运行后,会启动2个进程,其中一个是父进程,负责监控其子进程。一个是vrrp子进程。

1
ps -ef|grep keepalived

查询进程的结果

1
2
root       2607      1  0 15:35 ?        00:00:00 /usr/local/keepalived/sbin/keepalived -D
root 2608 2607 0 15:35 ? 00:00:00 /usr/local/keepalived/sbin/keepalived -D

IP

1
2
# 在 `host41` 上执行
ip a

结果

host42 上执行,是没有当前 VIP 的。

1
2
3
4
# 在 `host41` 上执行
systemctl stop keepalived
# 在 `host42` 上执行
ip a

这时候会发现 VIP 节点就到了 host42

1
2
3
4
# 在 `host41` 上执行
systemctl start keepalived
# 在 `host41` 上执行
ip a

会发现 VIP 节点又回来了,因为 host41priorityhost42大,所以会抢夺。

禁用抢夺策略关键字 nopreempt

1
2
3
4
vrrp_instance VI_1 {
##**************
nopreempt
}

正常测试

1
2
3
4
5
6
7
curl 192.168.2.41
#this is master
#root@centos7[14:46:07]:~
curl 192.168.2.42
#this is master
#root@centos7[15:03:29]:~
#1.2.3.4.5.6.

关闭 master 后测试

1
2
# host41 上执行
systemctl stop keepalived
1
2
3
curl 192.168.2.41
#this is slave
#root@centos7[15:03:59]:/etc/keepalived

测试 Keepalived VIPNacos

Nacos application.properties详细配置

1
2
3
4
5
6
7
8
9
10
11
12
13
14
15
16
17
18
19
20
21
22
23
24
25
26
27
28
29
30
31
32
33
34
35
36
37
38
39
40
41
42
43
44
45
46
47
48
49
50
51
52
53
54
55
56
57
58
59
60
61
62
63
64
65
66
67
68
69
70
71
72
73
74
75
76
77
78
79
80
81
82
83
84
85
86
87
88
89
90
91
92
93
94
95
96
97
98
99
100
101
102
103
104
105
106
107
108
109
110
111
112
113
114
115
116
117
118
119
120
121
122
123
124
125
126
127
128
129
130
131
132
133
134
135
136
137
138
139
140
141
142
143
144
145
### Default web context path:
server.servlet.contextPath=/nacos
server.port=8848
#*************** Network Related Configurations ***************#
### If prefer hostname over ip for Nacos server addresses in cluster.conf:
# nacos.inetutils.prefer-hostname-over-ip=false
### Specify local server's IP:
# nacos.inetutils.ip-address=
#*************** Config Module Related Configurations ***************#
### If use MySQL as datasource:
spring.datasource.platform=mysql
### Count of DB:
db.num=1
### Connect URL of DB:
db.url.0=jdbc:mysql://192.168.2.1:3306/nacos_db?charset=utf8mb4&connectTimeout=1000&socketTimeout=3000&autoReconnect=true&serverTimezone=GMT%2B8&useUnicode=true&useSSL=false
db.user.0=nacos
db.password.0=nacos
### Connection pool configuration: hikariCP
db.pool.config.connectionTimeout=30000
db.pool.config.validationTimeout=10000
db.pool.config.maximumPoolSize=20
db.pool.config.minimumIdle=2
#*************** Naming Module Related Configurations ***************#
### Data dispatch task execution period in milliseconds: Will removed on v2.1.X, replace with nacos.core.protocol.distro.data.sync.delayMs
# nacos.naming.distro.taskDispatchPeriod=200
### Data count of batch sync task: Will removed on v2.1.X. Deprecated
# nacos.naming.distro.batchSyncKeyCount=1000
### Retry delay in milliseconds if sync task failed: Will removed on v2.1.X, replace with nacos.core.protocol.distro.data.sync.retryDelayMs
# nacos.naming.distro.syncRetryDelay=5000
### If enable data warmup. If set to false, the server would accept request without local data preparation:
# nacos.naming.data.warmup=true
### If enable the instance auto expiration, kind like of health check of instance:
# nacos.naming.expireInstance=true
### will be removed and replaced by `nacos.naming.clean` properties
nacos.naming.empty-service.auto-clean=true
nacos.naming.empty-service.clean.initial-delay-ms=50000
nacos.naming.empty-service.clean.period-time-ms=30000
### Add in 2.0.0
### The interval to clean empty service, unit: milliseconds.
# nacos.naming.clean.empty-service.interval=60000
### The expired time to clean empty service, unit: milliseconds.
# nacos.naming.clean.empty-service.expired-time=60000
### The interval to clean expired metadata, unit: milliseconds.
# nacos.naming.clean.expired-metadata.interval=5000
### The expired time to clean metadata, unit: milliseconds.
# nacos.naming.clean.expired-metadata.expired-time=60000
### The delay time before push task to execute from service changed, unit: milliseconds.
# nacos.naming.push.pushTaskDelay=500
### The timeout for push task execute, unit: milliseconds.
# nacos.naming.push.pushTaskTimeout=5000
### The delay time for retrying failed push task, unit: milliseconds.
# nacos.naming.push.pushTaskRetryDelay=1000
### Since 2.1.2
### The expired time for inactive client, unit: milliseconds.
# nacos.naming.client.expired.time=180000
#*************** CMDB Module Related Configurations ***************#
### The interval to dump external CMDB in seconds:
nacos.cmdb.dumpTaskInterval=3600
### The interval of polling data change event in seconds:
nacos.cmdb.eventTaskInterval=10
### The interval of loading labels in seconds:
nacos.cmdb.labelTaskInterval=300
### If turn on data loading task:
nacos.cmdb.loadDataAtStart=false
#*************** Metrics Related Configurations ***************#
### Metrics for prometheus
# 激活Prometheus监控采集Exporter
management.endpoints.web.exposure.include=*
### Metrics for elastic search
management.metrics.export.elastic.enabled=false
#management.metrics.export.elastic.host=http://localhost:9200
### Metrics for influx
management.metrics.export.influx.enabled=false
#management.metrics.export.influx.db=springboot
#management.metrics.export.influx.uri=http://localhost:8086
#management.metrics.export.influx.auto-create-db=true
#management.metrics.export.influx.consistency=one
#management.metrics.export.influx.compressed=true
#*************** Access Log Related Configurations ***************#
### If turn on the access log:
server.tomcat.accesslog.enabled=true
### The access log pattern:
server.tomcat.accesslog.pattern=%h %l %u %t "%r" %s %b %D %{User-Agent}i %{Request-Source}i
### The directory of access log:
server.tomcat.basedir=
#*************** Access Control Related Configurations ***************#
### If enable spring security, this option is deprecated in 1.2.0:
#spring.security.enabled=false
### The ignore urls of auth, is deprecated in 1.2.0:
nacos.security.ignore.urls=/,/error,/**/*.css,/**/*.js,/**/*.html,/**/*.map,/**/*.svg,/**/*.png,/**/*.ico,/console-ui/public/**,/v1/auth/**,/v1/console/health/**,/actuator/**,/v1/console/server/**

### The auth system to use, currently only 'nacos' and 'ldap' is supported:
nacos.core.auth.system.type=nacos
### If turn on auth system:
nacos.core.auth.enabled=true

### worked when nacos.core.auth.system.type=ldap,{0} is Placeholder,replace login username
# nacos.core.auth.ldap.url=ldap://localhost:389
# nacos.core.auth.ldap.userdn=cn={0},ou=user,dc=company,dc=com

### The token expiration in seconds:
nacos.core.auth.default.token.expire.seconds=18000

### The default token:
nacos.core.auth.default.token.secret.key=SecretKey012345678901234567890123456789012345678901234567890123456789

### Turn on/off caching of auth information. By turning on this switch, the update of auth information would have a 15 seconds delay.
nacos.core.auth.caching.enabled=true

### Since 1.4.1, Turn on/off white auth for user-agent: nacos-server, only for upgrade from old version.
nacos.core.auth.enable.userAgentAuthWhite=false

### Since 1.4.1, worked when nacos.core.auth.enabled=true and nacos.core.auth.enable.userAgentAuthWhite=false.
### The two properties is the white list for auth and used by identity the request from other server.
nacos.core.auth.server.identity.key=serverIdentity
nacos.core.auth.server.identity.value=security

#*************** Istio Related Configurations ***************#
### If turn on the MCP server:
nacos.istio.mcp.server.enabled=false

#*************** Core Related Configurations ***************#

### set the WorkerID manually
# nacos.core.snowflake.worker-id=

### Member-MetaData
# nacos.core.member.meta.site=
# nacos.core.member.meta.adweight=
# nacos.core.member.meta.weight=

### MemberLookup
### Addressing pattern category, If set, the priority is highest
# nacos.core.member.lookup.type=[file,address-server]
## Set the cluster list with a configuration file or command-line argument
# nacos.member.list=192.168.16.101:8847?raft_port=8807,192.168.16.101?raft_port=8808,192.168.16.101:8849?raft_port=8809
## for AddressServerMemberLookup
# Maximum number of retries to query the address server upon initialization
# nacos.core.address-server.retry=5
## Server domain name address of [address-server] mode
# address.server.domain=jmenv.tbsite.net
## Server port of [address-server] mode
# address.server.port=8080
## Request address of [address-server] mode
# address.server.url=/nacos/serverlist

添加GrafanaDashboard

Nacos 监控手册

配置application.properties文件,暴露metrics数据

1
management.endpoints.web.exposure.include=*

访问 http://192.168.2.43:8848/nacos/actuator/prometheus

Grafana

1
2
3
sudo yum install https://s3-us-west-2.amazonaws.com/grafana-releases/release/grafana-6.2.2-1.x86_64.rpm
sudo systemctl start grafana-server
sudo systemctl enable grafana-server

访问地址 http://192.168.2.43:3000

默认账号密码 admin admin

haproxy

/etc/haproxy/haproxy.cfg

1
2
3
4
5
6
7
8
9
10
11
12
13
14
15
16
17
18
19
20
21
22
23
24
25
26
27
28
29
30
31
32
33
34
35
36
37
38
39
40
41
42
43
44
45
46
47
48
49
50
51
52
53
54
55
56
57
58
59
60
61
62
63
#全局配置
global
#设置日志 local为本地
log 127.0.0.1 local2 info
#当前工作目录
chroot /var/lib/haproxy
#pid 文件地址
pidfile /var/run/haproxy.pid
#用户与用户组
user haproxy
group haproxy
#运行进程ID
#uid 99
#gid 99
#守护进程启动
daemon
#最大连接数
maxconn 4096
# turn on stats unix socket
stats socket /var/lib/haproxy/stats
#默认配置
defaults
#应用全局的日志配置
log global
#默认的模式mode {tcp|http|health}
#TCP是4层,HTTP是7层,health只返回OK
mode http
#日志类别tcplog/httplog
option httplog
#不记录健康检查日志信息
option dontlognull
#3次失败则认为服务不可用
retries 3
#每个进程可用的最大连接数
maxconn 2000
#连接超时
timeout connect 5s
#客户端超时
timeout client 120s
#服务端超时
timeout server 120s

# Nacos 集群绑定配置
listen nacos_cluster
bind *:8848
option tcplog
#配置TCP模式
mode tcp
#轮询算法
balance roundrobin
#Nacos集群节点配置,5秒检测一次,2次成功则服务可用,3次失败则服务不可用
server nacos1 192.168.2.43:8848 check inter 2000 rise 2 fall 3 weight 1
server nacos2 192.168.2.44:8848 check inter 5000 rise 2 fall 3 weight 1
server nacos3 192.168.2.45:8848 check inter 5000 rise 2 fall 3 weight 1

#haproxy监控页面地址
listen monitor
bind *:8100
mode http
option httplog
stats enable
stats uri /stats
stats refresh 5s

Keepalived

/etc/keepalived/keepalived.conf

1
2
3
4
5
6
7
8
9
10
11
12
13
14
15
16
17
18
19
20
21
22
23
24
25
26
27
28
29
30
31
32
33
34
35
36
37
38
39
40
#全局定义块
global_defs {
## 标识本节点的字条串,通常为hostname
router_id host6
}
vrrp_script check_haproxy {
#执行脚本位置
script "/etc/keepalived/haproxy_chk.sh"
##检查时间间隔
interval 5
##如果条件成立则权重减20
weight -20
}
#VRRP 实例定义块
vrrp_instance VI_1 {
##主节点为MASTER,备份节点为BACKUP
state MASTER
##绑定虚拟ip的网络接口(网卡)
interface ens33
##虚拟路由id号,主备节点相同
virtual_router_id 80
##本机ip地址
mcast_src_ip 192.168.2.6
##优先级(0-254),
priority 100
##组播信息发送间隔,两个节点必须一致,默认1s
advert_int 1
##认证匹配
authentication {
auth_type PASS
auth_pass 1111
}
virtual_ipaddress {
##虚拟ip,可以指定多个
192.168.2.49/24
}
track_script {
check_haproxy
}
}

VRRP实例定义块

  1. vrrp_sync_group:同步vrrp级,用于确定失败切换(FailOver)包含的路由实例个数。即在有2个负载均衡器的场景,一旦某个负载均衡器失效,需要自动切换到另外一个负载均衡器的实例是哪
  2. group:至少要包含一个vrrp实例,vrrp实例名称必须和vrrp_instance定义的一致
  3. vrrp_instance:vrrp实例名 1> state:实例状态,只有MASTER 和
    BACKUP两种状态,并且需要全部大写。抢占模式下,其中MASTER为工作状态,BACKUP为备用状态。当MASTER所在的服务器失效时,BACKUP所在的服务会自动把它的状态由BACKUP切换到MASTER状态。当失效的MASTER所在的服务恢复时,BACKUP从MASTER恢复到BACKUP状态。
    2> interface:对外提供服务的网卡接口,即VIP绑定的网卡接口。如:eth0,eth1。当前主流的服务器都有2个或2个以上的接口(分别对应外网和内网),在选择网卡接口时,一定要核实清楚。 3> **
    mcast_src_ip:本机IP地址 4> virtual_router_id:虚拟路由的ID号,每个节点设置必须一样,可选择IP最后一段使用,相同的 VRID 为一个组,他将决定多播的 MAC 地址。 5> **
    priority
    :节点优先级,取值范围0~254,MASTER要比BACKUP高 6> advert_int:MASTER与BACKUP节点间同步检查的时间间隔,单位为秒 7> **
    lvs_sync_daemon_inteface:负载均衡器之间的监控接口,类似于 HA HeartBeat 的心跳线。但它的机制优于 Heartbeat,因为它没有“裂脑”这个问题,它是以优先级这个机制来规避这个麻烦的。在 DR
    模式中,lvs_sync_daemon_inteface与服务接口interface使用同一个网络接口 8> authentication:验证类型和验证密码。类型主要有 PASS、AH
    两种,通常使用PASS类型,据说AH使用时有问题。验证密码为明文,同一vrrp 实例MASTER与BACKUP使用相同的密码才能正常通信。 9> smtp_alert:有故障时是否激活邮件通知 10> **
    nopreempt

    :禁止抢占服务。默认情况,当MASTER服务挂掉之后,BACKUP自动升级为MASTER并接替它的任务,当MASTER服务恢复后,升级为MASTER的BACKUP服务又自动降为BACKUP,把工作权交给原MASTER。当配置了nopreempt,MASTER从挂掉到恢复,不再将服务抢占过来。
    11> virtual_ipaddress:虚拟IP地址池,可以有多个IP,每个IP占一行,不需要指定子网掩码。注意:这个IP必须与我们的设定的vip保持一致。

虚拟服务器virtual_server定义块

    1. virtual_server:定义一个虚拟服务器,这个ip是virtual_ipaddress中定义的其中一个,后面一个空格,然后加上虚拟服务的端口号。 1> delay_loop:健康检查时间间隔,单位:秒 2>
      lb_algo:负载均衡调度算法,互联网应用常用方式为wlc或rr 3> lb_kind:负载均衡转发规则。包括DR、NAT、TUN 3种,一般使用路由(DR)转发规则。 4>
      persistence_timeout:http服务会话保持时间,单位:秒 5> protocol:转发协议,分为TCP和UDP两种
    2. real_server:真实服务器IP和端口,可以定义多个 1> weight:负载权重,值越大,转发的优先级越高 2> notify_down:服务停止后执行的脚本 3> TCP_CHECK:服务有效性检测 *
      connect_port:服务连接端口 * connect_timeout:服务连接超时时长,单位:秒 * nb_get_retry:服务连接失败重试次数 * delay_before_retry:重试连接间隔,单位:秒

配置日志文件

本文地址: https://github.com/maxzhao-it/blog/post/534f2c3a/

免密登录

概述

  1. 客户端生成公私钥
  2. 上传公钥到服务器
    1. id_rsa (私钥)
    2. id_rsa.pub (公钥)
    3. id_ecdsa (私钥)
    4. id_ecdsa.pub (公钥)
  3. 权限配置
  4. SSH 文件配置

客户端生成公私钥

生成公私钥

1
2
3
# host21 执行,一直回车 
ssh-keygen -t ecdsa
# ssh-keygen -t rsa -C "email@domain.com" -f filename

分发到目标服务器

直接分发

1
2
# 分发到服务器
ssh-copy-id -i ~/.ssh/id_ecdsa.pub root@192.168.2.21

拷贝写入

客户机执行

1
2
# 或者拷贝到服务器
scp ~/.ssh/id_ecdsa.pub root@192.168.2.22:/home/root/.ssh/id_ecdsa_21.pub
1
2
# 添加到免密登录:192.168.2.22 执行
cat ~/.ssh/id_ecdsa_21.pub >> ~/.ssh/authorized_keys

权限配置

  • 服务器权限
1
2
3
sudo chmod 600 ~/.ssh/*
sudo chmod 700 ~/.ssh
sudo chmod 775 ~/

SSH 文件配置

  • 服务器的秘钥验证
1
sudo vim /etc/ssh/sshd_config
  • 服务器配置修改
1
2
3
4
5
# 设置ssh在接收登录请求之前是否检查用户家目录和rhosts文件的权限和所有权。这通常是必要的,因为新手经常会把自己的目录和文件设成任何人都有写权限。)
StrictModes no
# 允许 root
PermitRootLogin yes
PubkeyAuthentication yes
  • 服务器重启
1
sudo systemctl restart sshd.service
  • 客户端测试
1
ssh root@192.168.2.21

本文地址: https://github.com/maxzhao-it/blog/post/9556/

Linux 下,不要使用 root用户管理 Docker

启动 Docker

1
sudo systemctl start docker

测试

1
sudo docker run hello-world

会打印一条 Hello from Docker!然后退出。

更新

get.Docker. com 下载脚本,然后运行它在 Linux 上安装最新的 Docker 稳定版本:

1
2
sudo curl -fsSL https://get.docker.com -o get-docker.sh
sudo sh get-docker.sh

配置修改

1
sudo vim /etc/docker/daemon.json
  1. registry-mirrors 镜像
  2. dns
  3. hosts 远程访问
1
2
3
4
{
"registry-mirrors": ["https://aj2rgad5.mirror.aliyuncs.com","https://docker.mirrors.ustc.edu.cn"],
"dns": ["8.8.8.8", "8.8.4.4"]
}

"hosts": ["unix:///var/run/docker.sock", "tcp://127.0.0.1:2375"]

服务

1
sudo vim /lib/systemd/system/docker.service

将第11行的ExecStart=/usr/bin/dockerd,替换为:

1
2
#ExecStart=/usr/bin/dockerd -H tcp://0.0.0.0:2375 -H unix:///var/run/docker.sock -H tcp://0.0.0.0:7654
ExecStart=/usr/bin/dockerd -H fd:// -H tcp://0.0.0.0:2375

2375是管理端口,7654是备用端口

~/.bashrc中写入docker管理端口

1
2
3
4
5
6
7
8
9
export DOCKER_HOST=tcp://0.0.0.0:2375
source ~/.bashrc
env |grep DOCKER
# 重新加载 systemctl 配置。
sudo systemctl daemon-reload
# 重新启动 Docker。
sudo systemctl restart docker.service
# 查看端口监听
sudo netstat -lntp | grep dockerd

开机自启

1
2
sudo systemctl enable docker.service
sudo systemctl enable containerd.service

添加 docker 组用户

1
2
3
4
sudo groupadd docker
sudo usermod -aG docker $USER
sudo chown "$USER":"$USER" /home/"$USER"/.docker -R
sudo chmod g+rwx "$HOME/.docker" -R

完全退出后,重新登录,然后不适用 sudo 测试

1
docker run hello-world

常用命令

镜像相关

1)docter pull NAME[:TAG] 使用pull命令从docker hub仓库下载镜像到本地

2)docker tag oldName newName 为本地镜像添加新的标签

3)docker images 列出本地主机上已有的镜像

4)docker search TERM 默认搜索docker hub官方仓库的镜像

5)docker rmi IMAGE [IMAGE…] IMGE可以是标签或id

6)docker commit [OPTIONS] CONTAINER[REPOSITORY[:TAG]] 基于已有镜像的容器创建镜像,可以创建比较复杂的镜像。-a:作者信息,-m:提交信息,-p:提交时暂停容器运行

7)docker import -NAME[:TAG] 基于本地模板导入镜像

8)docker build -t NAME[:TAG] dockerfile路径 基于dockerfile创建

9)docker save –o xxx.tar NAME[:TAG] 存出镜像到本地文件

  1. docker load <xxxx.tar 载入镜像

11)docker inspect 镜像id 查看镜像详细信息

容器相关

1)docker create –it NAME[:TAG] 创建容器

2)docker start NAME[:TAG] 启动容器

3)docker run –it NAME[:TAG] 等于先执行docker create命令,再执行docker start,-it交互式,守护态运行,通过run后加-d实现

4)docker stop[-t|–time[=10]] 终止容器

5)docker restart NAME[:TAG] 启动状态重新启动

6)docker ps –a –q 查看处于终止的容器id信

7)docker ps 查看正在运行的容器

8)docker ps –a 查看所有容器

9)docker rm 容器id 删除容器,需要先停止

10)docker logs 容器id 查看容器日志
10)docker logs -f 容器id 查看容器日志
10)docker logs -n 100 容器id 查看容器日志
10)docker logs -f 容器id | tail -n 100

11)docker port <container-name|container-id> 端口 查看容器映射端口

12)docker inspect 容器id 查看容器信息

13)docker exec -u root -it containerID /bin/bash 指定用户进入容器操作

14)env 容器内部输入env查看容器内部环境变量

15)docker cp container-id : 复制本地文件到容器

16)docker cp container-id: 复制容器文件到本地

17)docker network create app_net 创建自定义网络

18)docker network connect app_net container-name连接网络

19)docker run -it -v /dbdata –name dbdata 创建数据卷容器dbdata,并在其中创建数据卷挂载到/dbdata。其他容器挂载使用–volumes-from dbdata,可以多次使

用,从多个容器挂载多个数据卷,还可以从一挂载数据卷的容器来挂载数据卷,且使用–volumes-from 参数所挂载数据卷的容器自身不需要保持运行,要删除一个数据卷

必须在删除最后一个还挂着它的容器时显示使用docker rm -v命令来指定同时删除关联的容器

原文:https://blog.csdn.net/songer_xing/article/details/78599197

本文地址 Centos7 安装 docker

附录

daemon.json

  • windows 下的地址 C:\Users\${USER}\.docker\daemon.json
  • linux 下的地址 /etc/docker/daemon.json
1
2
3
4
5
6
7
8
9
10
11
12
13
14
15
16
17
18
19
20
21
22
23
{
"registry-mirrors": [
"https://kfwkfulq.mirror.aliyuncs.com",
"https://2lqq34jg.mirror.aliyuncs.com",
"https://pee6w651.mirror.aliyuncs.com",
"https://docker.mirrors.ustc.edu.cn",
"https://registry.docker-cn.com",
"http://hub-mirror.c.163.com"
],
"dns": ["8.8.8.8", "8.8.4.4"],
"insecure-registries": [],
"debug": false,
"experimental": false,
"features": {
"buildkit": true
},
"builder": {
"gc": {
"enabled": true,
"defaultKeepStorage": "20GB"
}
}
}

本文地址: https://github.com/maxzhao-it/blog/post/38344/