一、前言 Pivotal Greenplum Database是一个建立在开源PostgreSQL上的MPP(大规模并行处理)数据库。系统由主节点、备节点和段节点组成。
所有数据驻留在段节点上,目录信息存储在主节点中。段节点运行一个或多个段,这些段是修改后的PostgreSQL数据库实例,并被分配一个内容标识符。
对于每个表,根据用户在DDL语句中指定的分布列键,将数据划分到段节点中。
对于每个段内容标识符,都有一个不在同一物理主机上运行的主段和镜像段。
当一个SQL查询进入主节点时,它将被解析、优化并分发到所有段以执行查询计划,并返回请求的数据或将查询结果插入数据库表。
官方最佳实践
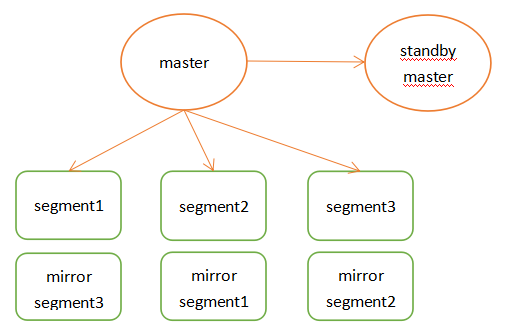
二、准备 概述 Master节点存储全局系统元数据信息,不存储真实数据。数据通过hash分布到不同的segment中,master作为sql的全局入口,负责在segment中分配工作负载,整合处理结果,返回客户端。
Greenplum架构特点如下:
master节点可以做主备,segment节点也有镜像保证高可用,segment主备尽量混布到不同服务器上。支持行列混合存储引擎,同时支持外部表。
在join时也涉及到数据跨节点重分布的问题,这也是share nothing数据库不可避免的问题。
高速内部interconnect网络,实现数据join时的高速移动和汇总。
高效的数据并行加载。
greenplum架构图
部署方案
gp-master:192.168.2.21 master 节点gp-master2:192.168.2.22gp-master3:192.168.2.23gp-master4:192.168.2.24
具体部署请参考附录中的虚拟机安装 、Centos系统配置
三、安装 Greenplum 配置 Centos
1 2 3 4 ssh root@192.168.2.21 "hostnamectl set-hostname host21;echo -e \"192.168.2.21 host21 dw1\\n192.168.2.22 host22 dw2\\n192.168.2.23 host23 dw3\\n192.168.2.24 host24 dw4\" >> /etc/hosts;" ssh root@192.168.2.22 "hostnamectl set-hostname host22;echo -e \"192.168.2.21 host21 dw1\\n192.168.2.22 host22 dw2\\n192.168.2.23 host23 dw3\\n192.168.2.24 host24 dw4\" >> /etc/hosts;" ssh root@192.168.2.23 "hostnamectl set-hostname host23;echo -e \"192.168.2.21 host21 dw1\\n192.168.2.22 host22 dw2\\n192.168.2.23 host23 dw3\\n192.168.2.24 host24 dw4\" >> /etc/hosts;" ssh root@192.168.2.24 "hostnamectl set-hostname host24;echo -e \"192.168.2.21 host21 dw1\\n192.168.2.22 host22 dw2\\n192.168.2.23 host23 dw3\\n192.168.2.24 host24 dw4\" >> /etc/hosts;"
1 yum install -y net-tools which openssh-clients openssh-server less zip unzip iproute
Centos 中默认已经启动 ssh,为了方便各节点之间的互连,创建相关的认证key。
1 2 3 4 5 ssh-keygen -t rsa -f /etc/ssh/ssh_host_rsa_key ssh-keygen -t ecdsa -f /etc/ssh/ssh_host_ecdsa_key ssh-keygen -t ed25519 -f /etc/ssh/ssh_host_ed25519_key /usr/sbin/sshd
同时修改所有节点里面的/etc/sysconfig/network文件,保持与主机名一致
1 2 3 4 5 6 7 8 9 cat /etc/sysconfig/networkecho "NETWORKING=yes" >> /etc/sysconfig/networkecho "HOSTNAME=mdw" >> /etc/sysconfig/networkvi /etc/sysconfig/network NETWORKING=yes HOSTNAME=mdw
为了方便安装Greenplum集群,且使Greenplum自带的python不与系统的python版本相冲突,在每个节点中创建Greenplum的用户和用户组
1 2 3 4 5 6 7 groupadd -g 530 gpadmin useradd -g 530 -u 530 -m -d /home/gpadmin -s /bin/bash gpadmin chown -R gpadmin:gpadmin /home/gpadminpasswd gpadmin echo "gpadmin ALL=(ALL) ALL" >> /etc/sudoers
1 2 3 4 5 6 cat /etc/security/limits.confecho "soft nofile 65536" >> /etc/security/limits.confecho "hard nofile 65536" >> /etc/security/limits.confecho "soft nproc 131072" >> /etc/security/limits.confecho "hard nproc 131072" >> /etc/security/limits.conf
下载Greenplum安装包 到greenplum的官网上,下载Greenplum安装包 GitHub下载 ,点开Greenplum Database Server,根据自己的操作系统下载安装包,我下载当前最新的open-source-greenplum-db-6.17.2-rhel7-x86_64.rpm,将其拷到master节点的/home/gpadmin目录中
版本快速链接: open-source-greenplum-db-6.17.2-rhel7-x86_64.rpm
安装Greenplum 切换到gpadmin用户
Rpm 安装1 2 3 scp D:\tools\linux\open-source-greenplum-db-6.17.2-rhel7-x86_64.rpm root@192.168.2.21:/home/gpadmin/ wget https://github.com/greenplum-db/gpdb/releases/download/6.17.2/open-source-greenplum-db-6.17.2-rhel7-x86_64.rpm
1 sudo yum localinstall /home/gpadmin/open-source-greenplum-db-6.17.2-rhel7-x86_64.rpm -y
1 2 3 4 5 6 7 whereis greenplum-db ls -l /usr/local/greenplum-db chown -R gpadmin:gpadmin /usr/local/greenplum-db*
gpssh-exkeys 报错问题:
1 2 cd /usr/binmv python python.bak
解压安装(ZIP) 解压下载后的zip文件
1 unzip greenplum-db-6.17.2-rhel7-x86_64.zip
执行安装文件
1 ./greenplum-db-6.17.2-rhel7-x86_64.bin
安装期间需要配置安装目录,输入/home/gpadmin/greenplum-db-6.17.2
批量操作节点 配置 为了方便安装集群,Greenplum提供了批量操作节点的命令,通过指定配置文件使用批处理命令
1 2 3 4 5 6 7 8 9 10 11 12 13 14 15 16 17 cd ~/ ;mkdir confecho dw1 > ./conf/hostlistecho dw2 >> ./conf/hostlistecho dw3 >> ./conf/hostlistecho dw4 >> ./conf/hostlistcat ./conf/hostlistssh dw2 ssh dw3 ssh dw4 echo dw2 > ./conf/seg_hosts echo dw3 >> ./conf/seg_hosts echo dw4 >> ./conf/seg_hosts cat ./conf/seg_hosts
/usr/local/greenplum-db/greenplum_path.sh中保存了运行greenplum的一些环境变量,包括GPHOME、PYTHONHOME等。
免密登录
客户端生成公私钥
上传公钥到服务器
id_rsa (私钥)id_rsa.pub (公钥)
1 2 3 4 5 6 7 8 9 10 11 12 13 14 15 16 17 18 ssh-keygen -t ecdsa ssh-copy-id -i ~/.ssh/id_ecdsa.pub gpadmin@192.168.2.21 ssh-copy-id -i ~/.ssh/id_ecdsa.pub gpadmin@192.168.2.22 ssh-copy-id -i ~/.ssh/id_ecdsa.pub gpadmin@192.168.2.23 ssh-copy-id -i ~/.ssh/id_ecdsa.pub gpadmin@192.168.2.24 scp ~/.ssh/id_ecdsa.pub gpadmin@192.168.2.22:/home/gpadmin/.ssh/id_ecdsa_21.pub scp ~/.ssh/id_ecdsa.pub gpadmin@192.168.2.23:/home/gpadmin/.ssh/id_ecdsa_21.pub scp ~/.ssh/id_ecdsa.pub gpadmin@192.168.2.24:/home/gpadmin/.ssh/id_ecdsa_21.pub cat ~/.ssh/id_ecdsa_21.pub >> ~/.ssh/authorized_keyscat ~/.ssh/id_ecdsa_21.pub >> ~/.ssh/authorized_keyscat ~/.ssh/id_ecdsa_21.pub >> ~/.ssh/authorized_keys
权限
1 2 3 4 5 su gpadmin sudo chmod 600 ~/.ssh/* sudo chmod 700 ~/.ssh sudo chmod 775 ~/ sudo cp ~/.ssh/authorized_keys /root/.ssh/authorized_keys
配置服务器的秘钥验证
1 sudo vim /etc/ssh/sshd_config
1 2 3 4 # 设置ssh在接收登录请求之前是否检查用户家目录和rhosts文件的权限和所有权。这通常是必要的,因为新手经常会把自己的目录和文件设成任何人都有写权限。) StrictModes no PermitRootLogin yes PubkeyAuthentication yes
重启
1 sudo systemctl restart sshd.service
测试
分发 master的 rsa key 在gpadmin账号下设置环境变量,并将master节点的key 交换到各个segment节点
1 2 3 4 5 6 7 8 9 10 11 12 13 14 15 16 17 18 19 20 21 22 23 source /usr/local/greenplum-db/greenplum_path.sh gpssh-exkeys -f /home/gpadmin/conf/hostlist [STEP 1 of 5] create local ID and authorize on local host [STEP 2 of 5] keyscan all hosts and update known_hosts file [STEP 3 of 5] authorize current user on remote hosts ... send to mdw ... send to sdw1 *** *** Enter password for sdw1: ... send to sdw2 ... send to sdw3 [STEP 4 of 5] determine common authentication file content [STEP 5 of 5] copy authentication files to all remote hosts ... finished key exchange with mdw ... finished key exchange with sdw1 ... finished key exchange with sdw2 ... finished key exchange with sdw3 [INFO** completed successfully
批量处理 后续就可以使用一些命令执行批量操作
注意 :使用gpssh-exkeys命令时一定要使用gpadmin用户,因为会在/home/gpadmin/.ssh中生成ssh的免密码登录秘钥,如果使用其它账号登录,则会在其它账号下生成密钥,在gpadmingpssh的批处理命令
1 2 3 4 5 6 7 8 9 10 11 12 gpssh -f /home/gpadmin/conf/hostlist => pwd [dw1] /home/gpadmin [dw2] /home/gpadmin [dw3] /home/gpadmin [dw4] /home/gpadmin => ls [dw1] /home/gpadmin/conf/ [dw2] [dw3] [dw4] => exit
分发安装包到每个子节点 打包master节点上的安装包
1 tar -czf gp.tar.gz greenplum-db-6.17.2
使用gpscp命令将这个文件复制到每个子节点
1 gpscp -f /home/gpadmin/conf/seg_hosts gp.tar.gz =:/home/gpadmin
批量解压,并创建软链接
1 2 3 4 5 6 7 8 9 gpssh -f /home/gpadmin/conf/seg_hosts => tar -zxf gp.tar.gz [dw2] [dw3] [dw4] => ln -s greenplum-db-6.17.2 greenplum-db [dw2] [dw3] [dw4]
这样就完成了所有子节点数据库的安装
初始化安装数据库
1 2 3 4 5 6 7 8 9 10 11 12 13 14 15 16 17 gpssh -f /home/gpadmin/conf/hostlist => mkdir gpdata [dw1] [dw2] [dw3] [dw4] => cd gpdata [dw1] [dw2] [dw3] [dw4] => mkdir gpmaster gpdatap1 gpdatap2 gpdatam1 gpdatam2 [dw1] [dw2] [dw3] [dw4] => exit
在master节点上修改.bash_profile配置环境变量,并发送给其他子节点,确保这些环境变量生效
1 2 3 4 5 6 7 8 9 echo "source /user/local/greenplum-db/greenplum_path.sh" >> ~/.bash_profileecho "export MASTER_DATA_DIRECTORY=/home/gpadmin/gpdata/gpmaster/gpseg-1" >> ~/.bash_profileecho "export PGPORT=2345" >> ~/.bash_profileecho "export PGDATABASE=testDB" >> ~/.bash_profilesource .bash_profilegpscp -f /home/gpadmin/conf/seg_hosts /home/gpadmin/.bash_profile =:/home/gpadmin/ source .bash_profile
1 vim /home/gpadmin/conf/gpinitsystem_config
填写配置
1 2 3 4 5 6 7 8 9 10 11 12 13 14 15 16 17 18 19 20 21 22 23 24 ARRAY_NAME =\"Greenplum\" MACHINE_LIST_FILE =/home/gpadmin/conf/seg_hosts SEG_PREFIX =gpseg PORT_BASE =33000 declare -a DATA_DIRECTORY=(/home/gpadmin/gpdata/gpdatap1 /home/gpadmin/gpdata/gpdatap2) MASTER_HOSTNAME =dw1 MASTER_DIRECTORY =/home/gpadmin/gpdata/gpmaster MASTER_PORT =5432 TRUSTED_SHELL =/usr/bin/ssh MIRROR_PORT_BASE =43000 REPLICATION_PORT_BASE =34000 MIRROR_REPLICATION_PORT_BASE =44000 declare -a MIRROR_DATA_DIRECTORY=(/home/gpadmin/gpdata/gpdatam1 /home/gpadmin/gpdata/gpdatam2)
1 gpinitsystem -c /home/gpadmin/conf/gpinitsystem_config -s host24 -e 1
其中,-s dw4是指配置master的standby节点,然后按照提示步骤就能完成安装了
如果gpinitsystem不成功,在master节点的/home/gpadmin/gpAdminLogs目录下gpinitsystem_*.log文件中查看日志信息,找出原因进行修改,然后再重新执行gpinitsystem进行初始化安装。
清空重来 所有的服务器执行
1 2 3 4 5 6 7 8 9 10 ps ax |grep greenplum |grep -v grep |awk '{print $1}' sudo rm -f /tmp/.s.PGSQL* rm -rf /home/gpadmin/gpdata/gpdatam1/*rm -rf /home/gpadmin/gpdata/gpdatam2/*rm -rf /home/gpadmin/gpdata/gpdatap1/*rm -rf /home/gpadmin/gpdata/gpdatap2/*rm -rf /home/gpadmin/gpdata/gpmaster/*rm -rf /home/gpadmin/gpdata/gpAdminLogs/*
四、配置 鬼鬼,有点复杂,待续
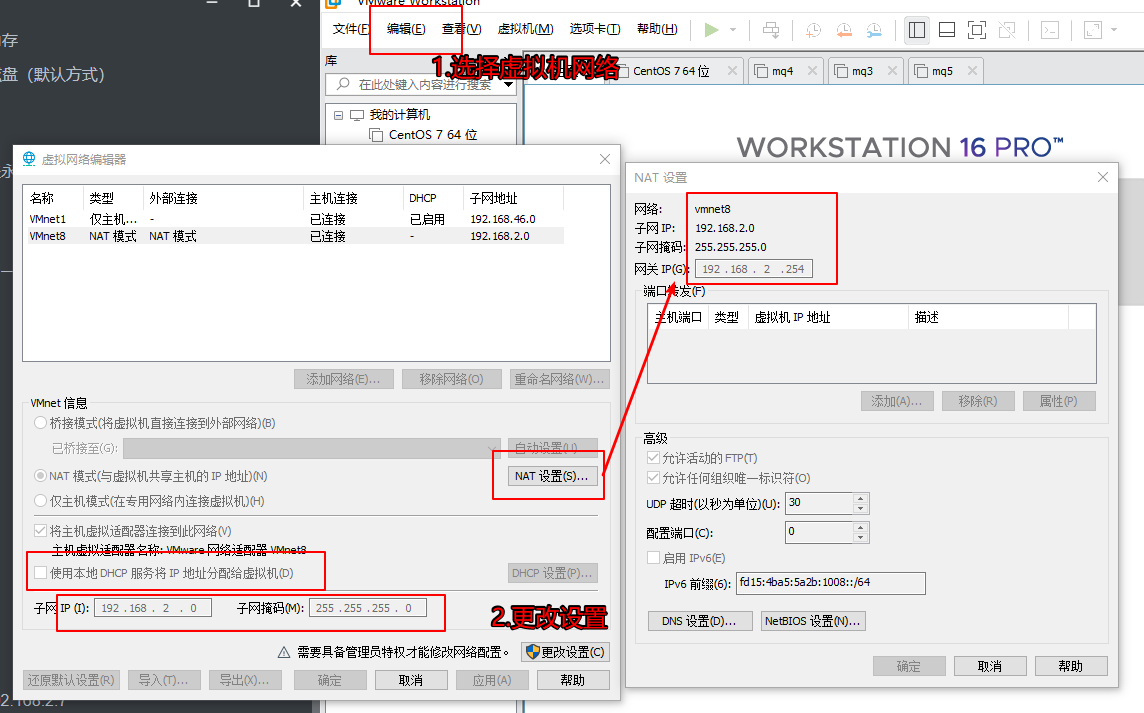
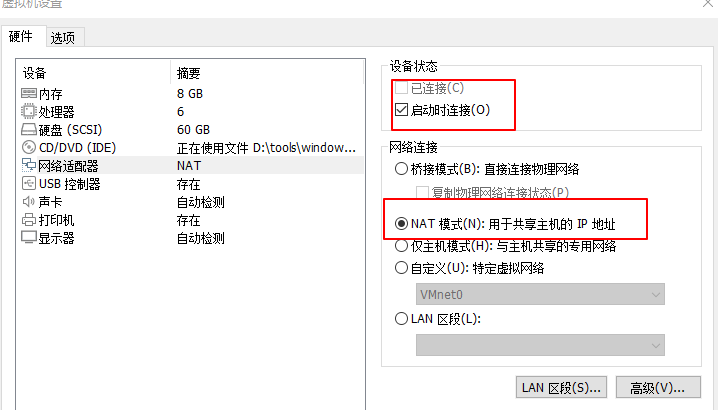
附: 1、虚拟机安装 虚拟机网络配置
虚拟机系统网络
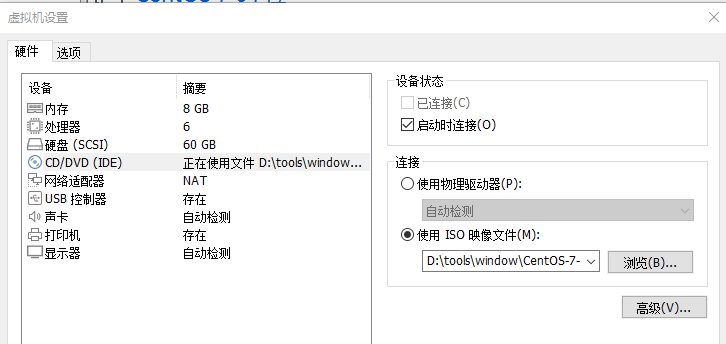
虚拟机CD设置
2、Centos系统配置 源 1 2 sudo cp /etc/yum.repos.d/CentOS-Base.repo /etc/yum.repos.d/CentOS-Base.repo.bak vim /etc/yum.repos.d/CentOS-Base.repo
详情请看附
1 2 3 4 5 6 7 8 9 10 11 12 13 14 yum clean all yum repolist yum -y install epel-release sed -e 's!^metalink=!#metalink=!g' \ -e 's!^#baseurl=!baseurl=!g' \ -e 's!//download\.fedoraproject\.org/pub!//mirrors.tuna.tsinghua.edu.cn!g' \ -e 's!http://mirrors\.tuna!https://mirrors.tuna!g' \ -i /etc/yum.repos.d/epel.repo /etc/yum.repos.d/epel-testing.repo rpm -ivh https://mirrors.tuna.tsinghua.edu.cn/epel/6/x86_64/epel-release-6-8.noarch.rpm
报错 RPM-GPG-KEY-EPEL-7 先设置 CentOS-Base.repo 中的 gpgcheck=0
1 2 cd /etc/pki/rpm-gpgwget https://archive.fedoraproject.org/pub/epel/RPM-GPG-KEY-EPEL-7
国内 1 2 3 4 5 6 7 8 sudo sed -e 's|^mirrorlist=|#mirrorlist=|g' \ -e 's|^#baseurl=http://mirror.centos.org|baseurl=https://mirrors.tuna.tsinghua.edu.cn|g' \ -i.bak \ /etc/yum.repos.d/CentOS-*.repo sudo yum clean all sudo yum makecache sudo yum -y update
关闭防火墙 1 2 3 4 5 6 7 8 9 10 11 12 13 14 15 systemctl status firewalld systemctl stop firewalld systemctl disable firewalld firewall-cmd --zone=public --add-port=80/tcp --add-port=3306/tcp --permanent firewall-cmd --reload firewall-cmd --zone=public --query-port=80/tcp firewall-cmd --zone=public --list-all firewall-cmd --zone=public --remove-port=80/tcp --permanent
max file修改
1 sudo vim /etc/security/limits.conf
添加
1 2 3 4 * soft nofile 65536 * hard nofile 65536 * soft nproc 65536 * hard nproc 65536
或者直接执行添加
1 echo -e "* soft nofile 65536\\n* hard nofile 65536\\n* soft nproc 65536\\n* hard nproc 65536" >>/etc/security/limits.conf
执行
1 sudo source /etc/security/limits.conf
中文字体 方式1 1 2 3 4 yum -y install fonts-chinese yum -y install fonts-ISO8859 fc-cache -fv reboot
方式2 1 2 3 4 yum -y install fontconfig mkdir chinseschmod -R 755 /usr/share/fonts/chinses/vim /etc/fonts/fonts.conf
在 <dir prefix="xdg">fonts</dir> 这一行下面插入:
1 <dir >/usr/share/fonts/chinses</dir>
网络 需要安装 net-tools
1 yum -y install net-tools
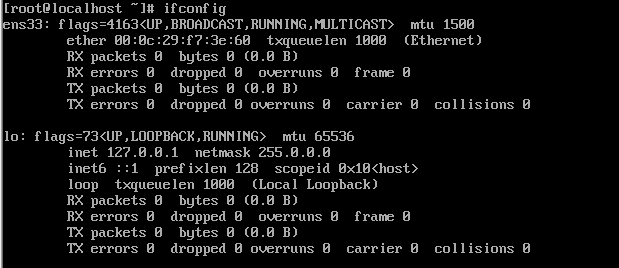
查看网络
我这里的网络魏 ens33
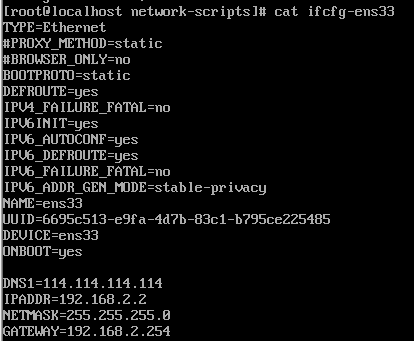
编辑网络 1 vim /etc/sysconfig/network-scripts/ifcfg-ens33
1 2 3 4 5 6 7 BOOTPROTO=static #开机协议,有dhcp及static; ONBOOT=yes #设置为开机启动; DNS1=114.114.114.114 #这个是国内的DNS地址,是固定的; IPADDR=192.168.2.2 #你想要设置的固定IP,理论上192.168.2.2-255之间都可以,请自行验证; NETMASK=255.255.255.0 #子网掩码,不需要修改; GATEWAY=192.168.2.254 #网关,这里应该和你“2.配置虚拟机的NAT模式具体地址参数”中的(2)选择VMnet8--取消勾选使用本地DHCP--设置子网IP--网关IP设置 一样才行。
重启网略 测试网络 设置hostname 默认hostname 为 localhost,所以这里做区分
1 ssh root@192.168.2.3 "hostnamectl set-hostname host3;echo -e \"192.168.2.3 host3\\n192.168.2.4 host4\\n192.168.2.5 host5\\n192.168.2.6 host6\\n192.168.2.7 host7\" >> /etc/hosts;"
3、关闭脚本 4、gpinitsystem命令
-a
不提示用户确认
- b < parallel_processes >
要并行创建的段的数量。如果不指定,
- c < gpinitsystem_config >
必需的。配置文件的完整路径和文件名,其中
- d
设置日志输出级别为调试。
- h < hostfile_gpinitsystem >
可选的。包含主机的文件的完整路径和文件名
Sets the default locale used by Greenplum Database.
可选的。输入配置文件的完整路径和文件名,
-l
要写入日志文件的目录。默认为~ / gpAdminLogs。
–max_connections= |-m
设置主服务器允许的最大客户端连接数。
- s
可选的。如果您希望配置备份主主机,请指定
-e <password>password to set for Greenplum superuser in database [default su_password]
  -a, don't ask to confirm instance creation [default:- ask]
  -D, set log output to debug level, shows all function calls
  -l, logfile_directory [optional]
      Alternative logfile directory
  -q, quiet mode, do not log progress to screen [default:- verbose output to screen]

  Configuration options:
  -b, shared_buffers per instance [default 128000kB]
      Specify either the number of database I/O buffers (without suffix) or the
      amount of memory to use for buffers (with suffix 'kB', 'MB' or 'GB').
      Applies to master and all segments.
  -B, <number> run this batch of create segment processes in parallel [default 60]
  -c, gp_config_file [mandatory]
      Supplies all Greenplum configuration information required by this utility.
      Full description of all parameters contained within the example file
      supplied with this distribution.
      Also see gpinitsystem_INSTRUCTIONS file for greater detail on
      the operation and configuration of this script
  -e, ,
  -S, standby_datadir [optional]
  -h, gp_hostlist_file [optional]
      Contains a list of all segment instance hostnames required to participate in
      the new Greenplum instance. Normally set in gp_config_file.
  -I, <input_configuration_file>
      The full path and filename of an input configuration file, which defines the
      Greenplum Database members and segments using the QD_PRIMARY_ARRAY and
      PRIMARY_ARRAY parameters. The input configuration file is typically created by
      using gpinitsystem with the -O <output_configuration_file> option. You must
      provide either the -c <cluster_configuration_file> option or the -I
      <input_configuration_file> option to gpinitsystem.
  -m, maximum number of connections for master instance [default 250]
  -n, <locale>, setting for locale to be set when database initialized [default en_US.utf8]
  -O, <output_configuration_file>
      When used with the -O option, gpinitsystem does not create a new Greenplum
      Database cluster but instead writes the supplied cluster configuration
      information to the specified output_configuration_file. This file defines
      Greenplum Database members and segments using the QD_PRIMARY_ARRAY and
      PRIMARY_ARRAY parameters, and can be later used with -I
      <input_configuration_file> to initialize a new cluster.
  -p, postgresql_conf_gp_additions [optional]
      List of additional PostgreSQL parameters to be applied to each Master/Segment
      postgresql.conf file during Greenplum database initialization.
  -P, standby_port [optional]
  -s, standby_hostname [optional]

  Return codes:
本文地址: https://github.com/maxzhao-it/blog/post/58641/