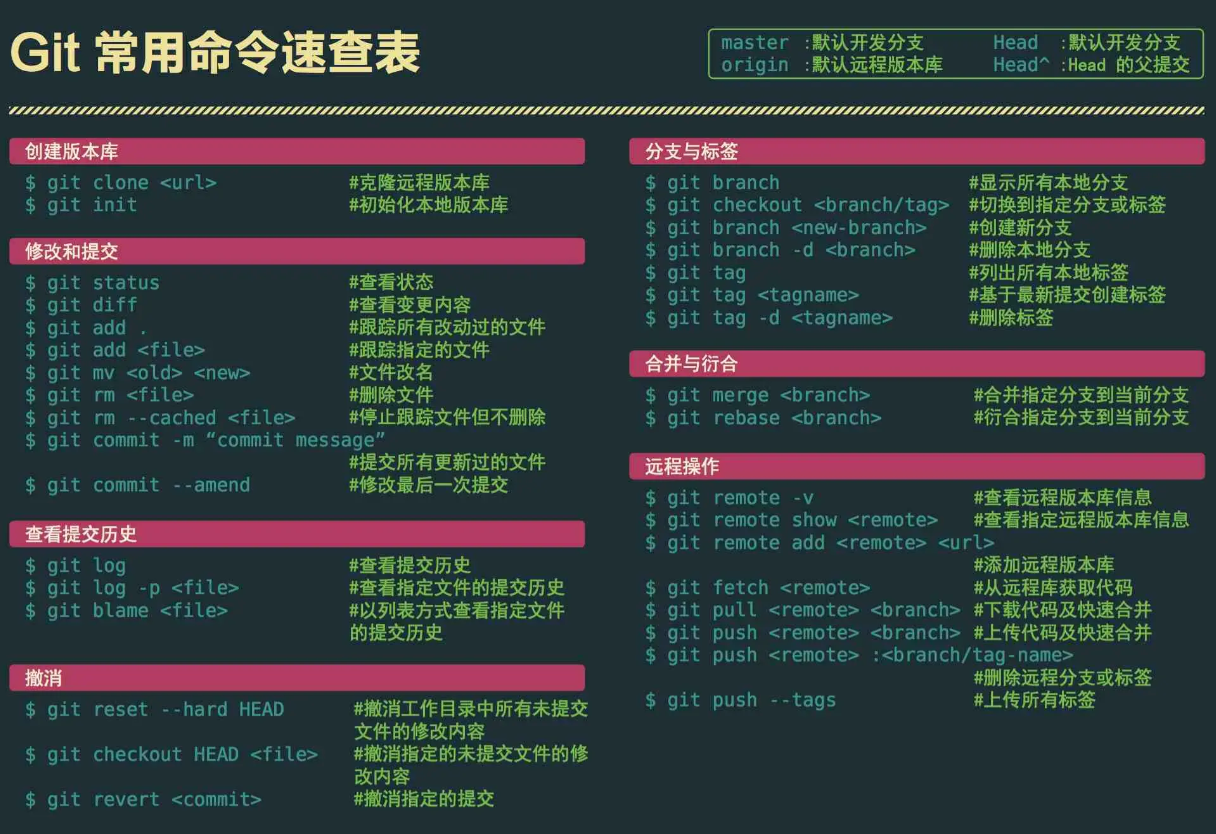
0%

查看git上的个人代码量:

1
git log --author="username" --pretty=tformat: --numstat | awk '{ add += $1; subs += $2; loc += $1 - $2 } END { printf "added lines: %s, removed lines: %s, total lines: %s\n", add, subs, loc }' -

结果示例:(记得修改 username)

1
added lines: 120745, removed lines: 71738, total lines: 49007

统计每个人增删行数

1
git log --format='%aN' | sort -u | while read name; do echo -en "$name\t"; git log --author="$name" --pretty=tformat: --numstat | awk '{ add += $1; subs += $2; loc += $1 - $2 } END { printf "added lines: %s, removed lines: %s, total lines: %s\n", add, subs, loc }' -; done

结果示例

1
2
3
4
5
6
7
8
9
10
11
12
Max-laptop    added lines: 1192, removed lines: 748, total lines: 444
chengshuai added lines: 120745, removed lines: 71738, total lines: 49007
cisen added lines: 3248, removed lines: 1719, total lines: 1529
max-h added lines: 1002, removed lines: 473, total lines: 529
max-l added lines: 2440, removed lines: 617, total lines: 1823
mw added lines: 148721, removed lines: 6709, total lines: 142012
spider added lines: 2799, removed lines: 1053, total lines: 1746
thy added lines: 34616, removed lines: 13368, total lines: 21248
wmao added lines: 12, removed lines: 8, total lines: 4
xrl added lines: 10292, removed lines: 6024, total lines: 4268
yunfei.huang added lines: 427, removed lines: 10, total lines: 417
³Ÿö added lines: 5, removed lines: 3, total lines: 2

查看仓库提交者排名前 5

1
git log --pretty='%aN' | sort | uniq -c | sort -k1 -n -r | head -n 5

贡献值统计

1
git log --pretty='%aN' | sort -u | wc -l

提交数统计

1
git log --oneline | wc -l

添加或修改的代码行数:

1
git log --stat|perl -ne 'END { print $c } $c += $1 if /(\d+) insertions/'

使用gitstats

GitStats项目,用Python开发的一个工具,通过封装Git命令来实现统计出来代码情况并且生成可浏览的网页。官方文档可以参考这里。

使用方法

1
2
3
git clone git://github.com/hoxu/gitstats.git
cd gitstats
./gitstats 你的项目的位置 生成统计的文件夹位置

可能会提示没有安装gnuplot画图程序,那么需要安装再执行:

1
2
3
4
//mac osx
brew install gnuplot
//centos linux
yum install gnuplot

使用cloc

1
npm install -g cloc

本文地址: https://github.com/maxzhao-it/blog/post/42913/

一、前言

SpringBoot Actuator 服务监控与管理**

其中包含了很多的服务,比如我们常用的amqp JVM cache等等,下面是actuator包下的目录

amqp,audit,beans,cache,cassandra,context,couchbase,elasticsearch,endpoint,env,flyway,health,influx,info,integration,jdbc,jms,ldap,liquibase,logging,mail,management,metrics,mongo,neo4j,redis,scheduling,security,session,solr,system,http,web

是不是感觉挺全面的。

2021-04-20 补充2.4.2 与之前版本的差异

二、服务监控与管理

Maven 依赖

1
2
3
4
5

<dependency>
<groupId>org.springframework.boot</groupId>
<artifactId>spring-boot-starter-actuator</artifactId>
</dependency>

主要配置

Spring Boot2.x中,默认只开放了info、health两个端点,开放其他端点需要配置

1
2
3
4
5
6
7
8
9
10
11
12
13
14
15
16
17
18
19
20
21
22
23
# 开启所有端点
management:
endpoints: # 这里是 endpoints
web:
# 默认路径
base-path: /actuator
exposure:
# Endpoint IDs that should be included or '*' for all.
include: '*'
# 显示详细的 health 信息
jmx:
# Whether unique runtime object names should be ensured.
domain: org.springframework.boot
exposure:
# Endpoint IDs that should be included or '*' for all.
include: '*'
# 显示详细的 health 信息
endpoint: # 这里是 endpoint
health:
show-details: always
# 打开 shutdown 端点,通过 POST 访问该端点可以关闭应用
shutdown:
enabled: true

监控状态

启动之后访问 http://localhost:8062/boot/actuator/health 就可以看到对应的项目监控状态。

访问 http://localhost:8062/boot/actuator 可以查看有那些监控。

健康指标 HealthIndicators 由 Spring Boot 自动配置,因此这里显示监控信息是由项目所使用的技术栈而决定的:

名称 描述
CassandraHealthIndicator 检查 Cassandra 数据库是否启动。
DiskSpaceHealthIndicator 检查磁盘空间不足。
DataSourceHealthIndicator 检查是否可以获得连接 DataSource。
ElasticsearchHealthIndicator 检查 Elasticsearch 集群是否启动。
InfluxDbHealthIndicator 检查 InfluxDB 服务器是否启动。
JmsHealthIndicator 检查 JMS 代理是否启动。
MailHealthIndicator 检查邮件服务器是否启动。
MongoHealthIndicator 检查 Mongo 数据库是否启动。
Neo4jHealthIndicator 检查 Neo4j 服务器是否启动。
RabbitHealthIndicator 检查 Rabbit 服务器是否启动。
RedisHealthIndicator 检查 Redis 服务器是否启动。
SolrHealthIndicator 检查 Solr 服务器是否已启动。

常用端点

查看常用接口

http://localhost:8062/boot/actuator/

env 端点,应用获取环境信息,包括:环境变量、JVM属性、应用的配置配置、命令行中的参数等等。
localhost:8080/actuator/env

mapping 端点,url 与 控制器映射关系信息
localhost:8080/actuator/info

metrics 端点,引用度量指标端点,提供引用再运行时的信息,如内存使用情况、HTTP请求统计、外部资源指标等
查看所有度量指标 localhost:8080/actuator/metrics
查看度量指标详细信息 localhost:8080/actuator/metrics/jvm.gc.pause

loggers 端点,查看可配置 loggers 的列表及相关的等级信息
localhost:8080/actuator/loggers
查看特定的 logger 详细信息localhost:8080/actuator/loggers/{name}

健康检查

health 端点用于暴露程序运行的健康状态,暴露的信息的详细程度由 management.endpoint.health.show-details 来控制,它具有以下三个可选值:

名称 描述
never 细节永远不会显示。
when-authorized 详细信息仅向授权用户显示。授权角色可以使用配置 management.endpoint.health.roles。
always 详细信息显示给所有用户。

org.springframework.boot.actuate.health.ShowDetails中有详细说明。

端点列表

  • info
    显示应用的基本信息
  • health
    显示应用的健康状态
  • metrics
    显示应用多样的度量信息
  • loggers
    显示和修改配置的loggers
  • logfile
    返回log file中的内容(如果logging.file或者logging.path被设置)
  • httptrace
    显示HTTP足迹,最近100个HTTP request/repsponse
  • env
    显示当前的环境特性
  • flyway
    显示数据库迁移路径的详细信息
  • liquidbase
    显示Liquibase 数据库迁移的纤细信息
  • shutdown
    让你逐步关闭应用
  • mappings
    显示所有的@RequestMapping路径
  • scheduledtasks
    显示应用中的调度任务
  • threaddump
    执行一个线程dump
  • heapdump
    返回一个GZip压缩的JVM堆dump

三、自定义健康检查

在启动类中加入

1
2
3
4
5
6
7
8
9
10
11
12
13
14
15
16
17
18
19

@Component
public class CustomHealthIndicatorDemo {
@Bean
HealthIndicator customHealthIndicator() {
return () -> Health.status("DOWN")
.withDetail("error code", "某健康专项检查失败").build();
}

@Bean
HealthIndicator customUpHealthIndicator() {
return () -> Health.up().withDetail("success code", "自定义检查一切正常 UP").build();
}

@Bean
HealthIndicator customDownHealthIndicator() {
return () -> Health.up().withDetail("success code", "自定义检查一切正常 DOWN ").build();
}
}

访问 http://localhost:8062/boot/actuator/health 的结果为:

这里我开启了redis ,数据库为mysql

1
2
3
4
5
6
7
8
9
10
11
12
13
14
15
16
17
18
19
20
21
22
23
24
25
26
27
28
29
30
31
32
33
34
35
36
37
38
39
40
41
42
43
44
{
"status": "DOWN",
"details": {
"custom": {
"status": "FATAL",
"details": {
"error code": "某健康专项检查失败"
}
},
"customUp": {
"status": "UP",
"details": {
"success code": "自定义检查一切正常 UP"
}
},
"customDown": {
"status": "DOWN",
"details": {
"success code": "自定义检查一切正常 DOWN "
}
},
"diskSpace": {
"status": "UP",
"details": {
"total": "471182741504",
"free": "375580655616",
"threshold": "10485760"
}
},
"db": {
"status": "UP",
"details": {
"database": "MySQL",
"hello": "1"
}
},
"redis": {
"status": "UP",
"details": {
"version": "5.0.8"
}
}
}
}

当前details中有一个检查statusDOWN时,Health检查的status就为DOWN,否则为UP

如果把第一个FATAL改为DOWNHealth检查结果同样为DOWN

下表显示了内置状态的默认映射:

Status Mapping
DOWN SERVICE_UNAVAILABLE (503)
OUT_OF_SERVICE SERVICE_UNAVAILABLE (503)
UP No mapping by default, so http status is 200
UNKNOWN No mapping by default, so http status is 200

四、自定义端点

Spring Boot 支持使用 @Endpoint 来自定义端点暴露信息。

1
2
3
4
5
6
7
8
9
10
11
12

@Endpoint(id = "customEndPoint")
@Component
public class CustomEndPoint {

@ReadOperation
public Map<String, Object> getInfo() {
Map<String, Object> dataMap = new LinkedHashMap<>();
dataMap.put("自定义信息", "custom endpoint ");
return dataMap;
}
}

请求 http://localhost:8062/boot/actuator/customEndPoint 的结果为

1
2
3
{
"自定义信息": "custom endpoint "
}

可用的方法注解由 HTTP 操作所决定:

operation HTTP 方法
@ReadOperation GET
@WriteOperation POST
@DeleteOperation DELETE

五、监控指标

参数 参数说明 是否监控 监控手段 重要度
–JVM–
jvm.memory.max JVM最大内存
jvm.memory.committed JVM可用内存 展示并监控堆内存和Metaspace 重要
jvm.memory.used JVM已用内存 展示并监控堆内存和Metaspace 重要
jvm.buffer.memory.used JVM缓冲区已用内存
jvm.buffer.count 当前缓冲区数
jvm.threads.daemon JVM守护线程数 显示在监控页面
jvm.threads.live JVM当前活跃线程数 显示在监控页面;监控达到阈值时报警 重要
jvm.threads.peak JVM峰值线程数 显示在监控页面
jvm.classes.loaded 加载classes数
jvm.classes.unloaded 未加载的classes数
jvm.gc.memory.allocated GC时,年轻代分配的内存空间
jvm.gc.memory.promoted GC时,老年代分配的内存空间
jvm.gc.max.data.size GC时,老年代的最大内存空间
jvm.gc.live.data.size FullGC时,老年代的内存空间
jvm.gc.pause GC耗时 显示在监控页面
–TOMCAT–
tomcat.sessions.created tomcat已创建session数
tomcat.sessions.expired tomcat已过期session数
tomcat.sessions.active.current tomcat活跃session数
tomcat.sessions.active.max tomcat最多活跃session数 显示在监控页面,超过阈值可报警或者进行动态扩容 重要
tomcat.sessions.alive.max.second tomcat最多活跃session数持续时间
tomcat.sessions.rejected 超过session最大配置后,拒绝的session个数 显示在监控页面,方便分析问题
tomcat.global.error 错误总数 显示在监控页面,方便分析问题
tomcat.global.sent 发送的字节数
tomcat.global.request.max request最长时间
tomcat.global.request 全局request次数和时间
tomcat.global.received 全局received次数和时间
tomcat.servlet.request servlet的请求次数和时间
tomcat.servlet.error servlet发生错误总数
tomcat.servlet.request.max servlet请求最长时间
tomcat.threads.busy tomcat繁忙线程 显示在监控页面,据此检查是否有线程夯住
tomcat.threads.current tomcat当前线程数(包括守护线程) 显示在监控页面 重要
tomcat.threads.config.max tomcat配置的线程最大数 显示在监控页面 重要
tomcat.cache.access tomcat读取缓存次数
tomcat.cache.hit tomcat缓存命中次数
–CPU–
system.cpu.count CPU数量
system.load.average.1m load average 超过阈值报警 重要
system.cpu.usage 系统CPU使用率
process.cpu.usage 当前进程CPU使用率 超过阈值报警
http.server.requests http请求调用情况 显示10个请求量最大,耗时最长的URL;统计非200的请求量 重要
process.uptime 应用已运行时间 显示在监控页面
process.files.max 允许最大句柄数 配合当前打开句柄数使用
process.start.time 应用启动时间点 显示在监控页面
process.files.open 当前打开句柄数 监控文件句柄使用率,超过阈值后报警 重要

Springboot 2.4.2

jvm.gc.pause

1
2
3
4
5
6
7
8
9
10
11
12
13
14
15
16
17
18
19
20
21
22
23
24
25
26
27
28
29
30
31
32
33
34
35
{
"name": "jvm.gc.pause",
"description": "Time spent in GC pause",
"baseUnit": "seconds",
"measurements": [
{
"statistic": "COUNT",
"value": 8
},
{
"statistic": "TOTAL_TIME",
"value": 0.255
},
{
"statistic": "MAX",
"value": 0
}
],
"availableTags": [
{
"tag": "cause",
"values": [
"Metadata GC Threshold",
"Allocation Failure"
]
},
{
"tag": "action",
"values": [
"end of minor GC",
"end of major GC"
]
}
]
}

httptrace 404解决

Springboot已经不推荐使用 httptrace

官方说明

1
2
3
4
5
6
7
8
9
@Configuration
public class SpringBootAdminConfig {

@Bean
public InMemoryHttpTraceRepository getInMemoryHttpTrace(){
return new InMemoryHttpTraceRepository();
}

}

本文地址: https://github.com/maxzhao-it/blog/post/12162/

Ant-Design官网

a-tree-select 支持单选、多选的下拉树形选择

a-tree-select

示例:

1
2
3
4
5
6
7
8
9
<a-tree-select
style="width:100%"
:dropdownStyle="{ maxHeight: '200px', overflow: 'auto' }"
:treeData="treeData"
v-model="model.parentId"
placeholder="请选择父级菜单"
:disabled="disableSubmit"
@change="handleParentIdChange">
</a-tree-select>

标准结构(源码中都有,可以直接看到)

1
2
3
4
5
6
7
8
9
10
11
12
13
14
15
16
17
18
19
20
21
22
23
24
25
26
27
28
29
30
31
32
33
34
35
36
37
38
39
40
41
42
43
44
45
46
47
48
49
50
51
52
53
54
55
56
57
58
59
60
61
62
63
64
65
66
67
68
69
70
71
72
73
74
75
76
77
78
79
80
81
82
83
84
85
86
87
88
89
90
91
92
93
94
95
96
97
98
99
100
101
102
103
104
105
106
107
108
109
110
111
112
113
114
115
116
117
118
119
120
121
122
123
124
125
126
127
128
129
130
131
132
133
134
135
136
137
138
139
140
141
142
143
144
145
146
147
148
149
150
151
152
153
154
155
156
157
158
159
160
161
162
163
164
165
166
167
168
169
170
171
172
173
174
175
176
177
178
179
180
181
182
183
184
185
186
187
188
189
190
191
192
193
194
195
196
197
198
199
200
201
202
203
204
205
206
207
/**
* Whether allow clear
* @default false
* @type boolean
*/
allowClear: boolean;

defaultValue: TreeNodeValue;

/**
* Disabled or not
* @default false
* @type boolean
*/
disabled: boolean;

/**
* className of dropdown menu
* @type string
*/
dropdownClassName: string;

/**
* Determine whether the dropdown menu and the select input are the same width
* @default true
* @type boolean
*/
dropdownMatchSelectWidth: boolean;

/**
* To set the style of the dropdown menu
* @type object
*/
dropdownStyle: object;

/**
* Whether to filter treeNodes by input value. The value of treeNodeFilterProp is used for filtering by default.
* @default Function
* @type boolean | Function
*/
filterTreeNode: boolean | Function;

/**
* To set the container of the dropdown menu.
* The default is to create a div element in body, you can reset it to the scrolling area and make a relative reposition.
* @default () => document.body
* @type Function
*/
getPopupContainer: (triggerNode: any) => HTMLElement;

/**
* whether to embed label in value, turn the format of value from string to {value: string, label: VNode, halfChecked: string[]}
* @default false
* @type boolean
*/
labelInValue: boolean;

/**
* Load data asynchronously.
* @type
*/
loadData: (node: any) => void;

maxTagCount: number;

maxTagPlaceholder: any;

/**
* Support multiple or not, will be true when enable treeCheckable.
* @default false
* @type boolean
*/
multiple: boolean;

/**
* Placeholder of the select input
* @type any (string | slot)
*/
placeholder: any;

/**
* Placeholder of the search input
* @type any (string | slot)
*/
searchPlaceholder: any;

/**
* work with `search` event to make search value controlled.
* @type string
*/
searchValue: string;

/**
* Show Checked Strategy
* @description The way show selected item in box. Default: just show child nodes.
* TreeSelect.SHOW_ALL: show all checked treeNodes (include parent treeNode).
* TreeSelect.SHOW_PARENT: show checked treeNodes (just show parent treeNode).
* @default TreeSelect.SHOW_CHILD
* @type
*/
showCheckedStrategy: 'SHOW_ALL' | 'SHOW_PARENT' | 'SHOW_CHILD';

/**
* Whether to display a search input in the dropdown menu(valid only in the single mode)
* @default false
* @type boolean
*/
showSearch: boolean;

/**
* To set the size of the select input, options: large small
* @default 'default'
* @type string
*/
size: 'small' | 'large' | 'default';

/**
* Whether to show checkbox on the treeNodes
* @default false
* @type boolean
*/
treeCheckable: boolean;

/**
* Whether to check nodes precisely (in the checkable mode), means parent and
* child nodes are not associated, and it will make labelInValue be true
* @default false
* @type boolean
*/
treeCheckStrictly: boolean;

/**
* Data of the treeNodes, manual construction work is no longer needed
* if this property has been set(ensure the Uniqueness of each value)
* @default []
* @type object[]
*/
treeData: TreeData[];

/**
* Enable simple mode of treeData.
* (treeData should like this: [{id:1, pId:0, value:'1', label:"test1",...},...], pId is parent node's id)
* @default false
* @type boolean | object[]
*/
treeDataSimpleMode:
| boolean
| Array<{
id: string;
pId: string;
rootPId: any;
}>;

/**
* Whether to expand all treeNodes by default
* @default false
* @type boolean
*/
treeDefaultExpandAll: boolean;

/**
* Default expanded treeNodes
* @type string[] | number[]
*/
treeDefaultExpandedKeys: string[] | number[];

/**
* Set expanded keys
* @type string[] | number[]
*/
treeExpandedKeys: string[] | number[];

/**
* Will be used for filtering if filterTreeNode returns true
* @default 'value'
* @type string
*/
treeNodeFilterProp: string;

/**
* Will render as content of select
* @default 'title'
* @type string
*/
treeNodeLabelProp: string;

value: TreeNodeValue;

/**
* The custom suffix icon
* @type any (VNode | slot)
*/
suffixIcon: any;

removeIcon?: any;

clearIcon?: any;

/**
* remove focus
*/
blur(): void;

/**
* get focus
*/
focus(): void;

treeData数据格式

示例

1
2
3
4
5
[
{key: '', value: '', title: ''}
,{key: 'id', value: 'id', title: '状态1'}
,{key: 'id2', value: 'id2', title: '状态2'}
]

标准结构

1
2
3
4
5
6
7
8
9
{
key: string | number;
value: string;
label: any;
children: any;
disabled?: boolean;
disableCheckbox?: boolean;
selectable?: boolean;
}

本文地址:ant-design-vue中的a-select设置只读

本文地址: https://github.com/maxzhao-it/blog/post/54598/

Ant-Design官网

treeNode 添加自定义按钮

a-tree 中的节点需要添加自定义按钮,这里就直接展示:

示例:

1
2
3
4
5
6
7
8
9
10
11
12
13
14
15
16
17
18
19
20
21
22
23
24
25
26
27
28
29
30
 <a-tree @click="handleClick"
@rightClick="rightHandle"
:treeData="$treeData(orgTree,{title: 'custom'})"
@expand="onExpand">
<template slot="custom" slot-scope="item">
<span>{{ item.title }}</span>
<a-dropdown style="padding: 0 0 0 10px;">
<a class="ant-dropdown-link">
<a-icon type="bars"/>
</a>
<a-menu slot="overlay">
<a-menu-item>
<a href="javascript:;">
<a-icon type="file-add"/>
</a>
</a-menu-item>
<a-menu-item>
<a href="javascript:;">
<a-icon type="file-text"/>
</a>
</a-menu-item>
<a-menu-item>
<a href="javascript:;">
<a-icon type="delete"/>
</a>
</a-menu-item>
</a-menu>
</a-dropdown>
</template>
</a-tree>

$treeData 是定义的一个过滤树节点的方法,给每个节点添加参数

1
scopedSlots: {title: 'custom'}

tree 属性

1
2
3
4
5
6
7
8
9
10
11
12
13
14
15
16
17
18
19
20
21
22
23
24
25
26
27
28
29
30
31
32
33
34
35
36
37
38
39
40
41
42
43
44
45
46
47
48
49
50
51
52
53
54
55
56
57
58
59
60
61
62
63
64
65
66
67
68
69
70
71
72
73
74
75
76
77
78
79
80
81
82
83
84
85
86
87
88
89
90
91
92
93
94
95
96
97
98
99
100
101
102
103
104
105
106
107
108
109
110
111
112
113
114
115
116
117
118
119
120
121
122
123
124
125
126
127
128
129
130
131
132
133
134
135
136
137
138
139
140
141
142
143
144
145
146
147
148
149
150
151
152
153
154
155
156
157
158
159
160
161
162
163
164
165
166
167
168
169
export declare class Tree extends AntdComponent {
static TreeNode: typeof TreeNode;
static DirectoryTree: typeof DictionaryTree;

blockNode: boolean;
selectable: boolean;
/**
* treeNode of tree
* @type TreeNode[]
*/
treeData: TreeNode[];

/**
*
*@description Replace the title,key and children fields in treeNode with the corresponding fields in treeData
*/
replaceFields?: {
/**@default 'children' */
children?: string;
/**@default 'title' */
title?: string;
/**@default 'key' */
key?: string;
};

/**
* Whether to automatically expand a parent treeNode
* @default true
* @type boolean
*/
autoExpandParent: boolean;

/**
* Adds a Checkbox before the treeNodes
* @default false
* @type boolean
*/
checkable: boolean;

/**
* (Controlled) Specifies the keys of the checked treeNodes
* (PS: When this specifies the key of a treeNode which is also a parent treeNode,
* all the children treeNodes of will be checked; and vice versa,
* when it specifies the key of a treeNode which is a child treeNode,
* its parent treeNode will also be checked. When checkable and checkStrictly is true,
* its object has checked and halfChecked property. Regardless of whether the child or parent treeNode is checked,
* they won't impact each other.
* @default []
* @type string[] | number[] | { checked: string[]; halfChecked: string[] }
*/
checkedKeys:
| string[]
| number[]
| {
checked: string[];
halfChecked: string[];
};

/**
* Check treeNode precisely; parent treeNode and children treeNodes are not associated
* @default false
* @type boolean
*/
checkStrictly: boolean;

/**
* Specifies the keys of the default checked treeNodes
* @default []
* @type string[] | number[]
*/
defaultCheckedKeys: string[] | number[];

/**
* Whether to expand all treeNodes by default
* @default false
* @type boolean
*/
defaultExpandAll: boolean;

/**
* Specify the keys of the default expanded treeNodes
* @default []
* @type string[] | number[]
*/
defaultExpandedKeys: string[] | number[];

/**
* auto expand parent treeNodes when init
* @default true
* @type boolean
*/
defaultExpandParent: boolean;

/**
* Specifies the keys of the default selected treeNodes
* @default []
* @type string[] | number[]
*/
defaultSelectedKeys: string[] | number[];

/**
* whether disabled the tree
* @default false
* @type boolean
*/
disabled: boolean;

/**
* Specifies whether this Tree is draggable (IE > 8)
* @default false
* @type boolean
*/
draggable: boolean;

/**
* (Controlled) Specifies the keys of the expanded treeNodes
* @default []
* @type string[] | number[]
*/
expandedKeys: string[] | number[];

/**
* Defines a function to filter (highlight) treeNodes.
* When the function returns true, the corresponding treeNode will be highlighted
* @type Function
*/
filterTreeNode: (node: TreeNode) => any;

/**
* Load data asynchronously
* @type Function
*/
loadData: (node: TreeNode) => any;

/**
* (Controlled) Set loaded tree nodes. Need work with loadData
* @default []
* @type string[]
*/
loadedKeys: string[];

/**
* Allows selecting multiple treeNodes
* @default false
* @type boolean
*/
multiple: boolean;

/**
* (Controlled) Specifies the keys of the selected treeNodes
* @type string[] | number[]
*/
selectedKeys: string[] | number[];

/**
* Shows the icon before a TreeNode's title.
* There is no default style; you must set a custom style for it if set to true
* @default false
* @type boolean
*/
showIcon: boolean;

/**
* Shows a connecting line
* @default false
* @type boolean
*/
showLine: boolean;
}

treeNode 属性

1
2
3
4
5
6
7
8
9
10
11
12
13
14
15
16
17
18
19
20
21
22
23
24
25
26
27
28
29
30
31
32
33
34
35
36
37
38
39
40
41
42
43
44
45
46
47
48
49
50
51
52
53
54
55
56
57
58
59
60
61
62
63
64
65
66
67
68
69
70
71
72
73
74
75
76
77
78
79
80
81
82
83
84
85
86
87
88
89
90
91
92
93
/**
* Class
* @description className
* @type string
*/
class: string;

/**
* Style
* @description style of tree node
* @type string | object
*/
style: string | object;

/**
* Disable Checkbox
* @description Disables the checkbox of the treeNode
* @default false
* @type boolean
*/
disableCheckbox: boolean;

/**
* Disabled
* @description Disabled or not
* @default false
* @type boolean
*/
disabled: boolean;

/**
* Icon
* @description customize icon. When you pass component, whose render will receive full TreeNode props as component props
* @type any (slot | slot-scope)
*/
icon: any;rightClick

/**
* Is Leaf?
* @description Leaf node or not
* @default false
* @type boolean
*/
isLeaf: boolean;

/**
* Key
* @description Required property, should be unique in the tree
* (In tree: Used with (default)ExpandedKeys / (default)CheckedKeys / (default)SelectedKeys)
* @default internal calculated position of treeNode or undefined
* @type string | number
*/
key: string | number;

/**
* Selectable
* @description Set whether the treeNode can be selected
* @default true
* @type boolean
*/
selectable: boolean;

/**
* Title
* @description Content showed on the treeNodes
* @default '---'
* @type any (string | slot)
*/
title: any;

/**
* Value
* @description Will be treated as treeNodeFilterProp by default, should be unique in the tree
* @default undefined
* @type string
*/
value: string;

/**
* Slots
* @description When using treeNodes, you can use this property to configure the properties that support the slot,
* such as slots: { title: 'XXX'}
* @type object
*/
slots: object;

/**
* Scoped Slots
* @description When using treeNodes, you can use this property to configure the properties that support the slot,
* such as scopedSlots: { title: 'XXX'}
* @type object
*/
scopedSlots: object;

本文地址:ant-design-vue中的a-tree添加节点按钮

本文地址: https://github.com/maxzhao-it/blog/post/29463/

基本语法

execution(<修饰符模式>?<返回类型模式><方法名模式>(<参数模式>)<异常模式>?)

返回类型模式、方法名模式和参数模式是必选的。

1
2
// gt.maxzhao 包及其子包下的所有方法,任意返回类型
@Pointcut("execution(* gt.maxzhao..*(..))")

..表示任务多个。

排除当前表达式范围中的更小范围

1
2
3
// 扫描所有接口
// 但是不扫描gt.maxzhao.boot.log.api.AppLogApiController.list方法的接口
@Pointcut("execution(* gt.maxzhao..api.*.*(..)) && !execution(* gt.maxzhao.boot.log.api.AppLogApiController.list(..))")

本文地址: https://github.com/maxzhao-it/blog/post/42520/

Boolean

布尔型boolean的包装类一个有趣的地方

1
2
3
public static boolean parseBoolean(String s){
return((s!=null)&&s.equalsIgnoreCase("true"));
}

这个代码就意味着,只有当前字符串为true的时候,转为Boolean才为 true其它都为false

另一个有趣的细节

1
2
3
public static int hashCode(boolean value){
return value?1231:1237;
}

为什么是12311237呢?其实其它比较大的 素数也是可以的。

编程还是要靠玄学的

本文地址: https://github.com/maxzhao-it/blog/post/4002/

为什么会用到 DataSource

在我读 oauth2 源码的时候,Spring 中提供了大量的测试代码,运行测试代码更方便自己理解,但是测试代码中使用的大多都是 Hsqldb等等,我想连接我的开发库(MySql8)进行测试。

传统的连接方式配置比较麻烦,这里使用 alibabadruid 来获取 datasource

引入依赖

1
2
3
4
5
6

<dependency>
<groupId>com.alibaba</groupId>
<artifactId>druid</artifactId>
<version>1.1.16</version>
</dependency>

创建工具类

1
2
3
4
5
6
7
8
9
10
11
12
13
14
15
16
17
18
19
20
21
22
/**
* 创建 DataSource 连接
* 测试使用
*
* @author maxzhao
* @date 2020-01-17 15:36
*/
public class BootDataSource {
private static final String url = "jdbc:mysql://127.0.0.1:3306/oauth2_boot?charset=utf8mb4&serverTimezone=GMT%2B8&useUnicode=true&useSSL=false";
private static final String username = "maxzhao";
private static final String password = "maxzhao";
private static final String drive = "com.mysql.cj.jdbc.Driver";

public static DataSource createDataSource() throws Exception {
Map<String, String> map = new HashMap<>();
map.put(DruidDataSourceFactory.PROP_DRIVERCLASSNAME, drive);
map.put(DruidDataSourceFactory.PROP_URL, url);
map.put(DruidDataSourceFactory.PROP_USERNAME, username);
map.put(DruidDataSourceFactory.PROP_PASSWORD, password);
return DruidDataSourceFactory.createDataSource(map);
}
}

引用工具类

这是在 JdbcClientDetailsServiceTests 中的一个初始化方法。

1
2
3
4
5
6
7
8
9
10
11
12
13
// 原来的
// private EmbeddedDatabase db;
// 新的
private DataSource db;
@Before
public void setUp()throws Exception{
// creates a HSQL in-memory db populated from default scripts
// classpath:schema.sql and classpath:data.sql
// db = new EmbeddedDatabaseBuilder().addDefaultScripts().build();
db=BootDataSource.createDataSource();
jdbcTemplate=new JdbcTemplate(db);
service=new JdbcClientDetailsService(db);
}

到这里就结束了,配置很简单。

我这里使用的是 MySql8的配置。

MySql5.xMySql8 的区别要个别注意一下。

本文地址:JAVA创建DataSource

本文地址: https://github.com/maxzhao-it/blog/post/53775/

前言

当自己的内存不够用时,可以适当的添加 swap分区。

比如 java开发就很费内存,主要是idea费内存,这时候会产生一个kswpd0的进程,会把当前内存部分放入swap分区,如果没有设置swap分区,那么死机的几率就很大了。

首先确定有没有swap分区

1
2
3
4
5
6
free -m
# 交换(swap)分区为 0 0 0 就是没有交换分区
总计 已用 空闲 共享 缓冲/缓存 可用
内存: 7833 3259 3115 805 1458 3501
交换: 0 0 0

创建swap分区

1、新增硬盘分区(明显不行了,没有新的硬盘了)

2、用文件作为 swap 分区

下面所有的操作都需要root权限,需要谨慎

创建一个空的swap文件

1
sudo dd if=/dev/zero of=/swapfile count=8192 bs=1M

其中 dd 命令的内容可以按自己的需求修改:

  • if =输入文件(或设备名称)。
  • of =输出文件(或设备名称)。
  • ibs = bytes 一次读取bytes字节,即读入缓冲区的字节数。
  • skip = blocks 跳过读入缓冲区开头的ibs*blocks块。
  • obs = bytes 一次写入bytes字节,即写入缓冲区的字节数。
  • bs = bytes 同时设置读/写缓冲区的字节数(等于设置ibs和obs)。
  • cbs = byte 一次转换bytes字节。
  • count=blocks 只拷贝输入的blocks块。

成功后的反馈

1
2
3
记录了8192+0 的读入
记录了8192+0 的写出
8589934592 bytes (8.6 GB, 8.0 GiB) copied, 17.0281 s, 504 MB/s

激活swap分区

Swap分区需要读写的权限,授权:

1
sudo chmod 600 /swapfile

查看授权:

1
sudo ls -lh /swapfile

成功提示:

1
-rw------- 1 root root 8.0G  1月 14 17:42 /swapfile

然后挂载Swap分区:

1
sudo mkswap /swapfile

成功提示:

1
2
正在设置交换空间版本 1,大小 = 8 GiB (8589930496  个字节)
无标签,UUID=cb8134b6-d8b9-4428-937a-caa9180afaad

打开swap

1
sudo swapon /swapfile

查看

1
free -m

设置开机自启

1
sudo vim /etc/fstab

在末尾添加

1
/swapfile none swap sw 0 0 

本文地址: https://github.com/maxzhao-it/blog/post/53370/