0%

文章前半部分转自:https://blog.csdn.net/lh513828570/article/details/56673804
###Spliterator是什么?
public interface Spliterator
Spliterator是一个可分割迭代器(splitable iterator)
,可以和iterator顺序遍历迭代器一起看。jdk1.8发布后,对于并行处理的能力大大增强,Spliterator就是为了并行遍历元素而设计的一个迭代器,jdk1.8中的集合框架中的数据结构都默认实现了spliterator,后面我们也会结合ArrayList中的spliterator()
一起解析。

1
2
3
4
5
6
7
8
9
10
11
12
13
14
15
16
17
18
19
20
21
22
23
24
25
26
27
28
29
30
31
32
33
 //单个对元素执行给定的动作,如果有剩下元素未处理返回true,否则返回false
boolean tryAdvance(Consumer<? super T>action);

//对每个剩余元素执行给定的动作,依次处理,直到所有元素已被处理或被异常终止。默认方法调用tryAdvance方法
default void forEachRemaining(Consumer<? super T>action){
do{}while(tryAdvance(action));
}

//对任务分割,返回一个新的Spliterator迭代器
Spliterator<T> trySplit();

//用于估算还剩下多少个元素需要遍历
long estimateSize();

//当迭代器拥有SIZED特征时,返回剩余元素个数;否则返回-1
default long getExactSizeIfKnown(){
return(characteristics()&SIZED)==0?-1L:estimateSize();
}

//返回当前对象有哪些特征值
int characteristics();

//是否具有当前特征值
default boolean hasCharacteristics(int characteristics){
return(characteristics()&characteristics)==characteristics;
}
//如果Spliterator的list是通过Comparator排序的,则返回Comparator
//如果Spliterator的list是自然排序的 ,则返回null
//其他情况下抛错
default Comparator<? super T>getComparator(){
throw new IllegalStateException();
}

特征值其实就是为表示该Spliterator有哪些特性,用于可以更好控制和优化Spliterator的使用。关于获取比较器getComparator这一个方法,目前我还没看到具体使用的地方,所以可能理解有些误差。(源玛里有这里就不展示了)

###ArrayList的例子
ArrayListSpliterator在ArrayList的源码里

1
2
3
4
5
6
7
8
9
10
11
12
13
14
15
16
17
18
19
20
21
22
23
24
25
26
27
28
29
30
31
32
33
34
35
36
37
38
39
40
41
42
43
44
45
46
47
48
49
50
51
52
53
54
55
56
57
58
59
60
61
62
63
64
65
66
67
68
69
70
71
72
73
74
75
76
77
78
79
80
81
82
83
84
85
86
87
88
89
90
91
92
93
94
95
96
97
98
99
100
101
102
103
104
105
106
107
static final class ArrayListSpliterator<E> implements Spliterator<E> {
//用于存放ArrayList对象
private final ArrayList<E> list;
//起始位置(包含),advance/split操作时会修改
private int index;
//结束位置(不包含),-1 表示到最后一个元素
private int fence;
//用于存放list的modCount
private int expectedModCount;

ArrayListSpliterator(ArrayList<E> list, int origin, int fence,
int expectedModCount) {
this.list = list;
this.index = origin;
this.fence = fence;
this.expectedModCount = expectedModCount;
}

//获取结束位置(存在意义:首次初始化石需对fence和expectedModCount进行赋值)
private int getFence() {
int hi;
ArrayList<E> lst;
//fence<0时(第一次初始化时,fence才会小于0):
if ((hi = fence) < 0) {
//list 为 null时,fence=0
if ((lst = list) == null)
hi = fence = 0;
else {
//否则,fence = list的长度。
expectedModCount = lst.modCount;
hi = fence = lst.size;
}
}
return hi;
}

//分割list,返回一个新分割出的spliterator实例
public ArrayListSpliterator<E> trySplit() {
//hi为当前的结束位置
//lo 为起始位置
//计算中间的位置
int hi = getFence(), lo = index, mid = (lo + hi) >>> 1;
//当lo>=mid,表示不能在分割,返回null
//当lo<mid时,可分割,切割(lo,mid)出去,同时更新index=mid
return (lo >= mid) ? null :
new ArrayListSpliterator<E>(list, lo, index = mid, expectedModCount);
}

//返回true 时,只表示可能还有元素未处理
//返回false 时,没有剩余元素处理了。。。
public boolean tryAdvance(Consumer<? super E> action) {
if (action == null)
throw new NullPointerException();
//hi为当前的结束位置
//i 为起始位置
int hi = getFence(), i = index;
//还有剩余元素未处理时
if (i < hi) {
//处理i位置,index+1
index = i + 1;
@SuppressWarnings("unchecked") E e = (E) list.elementData[i];
action.accept(e);
//遍历时,结构发生变更,抛错
if (list.modCount != expectedModCount)
throw new ConcurrentModificationException();
return true;
}
return false;
}

//顺序遍历处理所有剩下的元素
public void forEachRemaining(Consumer<? super E> action) {
int i, hi, mc; // hoist accesses and checks from loop
ArrayList<E> lst;
Object[] a;
if (action == null)
throw new NullPointerException();
if ((lst = list) != null && (a = lst.elementData) != null) {
//当fence<0时,表示fence和expectedModCount未初始化,可以思考一下这里能否直接调用getFence(),嘿嘿?
if ((hi = fence) < 0) {
mc = lst.modCount;
hi = lst.size;
} else
mc = expectedModCount;
if ((i = index) >= 0 && (index = hi) <= a.length) {
for (; i < hi; ++i) {
@SuppressWarnings("unchecked") E e = (E) a[i];
//调用action.accept处理元素
action.accept(e);
}
//遍历时发生结构变更时抛出异常
if (lst.modCount == mc)
return;
}
}
throw new ConcurrentModificationException();
}

public long estimateSize() {
return (long) (getFence() - index);
}

public int characteristics() {
//打上特征值:、可以返回size
return Spliterator.ORDERED | Spliterator.SIZED | Spliterator.SUBSIZED;
}
}

#####测试代码如下:

1
2
3
4
5
6
7
8
9
10
11
12
13
14
15
16
17
18
19
20
21
22
23
24
25
 List<String> arrs=new ArrayList<>();
arrs.add("a");
arrs.add("b");
arrs.add("c");
arrs.add("d");
arrs.add("e");
arrs.add("f");
arrs.add("h");
arrs.add("i");
arrs.add("j");
Spliterator<String> a=arrs.spliterator();
System.out.println(a);
//此时结果:a:0-9(index-fence)

Spliterator<String> b=a.trySplit();
System.out.println(b.toString());
//此时结果:b:4-9,a:0-4

Spliterator<String> c=a.trySplit();
//此时结果:c:4-6,b:4-9,a:6-9
System.out.println(c.toString());

Spliterator<String> d=a.trySplit();
System.out.println(d.toString());
//此时结果:d:6-7,c:4-6,b:4-9,a:7-9

可以看到每次分割,都会分割剩余的前一半,fence之不变,index后移。同时也发现:
1.ArrayListSpliterator本质上还是对原list进行操作,只是通过index和fence来控制每次处理范围
2.也可以得出,ArrayListSpliterator在遍历元素时,不能对list进行结构变更操作,否则抛错。
###衍生接口OfPrimitive
源码:

1
2
3
4
5
6
7
8
9
10
11
12
13
14
public interface OfPrimitive<T, T_CONS, T_SPLITR extends Spliterator.OfPrimitive<T, T_CONS, T_SPLITR>>
extends Spliterator<T> {
@Override
T_SPLITR trySplit();

@SuppressWarnings("overloads")
boolean tryAdvance(T_CONS action);

@SuppressWarnings("overloads")
default void forEachRemaining(T_CONS action) {
do {
} while (tryAdvance(action));
}
}
1
2
3
4
5
6
7
8
9
10
11
12
 public interface OfPrimitive<T, T_CONS, T_SPLITR extends Spliterator.OfPrimitive<T, T_CONS, T_SPLITR>> extends Spliterator<T> {
T_SPLITR trySplit();

boolean tryAdvance(T_CONS var1);

default void forEachRemaining(T_CONS var1) {
while (this.tryAdvance(var1)) {
;
}

}
}

可以看到,这个接口基本没有变动,这是多增加两个泛型声明而已,本质上和Spliterator没有太大的区别,只不过,它限制tryAdvance的参数action类型T_CONS和trySplit的返回参数T_SPLITR必须在实现接口时先声明类型。
基于OfPrimitive接口,又衍生出了OfInt、OfLong、OfDouble等专门用来处理int、Long、double等分割迭代器接口(在Spliterators有具体的实现)。
LinkedHashSet中的Spliterator方法的实现,内部使用到了Sqlieterator接口的常量值!

##简单的并发测试(jdk1.8+)

1
2
3
4
5
6
7
8
9
10
11
12
13
14
15
16
17
18
19
20
21
22
23
24
25
26
27
28
29
30
31
32
33
34
35
36
37
38
39
40
41
42
43
44
45
46
47
48
49
50
51
52
53
    private AtomicInteger count=new AtomicInteger(0);
private List<String> strList=createList();
private Spliterator spliterator=strList.spliterator();

/**
* 多线程计算list中数值的和
* 测试spliterator遍历
*/
@Test
public void mytest(){
for(int i=0;i< 4;i++){
new Thread(()->{
String threadName=Thread.currentThread().getName();
System.out.println(" "+threadName+" start ");
spliterator.trySplit().forEachRemaining((o)->{
if(isInteger((String)o)){
int num=Integer.parseInt(o+"");
count.addAndGet(num);
System.out.println("数值:"+num+" "+threadName);
try{
Thread.sleep(2000);
}catch(InterruptedException e){
e.printStackTrace();
}
}
});
System.out.println(" "+threadName+" end");
}).start();
}
try{
Thread.sleep(15000);
}catch(InterruptedException e){
e.printStackTrace();
}
System.out.println("结果为:"+count);
}

private List<String> createList(){
List<String> result=new ArrayList<>();
for(int i=0;i< 100;i++){
if(i%10==0){
result.add(i+"");
}else{
result.add("=");
}
}
return result;
}

public static boolean isInteger(String str){
Pattern pattern=Pattern.compile("^[-\\+]?[\\d]*$");
return pattern.matcher(str).matches();
}

本文地址 Spliterator并行遍历迭代器(JDK8)

本文地址: https://github.com/maxzhao-it/blog/post/42644/

jmap -heap pid

jstat

oracle官方文档

jstat:虚拟机统计信息监视工具(JVM Statistics Monitoring Tool)
说明:监视虚拟机的各种运行状态:类装载、内存、垃圾收集等运行数据。只用于Java进程或Java应用
格式:jstat [option] PID [interval] [count]
$ jstat -gcutil 2000 10 # 2秒打印一次,打印10次

option:
-class 查看类装载的信息
-gc 查看java堆的状况
-gccapacity 查看堆中各个区域的最小容量和最大容量
-gcutil 查看堆中各个区域已使用空间占其总空间的百分比
-gccause 与-gcutil相同,另外还输出了:导致上一次GC的原因和当前GC的原因
-gcnew 查看堆中新生代的状况
-gcnewcapacity 查看堆中新生代的最小容量和最大容量
-gcold 查看堆中老年代的状况
-gcoldcapacity 查看堆中老年代的最小容量和最大容量
-gcpermcapacity 查看堆中永久代的最小容量和最大容量
-gcmetacapacity 查看元数据空间的当前大小、最大容量和最小容量(jdk1.8)
interval:表示查询的间隔时间,单位:毫秒
count: 表示查询的次数,如果interval和count都省略,则默认为只查询一次。

这是 class 例子

这条命令的意思是查看类加载器统计信息

1
jstat -class -h3 -t pid 1000 8

参数

  1. -class监控类加载器统计信息,当然我们还可以监控垃圾收集堆统计信息(-gc)等信息。
  2. h3选项每三条信息加一个列标题(可选)
  3. -t选项是在在首列加一列距离jvm启动的时间戳(可选)
  4. 16468是jvm进程id(必须)
  5. 1000是每隔1000毫秒打印一条数据(可选,默认打印一条)
  6. 8是打印8条数据(可选,如果指定了间隔时间,将持续打印)

结果

  1. -class监控类加载器统计信息标题解释
  2. Timestamp 距离jvm启动的时间戳
  3. Loaded:已加载的类数。
  4. Bytes:加载的kB数。
  5. Unloaded:卸载的类数。
  6. Bytes:已卸载的Kbytes数。
  7. Time:执行类加载和卸载操作所花费的时间。

这是 gcutil 例子

1
2

jstat -gcutil -h3 -t pid 1000 8

查询结果标识:
通用:

  • SOC: S0区总共容量

  • S1C: S1区总共容量

  • S0U: S0区使用的量

  • S1U: S1区使用的量

  • EC: 伊甸园区总共容量

  • EU:伊甸园区使用的量

  • OC:老年代总共容量

  • OU:老年代使用的量

  • Minor GC(Young GC):

  • YGC: 进程从启动以来Minor GC的次数

  • YGCT:进程从启动以来Minor GC所花费的时间

  • Full GC:FGC表示次数,FGCT表示时间

  • FGC: 进程从启动以来Full GC的次数

  • FGCT:进程从启动以来Full GC所花费的时间

  • GCT: Minor GC和Full GC总共花费的时间

注:查看 JVM 是否回收垃圾频繁,主要根据 FGC 和 FGCT 来分析。上面的命令

$ jstat -gcutil 8842 2000 10 该命令对进程 8842 进行监控收集信息,每 2 秒收集一次,供收集 10 次。此时看 FGC
这一列,最新收集的信息排在最上面。用下一行的数字,减去上一行的数字,可得知每2秒内垃圾收集的次数(可换算成1秒的次数)
,若是回收垃圾频繁,则需要进一步分析原因。可能的原因是内存泄露、程序中有创建大对象的代码、相关配置设置的阈值较小。再进一步查找问题,可以打印出具体的堆栈信息,通过堆栈定位到具体的代码进行分析。

相关命令解析:
jstat -gc
jstat -gcutil
jstat -gccause
新生代(Young)中的Eden区:E
E: Eden区已使用的空间占其总空间的百分比
EC:Eden区的容量(Eden Capacity)
EU:Eden区已使用的空间(Eden Use)
新生代(Young)中的Survivor区:S0 S1
老年代(Old):O
永久代(Permanent):P
jdk8中:
元数据空间(Metaspace):M
元数据空间中的压缩类空间(Compressed Class Space):CCS
说明:
1>jdk8中已经没有永久代了,取而代之的是元空间,元空间占用的是本地内存,不占用虚拟机的内存。
2>Metaspace由Klass Metaspace和NoKlass Metaspace两部分组成。
3>M表示Metaspace已使用的百分比,CCS表示Klass Metaspace已使用的百分比(CCS=CCSU/CCSC)。
4>M的值达到了90%以上,不一定能说明metaspace已经用了很多了,因为内存是慢慢commit的,所以我们的分母是慢慢变大的,不过当我们commit到一定量的时候就不会再增长了。
5>根据MC,MU,CCSC,CCSU来判断metaspace的状态更靠谱。(注:可以在jstat -gc 中看到MU)
注:S0/S0C/S0U、S1/S1C/S1U、O/OC/OU、P/PC/PU、M/MC/MU、CCS/CCSC/CCSU 与 E/EC/EU类似
LGCC:最后一次GC发生的原因
GCC: 当前GC发生的原因
jstat -gccapacity
NGCMN:新生代的最小(初始化)容量
NGCMX:新生代的最大容量
NGC: 新生代当前的容量
ECMX: 新生代中Eden区的最大容量
S0CMX、S1CMX:新生代中Survivor区的最大容量
OGCMN:老年代的最小(初始化)容量
OGCMX:老年代的最大容量
OGC: 老年代当前的容量
PGCMN:永久代的最小(初始化)容量
PGCMX:永久代的最大容量
PGC: 永久代当前的容量
jdk8中:
MCMN: 元数据空间最小容量
MCMX: 元数据空间最大容量
MC: 当前元数据空间的大小
CCSMN: 压缩类空间CCS(即:Klass Metaspace)的最小容量
CCSMX: 压缩类空间CCS(即:Klass Metaspace)的最大容量
CCSC: 当前压缩类空间CCS(即:Klass Metaspace)的大小
jstat -gcnew
TT: 老年化阈值。被移动到老年代之前,在新生代空存活的次数
MTT:最大老年化阈值。
DSS:幸存者区所需空间大小
注意:单位是都是KB

系统异常排查的定位方法

定位相关进程的堆栈信息

查看进程的信息
$ ps -mp -o THREAD,tid,time | sort -k2r

该命令是查看某个进程下线程的具体信息,sort参数根据线程占用的cpu比例进行排序

$ top -Hp

查看某个进程下面线程的摘要信息,包括线程ID,cpu占用,内存占用,虚拟内存,运行时间等

以上两个命令,主要查找进程里面消耗CPU最高的线程

  1. 将占用cpu资源最高的线程,转换为16进制

$ printf “%xn” <线程ID>

  1. 打印线程(十六进制)的堆栈信息

$ jstack | grep -A 30

是第 2 步打印得到的16进制的线程 id ,-A 30 是打印前30行

另一种比较简单粗暴的方法,查看进程的堆栈情况

$ jstack >> jstack.out

先通过步骤 1 ,查找到消耗CPU最高的进程,将该进程的堆栈信息打印出来,输入到jstack.out 文件

其它一些辅助命令

$ jmap -heap

显示java堆的摘要信息,打印一个堆的摘要信息,包括使用的GC算法、堆配置信息和各内存区域内存使用信息

$ jmap -histo[:live]

显示堆中对象的统计信息,其中包括每个Java类、对象数量、内存大小(单位:字节)、完全限定的类名。打印的虚拟机内部的类名称将会带有一个’*’前缀。如果指定了live子选项,则只计算活动的对象。

本文地址: https://github.com/maxzhao-it/blog/post/e02b3732/

自定义注解

1、元注解(meta-annotation)

元注解的作用就是负责注解其他注解。Java5.0定义了4个标准的 meta-annotation类型,它们被用来提供对其它annotation类型作说明。Java5.0定义的元注解:
1.@Target,
2.@Retention,
3.@Documented,
4.@Inherited
这些类型和它们所支持的类在java.lang.annotation包中可以找到。下面我们看一下每个元注解的作用和相应分参数的使用说明。

@Target:

@Target说明了Annotation所修饰的对象范围:Annotation可被用于
packages、types(类、接口、枚举、Annotation类型)、类型成员(方法、构造方法、成员变量、枚举值)、方法参数和本地变量(如循环变量、catch参数)。在Annotation类型的声明中使用了target可更加明晰其修饰的目标。

作用:用于描述注解的使用范围(即:被描述的注解可以用在什么地方)

取值(ElementType)有:

1.CONSTRUCTOR:用于描述构造器
2.FIELD:用于描述域
3.LOCAL_VARIABLE:用于描述局部变量
4.METHOD:用于描述方法
5.PACKAGE:用于描述包
6.PARAMETER:用于描述参数
7.TYPE:用于描述类、接口(包括注解类型) 或enum声明

1
2
3
4
5
6
7
8
9
10
11
12
13
@Target(ElementType.TYPE)
public @interface Table {
/**
* 数据表名称注解,默认值为类名称
* @return
*/
public String tableName() default "className";
}

@Target(ElementType.FIELD)
public @interface NoDBColumn {

}

注解Table 可以用于注解类、接口(包括注解类型) 或enum声明,而注解NoDBColumn仅可用于注解类的成员变量。

@Retention:

@Retention
定义了该Annotation被保留的时间长短:某些Annotation仅出现在源代码中,而被编译器丢弃;而另一些却被编译在class文件中;编译在class文件中的Annotation可能会被虚拟机忽略,而另一些在class被装载时将被读取(请注意并不影响class的执行,因为Annotation与class在使用上是被分离的)。使用这个meta-Annotation可以对
Annotation的“生命周期”限制。

作用:表示需要在什么级别保存该注释信息,用于描述注解的生命周期(即:被描述的注解在什么范围内有效)

取值(RetentionPoicy)有:

1.SOURCE:在源文件中有效(即源文件保留)
2.CLASS:在class文件中有效(即class保留)
3.RUNTIME:在运行时有效(即运行时保留)

Retention meta-annotation类型有唯一的value作为成员,它的取值来自java.lang.annotation.RetentionPolicy的枚举类型值。具体实例如下:

1
2
3
4
5
6
7
8
@Target(ElementType.FIELD)
@Retention(RetentionPolicy.RUNTIME)
public @interface Column {
public String name() default "fieldName";
public String setFuncName() default "setField";
public String getFuncName() default "getField";
public boolean defaultDBValue() default false;
}

Column注解的的RetentionPolicy的属性值是RUTIME,这样注解处理器可以通过反射,获取到该注解的属性值,从而去做一些运行时的逻辑处理


@Documented:

**@**Documented用于描述其它类型的annotation应该被作为被标注的程序成员的公共API,因此可以被例如javadoc此类的工具文档化。Documented是一个标记注解,没有成员。

1
2
3
4
5
6
7
8
9
@Target(ElementType.FIELD)
@Retention(RetentionPolicy.RUNTIME)
@Documented
public @interface Column {
public String name() default "fieldName";
public String setFuncName() default "setField";
public String getFuncName() default "getField";
public boolean defaultDBValue() default false;
}

@Inherited:

@Inherited 元注解是一个标记注解,@Inherited阐述了某个被标注的类型是被继承的。如果一个使用了@Inherited修饰的annotation类型被用于一个class,则这个annotation将被用于该class的子类。

注意:@Inherited annotation类型是被标注过的class的子类所继承。类并不从它所实现的接口继承annotation,方法并不从它所重载的方法继承annotation。

当@Inherited
annotation类型标注的annotation的Retention是RetentionPolicy.RUNTIME,则反射API增强了这种继承性。如果我们使用java.lang.reflect去查询一个@Inherited
annotation类型的annotation时,反射代码检查将展开工作:检查class和其父类,直到发现指定的annotation类型被发现,或者到达类继承结构的顶层。

实例代码:

1
2
3
4
5
6
7
8
9
10
11
/**
*
* @author peida
*
*/
@Inherited
public @interface Greeting {
public enum FontColor{ BULE,RED,GREEN};
String name();
FontColor fontColor() default FontColor.GREEN;
}

2、自定义注解:

简介

使用@interface自定义注解时,自动继承了java.lang.annotation.Annotation
接口,由编译程序自动完成其他细节。在定义注解时,不能继承其他的注解或接口。@interface用来声明一个注解,其中的每一个方法实际上是声明了一个配置参数。方法的名称就是参数的名称,返回值类型就是参数的类型(返回值类型只能是基本类型、Class、String、enum)。可以通过default来声明参数的默认值。

注解的的RetentionPolicy的属性值是RUTIME, 这样注解处理器可以通过反射,获取到该注解的属性值,从而去做一些运行时的逻辑处理.

定义注解格式:

1
2
3
public @interface 注解名 {
定义体
}

注解参数的可支持数据类型:

1.所有基本数据类型(int,float,boolean,byte,double,char,long,short)
2.String类型
3.Class类型
4.enum类型
5.Annotation类型
6.以上所有类型的数组

Annotation类型的参数设定:

  1. 只能用public或默认(default)这两个访问权修饰.例如,String value();这里把方法设为defaul默认类型;
  2. 参数成员只能用基本类型byte,short,char,int,long,float,double,boolean八种基本数据类型和
    String,Enum,Class,annotations等数据类型,以及这一些类型的数组.例如,String value();这里的参数成员就为String;

如果只有一个参数成员,最好把参数名称设为”value”,后加小括号.例:下面的例子FruitName注解就只有一个参数成员。

定义和使用实例:

定义:
1
2
3
4
5
6
7
8
9
10
11
12
13
14
15
16
17
18
19
20
21
22
23
24
/**
* <p>多数据源标识</p>
* <p>使用方式:必须用在方法上</p>
*
* @author maxzhao
* @date 2019-06-26 16:13
*/
@Inherited
@Retention(RetentionPolicy.RUNTIME)
@Target({ElementType.METHOD})
public @interface MultiDatabase {
String name() default "main";
/**
* 枚举
* @author peida
*
*/
public enum SourceType{ MYSQL,POSTGRESQL,ORACLE};
/**
* 属性
* @return
*/
Type sourceType() default Type.MYSQL;
}
使用:
1
2
3
4
5
6
7
8
9
10
11
12
13
14
15
16
17
18
19
20
21
public class TempServiceDemo {

@Autowired
private TempRepository tempRepository;


public String findAll() {
return "default";
}

@MultiDatabase(name = "second", sourceType = MultiDataSource.SourceType.ORACLE)
public String findAllSecond() {
return "second";
}

@MultiDatabase(name = "third", sourceType = MultiDataSource.SourceType.MYSQL)
public String findAllThird() {
return "third";
}

}

用反射机制来调用注解中的内容

1
2
3
4
5
6
7
8
9
10
11
12
13
14
15
16
17
18
19
20
21
22
23
        //获得要调用的类,一般不会这么获取
Class<TempServiceDemo> tempServiceDemoClass=TempServiceDemo.class;
// 获得要调用的方法,output是要调用的方法名字,new Class[]{}为所需要的参数。空则不是这种
Method currentMethod=null;
try{
currentMethod=tempServiceDemoClass.getMethod("findAllSecond",new Class[]{});
// 是否有类型为MyAnnotation的注解
if(currentMethod.isAnnotationPresent(MultiDatabase.class)){
// 获得注解
MultiDatabase datasource=currentMethod.getAnnotation(MultiDatabase.class);
// 调用注解的内容
System.out.println(datasource.name());
}
System.out.println("----------------------------------");
// 获得所有注解。必须是runtime类型的 @Retention(RetentionPolicy.RUNTIME)
Annotation[]annotations=currentMethod.getAnnotations();
for(Annotation annotation:annotations){
// 遍历所有注解的名字
System.out.println(annotation.annotationType().getName());
}
}catch(NoSuchMethodException e){
//错误处理
}

AOP 使用自定义注解

注解 @UserAccess

1
2
3
4
5
6

@Target({ElementType.METHOD, ElementType.TYPE})
@Retention(RetentionPolicy.RUNTIME)
public @interface UserAccess {
String desc() default "无信息";
}

AOP 中的使用

1
2
3
4
@After("@annotation(userAccess)")
public void after(JoinPoint jp,UserAccess userAccess){
log.debug("second after:"+userAccess.desc());
}
1
2
3
4
5
6
7
8
9

@RestController
public class UserController {
@RequestMapping("/second")
@UserAccess(desc = "second")
public Object second() {
return "second controller";
}
}

其它注解

@Deprecated 表明不建议使用

@JsonValue 序列化之后只返回这一个值

用在属性或者get方法上。

@JsonProperty 把当前属性名称序列化为另一个名称

当接受application/json编码格式的参数时,同样需要接收参数为this_name的参数.

但是当用表单提交时,则必须传thisName或ThisName才能接收

本文地址: SpringBoot+JPA多数据源(注解方式)

推荐
IDEA好用的插件
JAVA自定义注解

本文地址: https://github.com/maxzhao-it/blog/post/55853/

一、前言

在我写 SpringBoot JPA 通用controller 的过程中,发现可以直接使用 Entitymanager进行实体类的操作,EntityManager需要实体信息,因为第一次不熟悉EntityManager
的操作,所以要获取当前类的泛型信息,然后传入EntityManager完成通用的接口操作。

二、以Dao为例

实体接口

1
2
3
4
5
6
7
8
9
10
11
12
13
14
15

@Data
@Accessors(chain = true)
@MappedSuperclass//实体集成映射
public class BaseEntity implements Serializable {
@Id
@Column(name = "ID")
@ApiModelProperty(value = "主键")
private Long id;

@Basic
@Column(name = "DEL_STATUS")
@ApiModelProperty(value = "状态 1启用 0 停用")
private Integer delStatus;
}

实体

1
2
3
4
5
6
7
8
9
10
11
12
13
14
15
16
17
18
19
20
21
22
23
24
25
26
27
28
/**
* 应用接口日志
*
* @author author
* @date 2019-7-23 15:38:57
*/
@Accessors(chain = true)
@Data
@Entity
@Table(name = "app_log_api", schema = "", catalog = "")
@ApiModel(value = "应用接口日志", description = "应用接口日志")
public class AppLogApi extends BaseEntity implements Serializable {
private static final long serialVersionUID = -1L;

@Basic
@Column(name = "API")
@ApiModelProperty(value = "请求地址")
private String api;

@Basic
@Column(name = "API_CLASS")
@ApiModelProperty(value = "请求的类.方法")
private String apiClass;

/*****/
public AppLogApi() {
}
}

Dao接口

1
2
3
4
5
6
7
8
9
10
11
12
13
14

/**
* BaseService
*
* @author maxzhao
* @date 2019-08-15 11:46
*/
public interface BaseService<T extends BaseEntity, ID> {
/**
* 逻辑删除
**********
*/
ResultObj<String> del(ID id);
}

Dao实现

1
2
3
4
5
6
7
8
9
10
11
12
13
14
15
16
17
18
19
20
21

@Slf4j
@Service(value = "baseService")
public class BaseServiceImpl<T extends BaseEntity, ID> implements BaseService<T, ID> {
private Class<T> clazz = null;

{
Type type = this.getClass().getGenericInterfaces()[0];
if (type instanceof ParameterizedType) {
ParameterizedType pType = (ParameterizedType) type;
Type claz = pType.getActualTypeArguments()[0];
if (claz instanceof Class) {
this.clazz = (Class<T>) claz;
}
}
}

ResultObj<String> del(ID id) {
return null;
}
}
1
2
3
4
5
6
7
8
9
10
{
Type type=getClass().getGenericSuperclass();
if(type instanceof ParameterizedType){
ParameterizedType pType=(ParameterizedType)type;
Type claz=pType.getActualTypeArguments()[0];
if(claz instanceof Class){
this.clazz=(Class<T>)claz;
}
}
}

其它解读

一、Type接口
Type是所有类型的父接口,他有4个子接口和一个实现类。

Class比较常见,它表示的是原始类型。Class类的对象表示JVM中的一个类或接口。每个Java类在JVM里都表现为一个Class对象,可以通过“类名.class”、“对象.getClass()”、“Class.forName(“类名”)
”等方式获取Class对象。数组也被映射为Class对象,所有元素类型相同且维数相同的数组都共享同一个Class对象。
ParameterizedType表示的是参数化类型,例如List、Map<Integer,String>、Service这种带有泛型的类型。
ParameterizedType接口中常用的方法有3个,分别是:
(1) Type getRawType()——返回参数化类型中的原始类型,例如List的原始类型为List。
(2) Type[] getActualTypeArguments()——获取参数化类型的类型变量或是实际类型列表,例如Map<Integer,String>
的实际泛型列表是Integer和String。需要注意的是,该列表的元素类型是Type,也就是说,可能存在多重嵌套的情况。
(3) Type getOwerType()——返回的是类型所属的类型,例如存在A,其中定义了内部类InnerA,则InnerA所属的类型是A,如果是顶层类型则返回null。这种关系常见与Map<K,V>
接口与Map.Entry<K,V>接口,Map<K,V>是Map.Entry<K,V>接口的所有者。
TypeVariable表示的是类型变量,它用来反映的是JVM编译该泛型前的信息,例如List中的T就是类型变量,它在编译时需要被转换为一个具体的类型后才能正常使用。
该接口常用的方法有3个,分别是:
(1) Type[] getBounds()——获取类型变量的上边界,如果未明确声明上边界则默认为Object。例如Class中K的上边界就是Person。
(2) D getGenericDeclaration()——获取声明该类型变量的原始类型,例如Test中原始类型是Test。
(3) String getName()——获取在源码中定义的名字,上例中为K。
GenericArrayType表示的是数组类型且组成元素时ParameterizedType或TypeVariable,例如List或T[],该接口只有Type getGenericComponentType()
一个方法,它返回数组的组成元素类型。
WildcardType表示的通配符类型,例如? extends Number 和 ? super Integer。
Wildcard接口有两个方法,分别是:
(1) Type[] getUpperBounds()——返回类型变量的上边界。
(2) Type[] getLowerBounds()——返回类型变量的下边界。
二、ParameterizedType与TypeVariable的使用
1.未指定泛型参数的泛型类(例如:ArrayList
public class TypeTest {
public static void main(String[] args) {
System.out.println(“接口是否是泛型类:”+ (ArrayList.class.getGenericInterfaces()[0] instanceof ParameterizedType));
System.out.println(“泛型类的名称:”+ ArrayList.class.getGenericInterfaces()[0].getTypeName());
System.out.println(“泛型类的实现:”+ ArrayList.class.getGenericInterfaces()[0].getClass());
System.out.println(“是否是泛型参数:”+(((ParameterizedType)ArrayList.class.getGenericInterfaces()[0])
.getActualTypeArguments()[0] instanceof TypeVariable));
System.out.println(“泛型参数名称:”+((ParameterizedType)ArrayList.class.getGenericInterfaces()[0]).getActualTypeArguments()[0]
.getTypeName());
System.out.println(“泛型参数的实现:”+((ParameterizedType)ArrayList.class.getGenericInterfaces()[0]).getActualTypeArguments()[0]
.getClass());
}
}

//输出结果:
接口是否是泛型类:true
泛型类的名称:java.util.List
泛型类的实现:class sun.reflect.generics.reflectiveObjects.ParameterizedTypeImpl
是否是泛型参数:true
泛型参数名称:E
泛型参数的实现:class sun.reflect.generics.reflectiveObjects.TypeVariableImpl
1
2
3
4
5
6
7
8
9
10
11
12
13
14
15
16
17
18
在这里,我们使用的是ArrayList.class,如果使用new ArrayList().getClass(),是否得到的泛型参数就是String呢?答案是否定的,因为this.getClass()
对象是被所有的不同具体类型的ArrayList实例 共享的(例如:new ArrayList(), new ArrayList() 等),所以在字节码中类型会被擦除到上限。

2.指定泛型参数的泛型类(例如:GenericSubClass
public class GenericClass {
}

public class GenericSubClass1 extends GenericClass {
}

public class GenericSubClass2 extends GenericClass {
}

public class TypeTest {
public static void main(String[] args) {
Class clazz = GenericSubClass1.class;
//Class clazz = GenericSubClass2 .class;
//Class clazz = new GenericSubClass1().getClass();
//Class clazz = new GenericSubClass2().getClass();
System.out.println(“父类是否是泛型类:”+ (clazz.getGenericSuperclass() instanceof ParameterizedType));
System.out.println(“泛型类的名称:”+ clazz.getGenericSuperclass().getTypeName());
System.out.println(“泛型类的实现:”+ clazz.getGenericSuperclass().getClass());
System.out.println(“是否是泛型参数:”+(((ParameterizedType)clazz.getGenericSuperclass()).getActualTypeArguments()[0] instanceof
TypeVariable));
System.out.println(“泛型参数名称:”+((ParameterizedType)clazz.getGenericSuperclass()).getActualTypeArguments()[0]
.getTypeName());
System.out.println(“泛型参数的实现:”+((ParameterizedType)clazz.getGenericSuperclass()).getActualTypeArguments()[0].getClass());
}
}

//输出结果:
父类是否是泛型类:true
泛型类的名称:com.arch.test.reflect.GenericClass
泛型类的实现:class sun.reflect.generics.reflectiveObjects.ParameterizedTypeImpl
是否是泛型参数:true
泛型参数名称:String
泛型参数的实现:class sun.reflect.generics.reflectiveObjects.TypeVariableImpl

不管是使用”类.class”,还是使用”对象.getClass()”,得到的父类的泛型参数始终是String。

本文地址: https://github.com/maxzhao-it/blog/post/56235/

对于使用过Spring Boot的开发者来说,程序启动的时候输出的由字符组成的Spring符号并不陌生。这个是Spring Boot为自己设计的Banner:

1
2
3
4
5
6
7
  .   ____          _            __ _ _  
/\\ / ___'_ __ _ _(_)_ __ __ _ \ \ \ \
( ( )\___ | '_ | '_| | '_ \/ _` | \ \ \ \
\\/ ___)| |_)| | | | | || (_| | ) ) ) )
' |____| .__|_| |_|_| |_\__, | / / / /
=========|_|==============|___/=/_/_/_/
:: Spring Boot :: (v1.3.3.RELEASE)

如果有人不喜欢这个输出,本文说一下怎么修改。

1. 第一种方式:修改的时候,进行设置,在Application的main方法中:

SpringApplication application = new SpringApplication(App.class);
/*
* Banner.Mode.OFF:关闭;
* Banner.Mode.CONSOLE:控制台输出,默认方式;
* Banner.Mode.LOG:日志输出方式;
*/ application.setBannerMode(Banner.Mode.OFF);
application.run(args);

2. 第二种方式:修改banner.txt配置文件

在src/main/resouces下新建banner.txt,在文件中加入:

1
2
3
4
5
6
7
8
9
10
11
#这个是MANIFEST.MF文件中的版本号
${application.version}

#这个是上面的的版本号前面加v后上括号
${application.formatted-version}

#这个是springboot的版本号
${spring-boot.version}

#这个是springboot的版本号
${spring-boot.formatted-version}

3. 第三种方式:重写接口Banner实现

SpringBoot提供了一个接口org.springframework.boot.Banner,他的实例可以被传给SpringApplication的setBanner(banner)方法。如果你闲得不行非要着重美化这个命令行输出的话,可以重写Banner接口的printBanner方法。

4. 第四种方式:在application.properties进行配置

在application.proerpties进行banner的显示和关闭:

1
2
### 是否显示banner,可选值[true|false]
spring.main.show-banner=false

使用Spring Boot启动的jar包总是会显示一个Spring的图标:

1
2
3
4
5
6
7
.   ____          _            __ _ _
/\\ / ___'_ __ _ _(_)_ __ __ _ \ \ \ \
( ( )\___ | '_ | '_| | '_ \/ _` | \ \ \ \
\\/ ___)| |_)| | | | | || (_| | ) ) ) )
' |____| .__|_| |_|_| |_\__, | / / / /
=========|_|==============|___/=/_/_/_/
:: Spring Boot :: (v1.3.3.RELEASE)

实际上Spring Boot在这个位置,放了一个彩蛋,我们是可以自定义这个图标的。
我们可以在resource目录下面放入一个banner.txt
文件,Spring Boot启动项目的时候就会优先启动这个文件中的内容。
这里给大家推荐两个个字符画生成的网站,我们可以利用生成的字符串放入这个banner.txt
文件:

http://www.network-science.de/ascii/
http://patorjk.com/software/taag/

比如我生成一个star wars的图标:

1
2
3
4
5
6
7
8
9
10
11
12
13
     _______.___________.    ___      .______         
/ | | / \ | _ \
| (----`---| |----` / ^ \ | |_) |
\ \ | | / /_\ \ | /
.----) | | | / _____ \ | |\ \----.
|_______/ |__| /__/ \__\ | _| `._____|

____ __ ____ ___ .______ _______.
\ \ / \ / / / \ | _ \ / |
\ \/ \/ / / ^ \ | |_) | | (----`
\ / / /_\ \ | / \ \
\ /\ / / _____ \ | |\ \----.----) |
\__/ \__/ /__/ \__\ | _| `._____|_______/

这样启动的时候

img

但是仅仅是这样看起来并不好看,还不如原来的图标好看呢。实际上Spring Boot为这个彩蛋提供了不少美化功能。

Spring Boot提供了一个枚举类

1
AnsiColor

,这个类可以控制

1
banner.txt

中的字符颜色,而且非常容易使用。

比如我可以将字符设置成颜色:

1
BRIGHT_YELLOW
1
2
3
4
5
6
7
8
9
10
11
12
13
14
${AnsiColor.BRIGHT_YELLOW}
_______.___________. ___ .______
/ | | / \ | _ \
| (----`---| |----` / ^ \ | |_) |
\ \ | | / /_\ \ | /
.----) | | | / _____ \ | |\ \----.
|_______/ |__| /__/ \__\ | _| `._____|

____ __ ____ ___ .______ _______.
\ \ / \ / / / \ | _ \ / |
\ \/ \/ / / ^ \ | |_) | | (----`
\ / / /_\ \ | / \ \
\ /\ / / _____ \ | |\ \----.----) |
\__/ \__/ /__/ \__\ | _| `._____|_______/

再重新启动项目,启动界面就会变成这个样子:

img

类似 ${AnsiColor.BRIGHT_YELLOW} 这种表达式,其实可以放置多个,启动界面上的颜色,总是会根据AnsiColor 的设置改变界面的颜色,这样启动的界面就会显示多种不同的颜色了。

除了这样美化的功能之外,启动界面很重要的功能就是要告诉我们这个项目的一些重要信息。

1
2
3
4
`${application.version}` 这个是`MANIFEST.MF`文件中的版本号
`${application.formatted-version}` 这个是上面的的版本号前面加v后上括号
` ${spring-boot.version}` 这个是springboot的版本号
`${spring-boot.formatted-version}`同上

把以上信息通过${} 放入banner.txt中,就会打印出项目对应的信息。
这里放一个完整的demo:

1
2
3
4
5
6
7
8
9
10
${AnsiColor.BRIGHT_YELLOW}
_______.___________. ___ .______ ____ __ ____ ___ .______ _______.
/ | | / \ | _ \ \ \ / \ / / / \ | _ \ / |
| (----`---| |----` / ^ \ | |_) | \ \/ \/ / / ^ \ | |_) | | (----`
\ \ | | / /_\ \ | / \ / / /_\ \ | / \ \
.----) | | | / _____ \ | |\ \----. \ /\ / / _____ \ | |\ \----.----) |
|_______/ |__| /__/ \__\ | _| `._____| \__/ \__/ /__/ \__\ | _| `._____|_______/

${AnsiColor.BRIGHT_BLUE}
::: Project (version:${application.version}) ::: \(^O^)/ Spring-Boot ${spring-boot.version}

启动就会是这一个样子:

img

如果颜色没有变,那么还需要设置:spring.output.ansi.enabled=ALWAYS


在2018年的最后一天,借用Spring Boot的Banner向各位程序猿同仁们问候一声:Happy New Year

img


接下来我们就来介绍一下这个轻松愉快的自定义banner功能。实现的方式非常简单,我们只需要在Spring Boot工程的/src/main/resources 目录下创建一个banner.txt 文件,然后将ASCII字符画复制进去,就能替换默认的banner了。
比如上图中的输出,就采用了下面的banner.txt 内容:

1
2
3
4
5
6
7
8
9
10
11
${AnsiColor.BRIGHT_GREEN}
## ## ### ######## ######## ## ## ## ## ######## ## ## ## ## ######## ### ########
## ## ## ## ## ## ## ## ## ## ### ## ## ## ## ## ## ## ## ## ## ## ##
## ## ## ## ## ## ## ## #### #### ## ## ## ## ## #### ## ## ## ## ##
######### ## ## ######## ######## ## ## ## ## ###### ## ## ## ## ###### ## ## ########
## ## ######### ## ## ## ## #### ## ## ## ## ## ## ######### ## ##
## ## ## ## ## ## ## ## ### ## ## ## ## ## ## ## ## ## ##
## ## ## ## ## ## ## ## ## ######## ### ### ## ######## ## ## ## ##
${AnsiColor.BRIGHT_RED}
Application Version: ${application.version}${application.formatted-version}
Spring Boot Version: ${spring-boot.version}${spring-boot.formatted-version}

从上面的内容中可以看到,还使用了一些属性设置:

1
2
3
4
5
`${AnsiColor.BRIGHT_RED}` :设置控制台中输出内容的颜色
`${application.version}` :用来获取`MANIFEST.MF` 文件中的版本号
`${application.formatted-version}` :格式化后的`${application.version}` 版本信息
`${spring-boot.version}` :Spring Boot的版本号
`${spring-boot.formatted-version}` :格式化后的`${spring-boot.version}` 版本信息

生成工具

如果让我们手工的来编辑这些字符画,显然是一件非常困难的差事。所以,我们可以借助下面这些工具,轻松地根据文字或图片来生成用于Banner输出的字符画。

http://patorjk.com/software/taag
http://www.network-science.de/ascii/
http://www.degraeve.com/img2txt.php

作者:蝉鸣的雨

链接:https://www.jianshu.com/p/bfbcabc4af1d

来源:简书

简书著作权归作者所有,任何形式的转载都请联系作者获得授权并注明出处。

本文地址: https://github.com/maxzhao-it/blog/post/18026/

下面介绍的开发环境为 postgresql 10.4 ;

初始操作参考官方文档.

遇到的问题

1.数据库编码

默认的编码不是 UTF-8 如果有需要

1
2
create
database encoding 'UTF8' template = owner to users;

2.分布列

MPP 在表结构中, 有一个分布列的概念, 默认为主键, 否为为当前表的第一个字段.

如果没有主键的表, 可以指定分布列.

数据存储方式为 行存储.

备份的表结构中会有特殊 SQL参数, 不一定能还原到开发环境.

解决方法:

  1. 单独备份表结构与数据
  2. 对结构进行修改, 还原表结构
  3. 还原数据

3.数据存储长度

在我们开发环境中, varchar(4) 是可以存储 4个汉字的, 但是在MPP中, 根据官方文档介绍, 只能存1汉字.

也就是说, 在开发库还原到线上之前, 需要对数据的长度进行一次处理.

可以根据下面的系统表查询出所需要修改的字段, 进行统一修改:

1
2
3
4
select table_name, column_name, data_type, character_maximum_length
from infomation_schema.columns
where table_schema = 'schema_name'
and data_type in ('character', 'character varying');

4.数据类型

判断条件中的 flag=true 是错误的.

本文地址: https://github.com/maxzhao-it/blog/post/51475/

一、前言

  由于项目中的表结构有很多复用的字段,比如创建时间、删除状态、主键等等,也是为个数据设计规范,我们把项目中的 实体(entity)默认都是继承一个父类(包含这些公共的属性)。

  所以我们这里要简单的实现这个父类。

  在项目中一般没有物理删除,为了实现逻辑删除,一般会自己实现RepositoryFactoryBean 和 Repository。但是由于多个团队开发,表的结构没有统一,会出现有的表没有基础父类对应的字段,这样就会导致自定义的 jpa repository 操作这些表就会出错。
  @MappedSuperclass 注解是重点!

二、通用父类

通用主键和逻辑删除状态

1
2
3
4
5
6
7
8
9
10
11
12
13
14
15
16
17
18
19
20
21
22
/**
* BaseEntity
* 实体继承映射类基础,保存实体的通用属性
*
* @author maxzhao
* @date 2019-08-15 09:39
*/
@Data
@Accessors(chain = true)
@MappedSuperclass//实体继承映射
public class BaseEntity implements Serializable {
@Id
@Column(name = "ID")
@ApiModelProperty(value = "主键")
private Long id;

@Basic
@Column(name = "DEL_STATUS")
@ApiModelProperty(value = "状态 1启用 0 停用")
private Integer delStatus;
}

  只要是实体继承当前类,就可以实现通用的主键和逻辑删除状态了。

  当然了,我们还可以继续继承,进行实体规范。

通用创建、修改信息

1
2
3
4
5
6
7
8
9
10
11
12
13
14
15
16
17
18
19
20
21
22
23
24
25
26
27
28
29
30
31
32
33
34
35
36
37
38
39
40
41
42
/**
* BaseEntityId
* 实体集成映射类,保存实体的通用属性
*
* @author maxzhao
* @date 2019-08-15 09:39
*/
@Data
@Accessors(chain = true)
@MappedSuperclass//实体集成映射
public class BaseEntityId extends BaseEntity {
@Basic
@Column(name = "CREATE_ID")
@ApiModelProperty(value = "创建人主键")
private Long createId;

@Basic
@Column(name = "CREATE_IP")
@ApiModelProperty(value = "创建IP")
private String createIp;


@Basic
@Column(name = "CREATE_DATE")
@ApiModelProperty(value = "创建时间")
private Timestamp createDate;

@Basic
@Column(name = "UPDATE_DATE")
@ApiModelProperty(value = "修改时间")
private Timestamp updateDate;

@Basic
@Column(name = "UPDATE_ID")
@ApiModelProperty(value = "修改人主键")
private Long updateId;

@Basic
@Column(name = "UPDATE_IP")
@ApiModelProperty(value = "修改IP")
private String updateIp;
}

  自此,通用实体属性规范父类就完成了,我们还可以定义主键策略和验证,这里就不列举了。

本文地址: SpringBoot Jpa实体继承通用属性

推荐
IDEA好用的插件
JAVA自定义注解

本文地址: https://github.com/maxzhao-it/blog/post/30217/

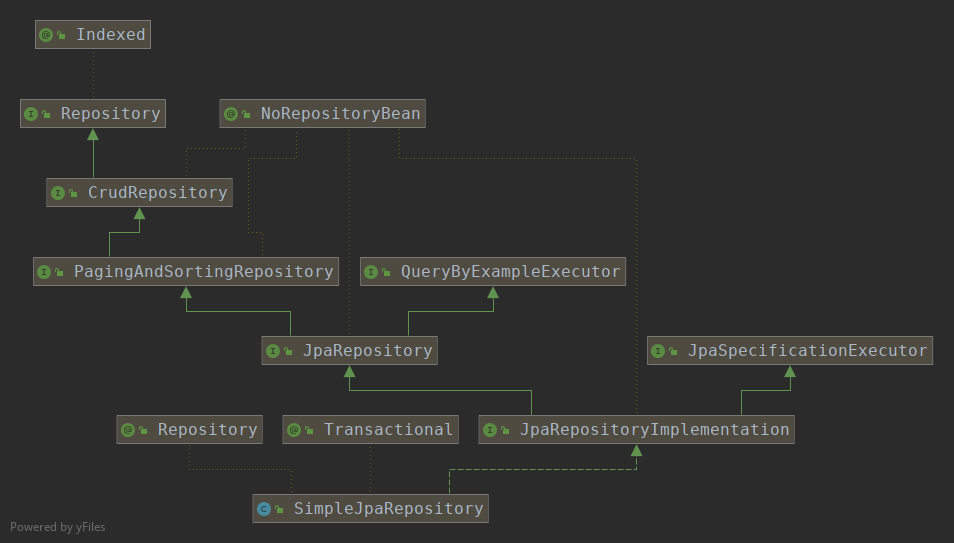
SimpleJpaRepository

  先看结构SimpleJpaRepository_Diagram

  • SimpleJpaRepository实现了JpaRepositoryImplementation接口,它是CrudRepository的默认实现;
  • SimpleJpaRepository的构造方法都包含EntityManager,从这里可以看出来,SimpleJpaRepository是通过EntityManager实现具体功能的。
  • SimpleJpaRepository代码太长就不贴出来了,比较值得注意的地方是:类上注解了@Transactional(readOnly = true)delete*、save*、flush 等都添加了@Transactional注解。
  • 对于查询功能很多都借助了applySpecificationToCriteria方法,将spring data的Specification转换为javax.persistence的CriteriaQuery
  • 正常 JPA 继承JpsRepository接口,此接口继承的PagingAndSortingRepository有分页和排序。自定义repository时,就需要对JpsRepositoryCrudRepository有所选择。

JpaRepositoryFactory

简单介绍了一下SimpleJpaRepository就不得不说JpaRepositoryFactory,这才是基础。

先看关系:

JpaRepositoryFactoryBean_Diagram

  • JpaRepositoryFactorygetTargetRepository会根据RepositoryInformation创建JpaRepositoryImplementation,这里默认创建的是SimpleJpaRepository实例
  • RepositoryFactorySupportgetRepository 方法在调用子类的 getTargetRepository 创建SimpleJpaRepository 实例之后,会对其进行proxy,设置其接口为用户定义的dao接口、Repository、TransactionalProxy,并添加了SurroundingTransactionDetectorMethodInterceptor、DefaultMethodInvokingMethodInterceptor、QueryExecutorMethodInterceptor、ImplementationMethodExecutionInterceptorMethodInterceptor,最后生成最终的实现类

本文地址: https://github.com/maxzhao-it/blog/post/22565/

First

  • 项目中经常会遇到使用多个数据源的情况。
  • 这里是基于 JPA 来配置多个数据源。
  • 使用了 注解 + AOP 的方式实现。
  • 如果多个数据源的表结构大不相同,不推荐使用,会产生冗余空表。
  • 上面问题也可以通过分包扫描实现
  • 上上面问题也可以通过 EntityManager(doc) 实现(操作类似于JpaRepository,并且没有实体映射数据库的操作)。
  • 上上上面那问题,在分包扫描方式中,对于不同数据库的相同表用注解实现跨数据库访问很方便。
  • 基于 MySql 8.x
  • alibaba Druid pool

优点

  • 注解+AOP 简化切换工作
  • 配置多数据源简单

缺点

  • 不能简单的跟据参数动态切换数据源,也就是说,启动打那一刻,该方法执行连接的数据源就确定了。
  • 如果其它数据源的表在主数据源中没有,则会自动在主数据源中添加。需要另外添加解决方案(扫描包的方式配置数据源)。这是JPA在初始化 Table Bean 的时候,必须要映射到对应数据库中的 Table。

构建

添加依赖

1
2
3
4
5
6
7
8
9
10
11
12
13
14
15
<dependency>
<groupId>org.springframework.boot</groupId>
<artifactId>spring-boot-starter-data-jpa</artifactId>
</dependency>
<dependency>
<groupId>mysql</groupId>
<artifactId>mysql-connector-java</artifactId>
<scope>runtime</scope>
</dependency>
<dependency>
<groupId>com.alibaba</groupId>
<artifactId>druid-spring-boot-starter</artifactId>
<version>1.1.16</version>
</dependency>
<!--使用啦Lombok插件,需要自己添加 其它需要自己添加了-->

配置文件

1
2
3
4
5
6
7
8
9
10
11
12
13
14
15
16
17
18
19
20
21
22
23
24
25
26
27
28
29
30
31
32
33
34
35
36
37
38
39
40
41
42
spring:
datasource:
driverClassName: com.mysql.cj.jdbc.Driver
url: jdbc:mysql://127.0.0.1:3306/maxzhao_ittest?charset=utf8mb4&useSSL=false
username: maxzhao
password: maxzhao
main:
allow-bean-definition-overriding: true

jpa:
database: MYSQL
database-plinatform: org.hibernate.dialect.MySQL5InnoDBDialect
show-sql: true
generate-ddl: true
open-in-view: false

hibernate:
ddl-auto: update
# naming-strategy: org.hibernate.cfg.ImprovedNamingStrategy
properties:
#不加此配置,获取不到当前currentsession
hibernate:
current_session_context_class: org.springframework.orm.hibernate5.SpringSessionContext
dialect: org.hibernate.dialect.MySQL5Dialect
# 多数据源配置
gt:
maxzhao:
boot:
#主动开启多数据源
multiDatasourceOpen: true
datasource[0]:
dbName: second
driverClassName: com.mysql.cj.jdbc.Driver
url: jdbc:mysql://127.0.0.1:3306/pos?charset=utf8mb4&useSSL=false
username: maxzhao
password: maxzhao
datasource[1]:
dbName: third
driverClassName: com.mysql.cj.jdbc.Driver
url: jdbc:mysql://127.0.0.1:3306/biz?charset=utf8mb4&useSSL=false
username: maxzhao
password: maxzhao

添加注解类

1
2
3
4
5
6
7
8
9
10
11
12
13
14
15
16
17
package gt.maxzhao.boot.common.annotation;

import java.lang.annotation.*;

/**
* <p>多数据源标识</p>
* <p>使用方式:必须用在方法上</p>
*
* @author maxzhao
* @date 2019-06-26 16:13
*/
@Inherited
@Retention(RetentionPolicy.RUNTIME)
@Target({ElementType.METHOD})
public @interface MultiDataSource {
String name() default "main";
}

数据源配置映射 yml配置类

1
2
3
4
5
6
7
8
9
10
11
12
13
14
15
16
17
18
19
20
21
22
23
24
25
26
27
28
29
30
31
32
33
34
35
36
37
38
39
40
41
42
43
44
45
46
47
48
49
50
51
52
53
54
55
56
57
58
59
60
61
62
63
64
65
66
67
68
69
70
71
72
73
74
75
76
77
78
79
80
81
82
83
84
85
86
87
88
89
90
91
92
93
94
95
96
97
98
99
100
101
102
103
104
105
106
107
108
109
110
/**
* <p>多数据源配置</p>
* <p>数据库数据源配置</p>
* <p>说明:这个类中包含了许多默认配置,建议不要修改本类,直接在"application.yml"中配置即可</p>
*
* @author maxzhao
* @date 2019-06-26 16:13
*/
@Component
@ConfigurationProperties(prefix = "spring.datasource")
@Setter
@Getter
@Slf4j
public class DruidProperties {
public DruidProperties() {
log.info("default 数据源加载");
}

/**
* 数据源名称
*/
private String dbName = "main";

private String url;

private String username;

private String password;
/**
* 默认为 MYSQL 8.x 配置
*/
private String driverClassName = "com.mysql.cj.jdbc.Driver";

private Integer initialSize = 10;

private Integer minIdle = 3;

private Integer maxActive = 60;

private Integer maxWait = 60000;

private Boolean removeAbandoned = true;

private Integer removeAbandonedTimeout = 180;

private Integer timeBetweenEvictionRunsMillis = 60000;

private Integer minEvictableIdleTimeMillis = 300000;

private String validationQuery = "SELECT 'x'";

private Boolean testWhileIdle = true;

private Boolean testOnBorrow = false;

private Boolean testOnReturn = false;

private Boolean poolPreparedStatements = true;

private Integer maxPoolPreparedStatementPerConnectionSize = 50;

private String filters = "stat";

public DruidDataSource config() {
DruidDataSource dataSource = new DruidDataSource();
return config(dataSource);
}

public DruidDataSource config(DruidDataSource dataSource) {
dataSource.setDbType(JdbcConstants.MYSQL);
dataSource.setUrl(url);
dataSource.setUsername(username);
dataSource.setPassword(password);
dataSource.setDriverClassName(driverClassName);
dataSource.setInitialSize(initialSize); // 定义初始连接数
dataSource.setMinIdle(minIdle); // 最小空闲
dataSource.setMaxActive(maxActive); // 定义最大连接数
dataSource.setMaxWait(maxWait); // 获取连接等待超时的时间
dataSource.setRemoveAbandoned(removeAbandoned); // 超过时间限制是否回收
dataSource.setRemoveAbandonedTimeout(removeAbandonedTimeout); // 超过时间限制多长

// 配置间隔多久才进行一次检测,检测需要关闭的空闲连接,单位是毫秒
dataSource.setTimeBetweenEvictionRunsMillis(timeBetweenEvictionRunsMillis);
// 配置一个连接在池中最小生存的时间,单位是毫秒
dataSource.setMinEvictableIdleTimeMillis(minEvictableIdleTimeMillis);
// 用来检测连接是否有效的sql,要求是一个查询语句
dataSource.setValidationQuery(validationQuery);
// 申请连接的时候检测
dataSource.setTestWhileIdle(testWhileIdle);
// 申请连接时执行validationQuery检测连接是否有效,配置为true会降低性能
dataSource.setTestOnBorrow(testOnBorrow);
// 归还连接时执行validationQuery检测连接是否有效,配置为true会降低性能
dataSource.setTestOnReturn(testOnReturn);
// 打开PSCache,并且指定每个连接上PSCache的大小
dataSource.setPoolPreparedStatements(poolPreparedStatements);
dataSource.setMaxPoolPreparedStatementPerConnectionSize(maxPoolPreparedStatementPerConnectionSize);
// 属性类型是字符串,通过别名的方式配置扩展插件,常用的插件有:
// 监控统计用的filter:stat
// 日志用的filter:log4j
// 防御SQL注入的filter:wall
try {
dataSource.setFilters(filters);
} catch (SQLException e) {
log.error("扩展插件失败.{}", e.getMessage());
}
return dataSource;
}

}

多数据源配置映射 yml配置类

1
2
3
4
5
6
7
8
9
10
11
12
13
14
15
16
17
18
19
20
21
22
/**
* <p>多数据源配置</p>
* <p>多个数据源</p>
*
* @author maxzhao
* @date 2019-06-26 16:22
*/
@Configuration
@ConfigurationProperties(prefix = "gt.maxzhao.boot")
@Getter
@Setter
@Slf4j
public class MultiDataSource {
public MultiDataSource() {
log.info("加载多数据源配置信息 --> {}", "gt.maxzhao.boot.datasource");
}
/**
* 多个数据源
*/
private List<DruidProperties> datasource;
}

多数据源配置类

这里需要配置动态开启多数据源,如果不主动开启,配置了注解也不会生效。

这里也做了一个不必要的处理,如果多数据源中有处理失败或名称填写错误,默认使用主数据源。

1
2
3
4
5
6
7
8
9
10
11
12
13
14
15
16
17
18
19
20
21
22
23
24
25
26
27
28
29
30
31
32
33
34
35
36
37
38
39
40
41
42
43
44
45
46
47
48
49
50
51
52
53
54
55
56
57
58
59
60
61
62
63
64
65
66
67
68
69
70
71
72
/**
* <p>多数据源配置</p>
* <p>多数据源配置</p>
*
* @author maxzhao
* @date 2019-06-26 16:07
*/
@Slf4j
@Component
public class MultiSourceConfig {
@Autowired
private DruidProperties druidProperties;

@Autowired
private MultiDataSource multiDataSource;


/**
* 单数据源连接池配置
*/
@Bean
@ConditionalOnProperty(name = "gt.maxzhao.boot.multiDatasourceOpen", havingValue = "false")
public DruidDataSource singleDatasource() {
log.error("singleDatasource");
return druidProperties.config(new DruidDataSource());
}

/**
* 多数据源连接池配置
*/
@Bean
@ConditionalOnProperty(name = "gt.maxzhao.boot.multiDatasourceOpen", havingValue = "true")
public DynamicDataSource mutiDataSource() {
log.error("mutiDataSource");

//存储数据源别名与数据源的映射
HashMap<Object, Object> dbNameMap = new HashMap<>();
// 核心数据源
DruidDataSource mainDataSource = druidProperties.config();
// 这里添加 主要数据库,其它数据库挂了,默认使用主数据库
dbNameMap.put("main", mainDataSource);
// 其它数据源
// 当前多数据源是否存在
if (multiDataSource.getDatasource() != null) {
//过滤掉没有添加 dbName 的数据源,先加载娟全局配置,再次加载当前配置
List<DruidDataSource> multiDataSourceList = multiDataSource.getDatasource().stream()
.filter(dp -> !"".equals(Optional.ofNullable(dp.getDbName()).orElse("")))
.map(dp -> {
DruidDataSource druidDataSource = dp.config(druidProperties.config());
dbNameMap.put(dp.getDbName(), druidDataSource);
return druidDataSource;
})
.collect(Collectors.toList());

// 测试所有的数据源
try {
mainDataSource.init();
for (DruidDataSource druidDataSource : multiDataSourceList) {
druidDataSource.init();
}
} catch (SQLException sql) {
log.error("======================= 多数据源配置错误 ==========================");
sql.printStackTrace();
}
}
DynamicDataSource dynamicDataSource = new DynamicDataSource();
dynamicDataSource.setTargetDataSources(dbNameMap);
dynamicDataSource.setDefaultTargetDataSource(mainDataSource);
return dynamicDataSource;
}

}

DataSource 的 router

1
2
3
4
5
6
7
8
9
10
11
12
13
14
15
16
17
18
19
20
21
22
23
24
25
26
27
28
29
30
31
32
33
34
35
36
37
38
39
40
41
42
43
44
45
46
47
/**
* <p>多数据源配置</p>
* <p>动态数据源</p>
* <p>多 datasource 的上下文</p>
*
* @author xiongneng
* @since 2017年3月5日 上午9:11:49
*/
public class DynamicDataSource extends AbstractRoutingDataSource {
/**
* <p>多 datasource 的上下文</p>
* <p>每个线程独立的数据库连接名称</p>
*/
private static final ThreadLocal<String> contextHolder = new ThreadLocal<String>();

/**
* @param dataSourceDbName 数据库别名
* @Description: 设置数据源别名
*/
public static void setDataSourceDbName(String dataSourceDbName) {
contextHolder.set(dataSourceDbName);
}

/**
* @Description: 获取数据源别名
*/
public static String getDataSourceDbName() {
return contextHolder.get();
}

/**
* @Description: 清除数据源别名
*/
public static void clearDataSourceDbName() {
contextHolder.remove();
}

/**
* 重写获取连接名称的方法
* @return 连接名称
*/
@Override
protected Object determineCurrentLookupKey() {
return getDataSourceDbName();
}

}

AOP配置

切点是自定义注解的包路径

1
2
3
4
5
6
7
8
9
10
11
12
13
14
15
16
17
18
19
20
21
22
23
24
25
26
27
28
29
30
31
32
33
34
35
36
37
38
39
40
41
42
43
44
45
46
47
48
49
50
51
52
53
54
55
56
57
/**
* <p>多数据源切换的 aop</p>
*
* @author maxzhao
* @date 2019-06-26 16:22
*/
@Aspect
@Component
@ConditionalOnProperty(prefix = "gt.maxzhao.boot", name = "multiDatasourceOpen", havingValue = "true")
public class MultiDataSourceAop implements Ordered {
private Logger log = LoggerFactory.getLogger(this.getClass());

public MultiDataSourceAop() {
log.info("多数据源初始化 AOP ");
}

@Pointcut(value = "@annotation(gt.maxzhao.boot.common.annotation.MultiDataSource)")
private void cut() {
}

@Around("cut()")
public Object around(ProceedingJoinPoint point) throws Throwable {

Signature signature = point.getSignature();
MethodSignature methodSignature ;
if (!(signature instanceof MethodSignature)) {
throw new IllegalArgumentException("该注解只能用于方法");
}
methodSignature = (MethodSignature) signature;
//获取当点方法的注解
Object target = point.getTarget();
Method currentMethod = target.getClass().getMethod(methodSignature.getName(), methodSignature.getParameterTypes());

MultiDataSource datasource = currentMethod.getAnnotation(MultiDataSource.class);
if (datasource != null) {
DynamicDataSource.setDataSourceDbName(datasource.name());
log.debug("设置数据源为:" + datasource.name());
} else {
DynamicDataSource.setDataSourceDbName("main");
log.debug("设置数据源为:默认 --> main");
}
try {
return point.proceed();
} finally {
log.debug("清空数据源信息!");
DynamicDataSource.clearDataSourceDbName();
}
}

/**
* aop的顺序要早于spring的事务
*/
@Override
public int getOrder() {
return 1;
}
}

到这里构建结束

测试

model

1
2
3
4
5
6
7
8
9
10
11
12
13
14
15
16
@Accessors(chain = true)
@Data
@Entity
@Table(name = "temp", schema = "", catalog = "")
public class Temp implements Serializable {
private static final long serialVersionUID = -1L;

@Id
@Column(name = "ID",unique = true)
@ApiModelProperty(value = "主键")
private Long id;
@Basic
@Column(name = "NAME")
@ApiModelProperty(value = "地区名称")
private String name;
}

service

1
2
3
4
5
6
7
8
9
10
11
12
13
14
15
16
17
18
19
20
21
22
@Service
@Transactional
public class TempServiceDemo {

@Autowired
private TempRepository tempRepository;


public List<Temp> findAll() {
return tempRepository.findAll();
}

@MultiDataSource(name = "second")
public List<Temp> findAllSecond() {
return tempRepository.findAll();
}

@MultiDataSource(name = "third")
public List<Temp> findAllThird() {
return tempRepository.findAll();
}
}

dao

1
2
3
@Repository("tempRepository")
public interface TempRepository extends JpaRepository<Temp, Long> {
}

Test

1
2
3
4
5
6
7
8
9
10
11
12
13
14
15
16
17
18
19
20
@RunWith(SpringRunner.class )
// 这里的 BasicApplication 是当前SpringBoot的启动类
@SpringBootTest(classes = BasicApplication.class)
@Slf4j
public class MultiDataSourceTest {
@Resource
private TempServiceDemo tempServiceDemo;

@Autowired
private MultiDataSource multiDataSource;

@Test
public void testMultiDataSource() {
System.out.println("\r\n=================\r\n");
System.out.println(tempServiceDemo.findAllSecond());
System.out.println("\r\n=================\r\n");
System.out.println( tempServiceDemo.findAllThird());
System.out.println("\r\n=================\r\n");
}
}

EntityManager(doc) 方式

引入:

1
2
@Autowired
private EntityManager entityManager

使用:

后续更新。

本文地址: SpringBoot+JPA多数据源(注解方式)

gitee

推荐
IDEA好用的插件
JAVA自定义注解

本文地址: https://github.com/maxzhao-it/blog/post/40131/

前言

由于版本原因,SpringBoot2.0整合Redis和低版本的SpringBoot不太一样,此方案基于Srping Boot 2.x

Linux下Redis安装

整合

maven 依赖

1
2
3
4
5
6
7
8
9
<dependency>
<groupId>org.springframework.boot</groupId>
<artifactId>spring-boot-starter-data-redis</artifactId>
</dependency>
<!-- 下面的不用加,用于分布式共享session的配置 -->
<dependency>
<groupId>org.springframework.session</groupId>
<artifactId>spring-session-data-redis</artifactId>
</dependency>

分布式共享session参考:参考

配置文件application.properties

1
2
3
4
5
6
7
8
9
10
11
12
13
14
# Redis 数据库索引
spring.redis.host=127.0.0.1
spring.redis.port=6379
spring.redis.password=maxzhao
# 连接池最大连接数
spring.redis.jedis.pool.max-active=1000
# 连接池最大阻塞等待时间,负值没有限制
spring.redis.jedis.pool.max-wait=-1
# 连接池中最大空闲连接
spring.redis.jedis.pool.max-idle=10
# 连接池中的最小空闲连接
spring.redis.jedis.pool.min-idle=2
# 超时时间 毫秒
spring.redis.timeout=1000

对应的配置类:org.springframework.boot.autoconfigure.data.redis.RedisProperties

Jedis 与 Lettuce 两种连接方式

  • defautl : 默认,0配置 ,也就是走的是 lettuce 单通道方式。 端口:8081
  • jedis : 使用Jedis 连接池。 端口:8082
  • lettue: lettuce 连接池方式。 端口:8083
  1. 使用jedis:当多线程使用同一个连接时,是线程不安全的。所以要使用连接池,为每个jedis实例分配一个连接。
  2. 使用Lettuce:当多线程使用同一连接实例时,是线程安全的。

注入

1
2
3
4
5
6
@Autowired
private RedisTemplate redisTemplate;
@Autowired
private StringRedisTemplate stringRedisTemplate;
// StringRedisTemplate是继承RedisTemplate的,
// RedisTemplate在StringRedisTemplate中泛型定义为String

StringRedisTemplate 源码

1
2
3
4
5
6
7
8
9
10
11
12
13
14
15
16
17
18
public class StringRedisTemplate extends RedisTemplate<String, String> {
public StringRedisTemplate() {
this.setKeySerializer(RedisSerializer.string());
this.setValueSerializer(RedisSerializer.string());
this.setHashKeySerializer(RedisSerializer.string());
this.setHashValueSerializer(RedisSerializer.string());
}

public StringRedisTemplate(RedisConnectionFactory connectionFactory) {
this();
this.setConnectionFactory(connectionFactory);
this.afterPropertiesSet();
}

protected RedisConnection preProcessConnection(RedisConnection connection, boolean existingConnection) {
return new DefaultStringRedisConnection(connection);
}
}

StringRedisTemplate 测试

这里用的是Springboot Test

1
2
3
4
5
6
7
8
9
10
11
12
13
14
15
16
17
18
19
20
21
22
23
24
25
26
27
28
29
30
31
32
33
34
35
36
37
38
39
40
41
42
43
44
45
46
47
48
49
50
51
52
53
54
55
56
57
58
59
60
61
62
63
64
65
66
67
68
69
70
71
72
73
74
75
76
77
78
79
80
81
82
@RunWith(SpringRunner.class)
@SpringBootTest(classes = IttestApplication.class)
public class RedisTest {


@Autowired
private RedisTemplate redisTemplate;
@Autowired
private StringRedisTemplate stringRedisTemplate;

@Test
public void testRedisTemplate() {
String prefix = "maxzhao:redisTemplate:";
HashOperations hashOperations = redisTemplate.opsForHash();
ValueOperations valueOps = redisTemplate.opsForValue();
ListOperations listOps = redisTemplate.opsForList();
SetOperations setOps = redisTemplate.opsForSet();
ZSetOperations zSetOps = redisTemplate.opsForZSet();
GeoOperations geoOperations = redisTemplate.opsForGeo();
ClusterOperations clusterOperations = redisTemplate.opsForCluster();
Map map = Arrays.stream(new String[]{"a", "B"}).collect(Collectors.toMap(Function.identity(), Function.identity()));
hashOperations.putAll(prefix + "hash", map);
}

@Test
public void testStringRedisTemplate() {
String prefix = "maxzhao:stringRedisTemplate:";
HashOperations hashOperations = stringRedisTemplate.opsForHash();
hashOperations.putAll(prefix + "hash", Arrays.stream(new String[]{"a", "b"}).collect(Collectors.toMap(Function.identity(), Function.identity())));
hashOperations.putAll(prefix + "hash", Arrays.stream(new String[]{"c", "d"}).collect(Collectors.toMap(Function.identity(), Function.identity())));
hashOperations.putAll(prefix + "hash", Arrays.stream(new String[]{"e", "f"}).collect(Collectors.toMap(Function.identity(), Function.identity())));
hashOperations.put(prefix + "hash", "max", "maxvalue");// a b c d e f max
hashOperations.get(prefix + "hash", "max");// maxvalue
hashOperations.delete(prefix + "hash", "f");// return 1 database:a b c d e max
hashOperations.delete(prefix + "hash", "c", "d");// return 2 database:a b e max
hashOperations.hasKey(prefix + "hash", "max");//return true
hashOperations.values(prefix + "hash");// return map object
ValueOperations valueOperations = stringRedisTemplate.opsForValue();
valueOperations.set(prefix + "value", "value");
valueOperations.set(prefix + "value", "valueTest");//value 被覆盖
valueOperations.get(prefix + "value");// return valueTest

ListOperations listOps = stringRedisTemplate.opsForList();
// listOps.remove(prefix + "list", listOps.size(prefix + "list"), 1);
listOps.leftPush(prefix + "list", "A");
listOps.leftPush(prefix + "list", "B");
listOps.rightPush(prefix + "list", "C", "D");//只有 1:B 2:A
listOps.leftPush(prefix + "list", "C");
listOps.leftPush(prefix + "list", "D");//return 3 1:D 2:C 3:A
listOps.range(prefix + "list", 0, listOps.size(prefix + "list"));//return 3 0:D 1:C 2:A list下标从0开始
listOps.leftPop(prefix + "list");//只有 1:A 返回的为B
listOps.leftPush(prefix + "list2", "A");
listOps.leftPush(prefix + "list2", "B");//只有 1:B 2:A
listOps.rightPush(prefix + "list2", "C");//只有 1:B 2:A 3 C

// set 是无序的,所有pop等获取value的操作,得到结果可能不同
SetOperations setOps = stringRedisTemplate.opsForSet();
setOps.add(prefix + "set", "A");//return 1
setOps.add(prefix + "set", "A");//return 0
setOps.add(prefix + "set", "B");//return 1
setOps.difference(prefix + "set", "A");//return HashSet A,B
setOps.isMember(prefix + "set", "A");//return true
setOps.isMember(prefix + "set", "C");//return false
setOps.members(prefix + "set");//return HashSet A,B
setOps.pop(prefix + "set");// 出序列并删除 1个
setOps.add(prefix + "set", "A","B", "C", "D", "E");//return 5
setOps.pop(prefix + "set", 2);// 出序列并删除 2个
setOps.add(prefix + "set", "A","B", "C", "D", "E");
setOps.move(prefix + "set", "D", "A");//return true database=BCE
// 把当前key=set的c值,move到 key=set1
setOps.move(prefix + "set", "C", prefix + "set1");//return true
setOps.remove(prefix + "set", "C", "D");//删除
// 有序的set
ZSetOperations zSetOps = stringRedisTemplate.opsForZSet();

GeoOperations geoOperations = stringRedisTemplate.opsForGeo();
// 只有jedis 和 lettuce 支持Redis Cluster。
ClusterOperations clusterOperations = stringRedisTemplate.opsForCluster();
System.out.println("====================");
}
}

Redis Cluster

Enabling Redis Cluster

集群的支持是基于非集群通讯构建的。RedisClusterConnection 是RedisConnection 的一个扩展,用来处理和Redis Cluster的通讯,转换错误信息到Spring DAO异常层。RedisClusterConnection 是通过RedisConnectionFactory 创建的,该工程的创建要依据于RedisClusterConfiguration配置。

Example 1. Sample RedisConnectionFactory Configuration for Redis Cluster

1
2
3
4
5
6
7
8
9
10
11
12
13
14
15
16
17
18
19
20
21
22
23
24
25
26
27
28
29
30
31
32
33
34
35
36
37
38
39
@Component
@ConfigurationProperties(prefix = "spring.redis.cluster")
public class ClusterConfigurationProperties {

/*
* spring.redis.cluster.nodes[0] = 127.0.0.1:7379
* spring.redis.cluster.nodes[1] = 127.0.0.1:7380
* ...
*/
List<String> nodes;

/**
* Get initial collection of known cluster nodes in format {@code host:port}.
*
* @return
*/
public List<String> getNodes() {
return nodes;
}

public void setNodes(List<String> nodes) {
this.nodes = nodes;
}
}

@Configuration
public class AppConfig {

/**
* Type safe representation of application.properties
*/
@Autowired ClusterConfigurationProperties clusterProperties;

public @Bean RedisConnectionFactory connectionFactory() {

return new JedisConnectionFactory(
new RedisClusterConfiguration(clusterProperties.getNodes()));
}
}

通过配置文件配置:

1
2
3
# 这个初始化的配置为驱动库指定了一组初始化集群节点。集群可以在线修改配置,但修改结果只会保存在本驱动的内存中,不会写入到配置文件中。
spring.redis.cluster.nodes: Comma delimited list of host:port pairs.
spring.redis.cluster.max-redirects: Number of allowed cluster redirections.

参考:官方文档中文版(个人站)

参考:官方文档中文版(官网)

参考:官方文档中文版(官网doc)

参考:SpringBoot的配置文件

RedisTemplate源码

1
2
3
4
5
6
7
8
9
10
11
12
13
14
15
16
17
18
19
20
21
22
23
24
25
26
27
28
29
30
31
32
33
34
35
36
37
38
39
40
41
42
43
44
45
46
47
48
49
50
51
52
53
54
55
56
57
58
59
60
61
62
63
64
65
66
67
68
69
70
71
72
73
74
75
76
77
78
79
80
81
82
83
84
85
86
87
88
89
90
91
92
93
94
95
96
97
98
99
100
101
102
103
104
105
106
107
108
109
110
111
112
113
114
115
116
117
118
119
120
121
122
123
124
125
126
127
128
129
130
131
132
133
134
135
136
137
138
139
140
141
142

public class RedisTemplate<K, V> extends RedisAccessor implements RedisOperations<K, V>, BeanClassLoaderAware {
// 是否支持事物,必须通过设置setEnableTransactionSupport(true)显式地为使用中的每个RedisTemplate启用事务支持这将强制将正在使用的重断开绑定到当前线程触发MULTI。如果事务完成时没有错误,则调用EXEC,否则丢弃。一旦在MULTI中,RedisConnection将对写操作进行排队,所有只读操作(例如键)都将通过管道传输到一个新的(非线程绑定的)RedisConnection。
private boolean enableTransactionSupport = false;
// 有一个this.createRedisConnectionProxy代理
private boolean exposeConnection = false;
// afterPropertiesSet()方法用到,此方法允许bean实例在设置了所有bean属性后执行总体配置的验证和最终初始化。
private boolean initialized = false;
// 默认序列化
private boolean enableDefaultSerializer = true;
// 默认使用JdkSerializationRedisSerializer序列化
@Nullable
private RedisSerializer<?> defaultSerializer;
@Nullable
private ClassLoader classLoader;
// 默认使用 this.defaultSerializer 序列化
@Nullable
private RedisSerializer keySerializer = null;
// 默认使用 this.defaultSerializer 序列化
@Nullable
private RedisSerializer valueSerializer = null;
// 默认使用 this.defaultSerializer 序列化
@Nullable
private RedisSerializer hashKeySerializer = null;
// 默认使用 this.defaultSerializer 序列化
@Nullable
private RedisSerializer hashValueSerializer = null;
// 默认使用 new StringRedisSerializer(StandardCharsets.UTF_8)
private RedisSerializer<String> stringSerializer = RedisSerializer.string();
// 用于执行Redis脚本的ScriptExecutor
@Nullable
private ScriptExecutor<K> scriptExecutor;
@Nullable
private ValueOperations<K, V> valueOps;
@Nullable
private ListOperations<K, V> listOps;
@Nullable
private SetOperations<K, V> setOps;
@Nullable
private ZSetOperations<K, V> zSetOps;
@Nullable
private GeoOperations<K, V> geoOps;
@Nullable
private HyperLogLogOperations<K, V> hllOps;

public RedisTemplate() {
}

public void afterPropertiesSet() ;
// 在连接中执行给定的操作对象
@Nullable
public <T> T execute(RedisCallback<T> action) ;
// 在连接中执行给定的操作对象,该对象可以公开,也可以不公开。
@Nullable
public <T> T execute(RedisCallback<T> action, boolean exposeConnection) ;
// 在可公开或不可公开的连接中执行给定的操作对象。此外,可以对连接进行流水线操作。注意,管道的结果被丢弃(使其适合只写的场景)。有道翻译
@Nullable
public <T> T execute(RedisCallback<T> action, boolean exposeConnection, boolean pipeline);
// 执行一个Redis会话。允许在同一个会话中执行多个操作,通过RedisOperations.multi()和RedisOperations.watch(Collection)操作启用“事务”功能。
public <T> T execute(SessionCallback<T> session) ;
//在管道连接上执行给定的Redis会话。允许流水线处理事务。注意,回调函数不能返回非空值,因为它被管道覆盖。
public List<Object> executePipelined(SessionCallback<?> session) ;
// 自定义序列化
public List<Object> executePipelined(SessionCallback<?> session, @Nullable RedisSerializer<?> resultSerializer) ;
// 在管道连接上执行给定的操作对象,返回结果。注意,回调函数不能返回非空值,因为它被管道覆盖。此方法将使用默认的序列化器反序列化结果
public List<Object> executePipelined(RedisCallback<?> action) ;
// 自定义序列化
public List<Object> executePipelined(RedisCallback<?> action, @Nullable RedisSerializer<?> resultSerializer) ;
public <T> T execute(RedisScript<T> script, List<K> keys, Object... args) ;
public <T> T execute(RedisScript<T> script, RedisSerializer<?> argsSerializer, RedisSerializer<T> resultSerializer, List<K> keys, Object... args) ;
public <T extends Closeable> T executeWithStickyConnection(RedisCallback<T> callback) ;
private Object executeSession(SessionCallback<?> session) {
return session.execute(this);
}
protected RedisConnection createRedisConnectionProxy(RedisConnection pm) ;
protected RedisConnection preProcessConnection(RedisConnection connection, boolean existingConnection) ;
@Nullable
protected <T> T postProcessResult(@Nullable T result, RedisConnection conn, boolean existingConnection) ;
public boolean isExposeConnection();
public void setExposeConnection(boolean exposeConnection) ;
public boolean isEnableDefaultSerializer() ;
public void setEnableDefaultSerializer(boolean enableDefaultSerializer) ;
@Nullable
public RedisSerializer<?> getDefaultSerializer() ;
public void setDefaultSerializer(RedisSerializer<?> serializer) ;
public void setKeySerializer(RedisSerializer<?> serializer) ;
public RedisSerializer<?> getKeySerializer() ;
public void setValueSerializer(RedisSerializer<?> serializer) ;
public RedisSerializer<?> getValueSerializer() ;
public RedisSerializer<?> getHashKeySerializer() ;
public void setHashKeySerializer(RedisSerializer<?> hashKeySerializer) ;
public RedisSerializer<?> getHashValueSerializer() ;
public void setHashValueSerializer(RedisSerializer<?> hashValueSerializer) ;
public RedisSerializer<String> getStringSerializer() ;
public void setStringSerializer(RedisSerializer<String> stringSerializer) ;
public void setScriptExecutor(ScriptExecutor<K> scriptExecutor) ;
private byte[] rawKey(Object key) ;
private byte[] rawString(String key) ;
private byte[] rawValue(Object value) ;
private byte[][] rawKeys(Collection<K> keys) ;
private K deserializeKey(byte[] value) ;
@Nullable
private List<Object> deserializeMixedResults(@Nullable List<Object> rawValues, @Nullable RedisSerializer valueSerializer, @Nullable RedisSerializer hashKeySerializer, @Nullable RedisSerializer hashValueSerializer) ;
private Set<?> deserializeSet(Set rawSet, @Nullable RedisSerializer valueSerializer) ;
private Set<TypedTuple<V>> convertTupleValues(Set<Tuple> rawValues, @Nullable RedisSerializer valueSerializer) ;
public List<Object> exec() ;
public List<Object> exec(RedisSerializer<?> valueSerializer) ;
protected List<Object> execRaw() ;
public Boolean delete(K key) ;
public Long delete(Collection<K> keys) ;
public Boolean unlink(K key) ;
public Long unlink(Collection<K> keys) ;
public Boolean hasKey(K key) ;
public Long countExistingKeys(Collection<K> keys) ;
public Boolean expire(K key, long timeout, TimeUnit unit) ;
public Boolean expireAt(K key, Date date) ;
public void convertAndSend(String channel, Object message);
public Long getExpire(K key) ;
public Long getExpire(K key, TimeUnit timeUnit) ;
public Set<K> keys(K pattern) ;
public Boolean persist(K key) ;
public Boolean move(K key, int dbIndex) ;
public K randomKey() ;
public void rename(K oldKey, K newKey) ;
public Boolean renameIfAbsent(K oldKey, K newKey) ;
public DataType type(K key);
public byte[] dump(K key) ;
public void restore(K key, byte[] value, long timeToLive, TimeUnit unit, boolean replace) ;
public void multi() ;
public void discard() ;
public void watch(K key) ;
public void watch(Collection<K> keys) ;
public void unwatch() ;
public List<V> sort(SortQuery<K> query) ;
public <T> List<T> sort(SortQuery<K> query, @Nullable RedisSerializer<T> resultSerializer) ;
public <T> List<T> sort(SortQuery<K> query, BulkMapper<T, V> bulkMapper) ;
public <T, S> List<T> sort(SortQuery<K> query, BulkMapper<T, S> bulkMapper, @Nullable RedisSerializer<S> resultSerializer) ;
public Long sort(SortQuery<K> query, K storeKey) ;
public void killClient(String host, int port);
public List<RedisClientInfo> getClientList() ;
public void slaveOf(String host, int port) ;
public void slaveOfNoOne() ;

完成的cache + redis application.yml配置

1
2
3
4
5
6
7
8
9
10
11
12
13
14
15
16
17
18
19
spring:
cache:
type: REDIS
redis:
cache-null-values: false
time-to-live: 600000ms
use-key-prefix: true
cache-names: userCache,allUsersCache
redis:
host: 127.0.0.1
port: 6379
database: 0
lettuce:
shutdown-timeout: 200ms
pool:
max-active: 7
max-idle: 7
min-idle: 2
max-wait: -1ms

本文地址:SpringBoot整合Redis及Redis简介

推荐

Spring cache+ redis与redis 的比较

本文地址: https://github.com/maxzhao-it/blog/post/45583/