Centos安装Greenplum集群
一、前言
Pivotal Greenplum Database是一个建立在开源PostgreSQL上的MPP(大规模并行处理)数据库。系统由主节点、备节点和段节点组成。
所有数据驻留在段节点上,目录信息存储在主节点中。段节点运行一个或多个段,这些段是修改后的PostgreSQL数据库实例,并被分配一个内容标识符。
对于每个表,根据用户在DDL语句中指定的分布列键,将数据划分到段节点中。
对于每个段内容标识符,都有一个不在同一物理主机上运行的主段和镜像段。
当一个SQL查询进入主节点时,它将被解析、优化并分发到所有段以执行查询计划,并返回请求的数据或将查询结果插入数据库表。
二、准备
概述
Master节点存储全局系统元数据信息,不存储真实数据。数据通过hash分布到不同的segment中,master作为sql的全局入口,负责在segment中分配工作负载,整合处理结果,返回客户端。
Greenplum架构特点如下:
master节点可以做主备,segment节点也有镜像保证高可用,segment主备尽量混布到不同服务器上。- 支持行列混合存储引擎,同时支持外部表。
- 在
join时也涉及到数据跨节点重分布的问题,这也是share nothing数据库不可避免的问题。 - 高速内部
interconnect网络,实现数据join时的高速移动和汇总。 - 高效的数据并行加载。
greenplum架构图

部署方案
gp-master:192.168.2.21 master节点gp-master2:192.168.2.22gp-master3:192.168.2.23gp-master4:192.168.2.24
具体部署请参考附录中的虚拟机安装、Centos系统配置
三、安装 Greenplum
配置 Centos
host
1 | ssh root@192.168.2.21 "hostnamectl set-hostname host21;echo -e \"192.168.2.21 host21 dw1\\n192.168.2.22 host22 dw2\\n192.168.2.23 host23 dw3\\n192.168.2.24 host24 dw4\" >> /etc/hosts;" |
- 安装相关的依赖包
1 | yum install -y net-tools which openssh-clients openssh-server less zip unzip iproute |
- 启动
ssh
Centos 中默认已经启动 ssh,为了方便各节点之间的互连,创建相关的认证key。
1 | # 所有节点都要执行 |
同时修改所有节点里面的/etc/sysconfig/network文件,保持与主机名一致
1 | # 查看 |
- 创建
Greenplum的用户和用户组
为了方便安装Greenplum集群,且使Greenplum自带的python不与系统的python版本相冲突,在每个节点中创建Greenplum的用户和用户组
1 | # 所有部署服务器节点都做这个操作 |
- 修改每个节点上的文件打开数量限制
1 | cat /etc/security/limits.conf |
下载Greenplum安装包
到greenplum的官网上,下载Greenplum安装包
或GitHub下载,点开Greenplum Database Server,根据自己的操作系统下载安装包,我下载当前最新的open-source-greenplum-db-6.17.2-rhel7-x86_64.rpm,将其拷到master节点的/home/gpadmin目录中
安装Greenplum
切换到gpadmin用户
1 | su gpadmin |
Rpm 安装
- 传递文件到
Centos
1 | scp D:\tools\linux\open-source-greenplum-db-6.17.2-rhel7-x86_64.rpm root@192.168.2.21:/home/gpadmin/ |
- 安装
1 | sudo yum localinstall /home/gpadmin/open-source-greenplum-db-6.17.2-rhel7-x86_64.rpm -y |
1 | # 查看安装地址 |
gpssh-exkeys报错问题:
2
mv python python.bak
解压安装(ZIP)
解压下载后的zip文件
1 | unzip greenplum-db-6.17.2-rhel7-x86_64.zip |
执行安装文件
1 | ./greenplum-db-6.17.2-rhel7-x86_64.bin |
安装期间需要配置安装目录,输入/home/gpadmin/greenplum-db-6.17.2
批量操作节点
配置
为了方便安装集群,Greenplum提供了批量操作节点的命令,通过指定配置文件使用批处理命令
1 | # 在主节点 host21 配置 |
/usr/local/greenplum-db/greenplum_path.sh中保存了运行greenplum的一些环境变量,包括GPHOME、PYTHONHOME等。
免密登录
- 客户端生成公私钥
- 上传公钥到服务器
id_rsa(私钥)id_rsa.pub(公钥)
1 | # host21 执行,一直回车 |
权限
1
2
3
4
5su gpadmin
sudo chmod 600 ~/.ssh/*
sudo chmod 700 ~/.ssh
sudo chmod 775 ~/
sudo cp ~/.ssh/authorized_keys /root/.ssh/authorized_keys配置服务器的秘钥验证
1 | sudo vim /etc/ssh/sshd_config |
- 修改
1 | # 设置ssh在接收登录请求之前是否检查用户家目录和rhosts文件的权限和所有权。这通常是必要的,因为新手经常会把自己的目录和文件设成任何人都有写权限。) |
重启
1
sudo systemctl restart sshd.service
测试
1
ssh root@dw2
分发 master的 rsa key
在gpadmin账号下设置环境变量,并将master节点的key 交换到各个segment节点
1 | # 解压安装 source /home/gpadmin/greenplum-db/greenplum_path.sh |
批量处理
后续就可以使用一些命令执行批量操作
注意:使用gpssh-exkeys命令时一定要使用gpadmin用户,因为会在/home/gpadmin/.ssh中生成ssh的免密码登录秘钥,如果使用其它账号登录,则会在其它账号下生成密钥,在gpadmin
账号下就无法使用gpssh的批处理命令
1 | gpssh -f /home/gpadmin/conf/hostlist |
分发安装包到每个子节点
打包master节点上的安装包
1 | tar -czf gp.tar.gz greenplum-db-6.17.2 |
使用gpscp命令将这个文件复制到每个子节点
1 | gpscp -f /home/gpadmin/conf/seg_hosts gp.tar.gz =:/home/gpadmin |
批量解压,并创建软链接
1 | gpssh -f /home/gpadmin/conf/seg_hosts |
这样就完成了所有子节点数据库的安装
初始化安装数据库
- 批量创建数据目录
1 | gpssh -f /home/gpadmin/conf/hostlist |
- 在master节点上修改
.bash_profile配置环境变量,并发送给其他子节点,确保这些环境变量生效
1 | #.bash_profile |
- 初始化配置文件
1 | vim /home/gpadmin/conf/gpinitsystem_config |
填写配置
1 | ARRAY_NAME=\"Greenplum\" |
- 初始化数据库
1 | gpinitsystem -c /home/gpadmin/conf/gpinitsystem_config -s host24 -e 1 |
其中,-s dw4是指配置master的standby节点,然后按照提示步骤就能完成安装了
如果gpinitsystem不成功,在master节点的/home/gpadmin/gpAdminLogs目录下gpinitsystem_*.log文件中查看日志信息,找出原因进行修改,然后再重新执行gpinitsystem进行初始化安装。
清空重来
所有的服务器执行
1 | # 关闭查询到的进程 |
四、配置
鬼鬼,有点复杂,待续
附:
1、虚拟机安装
虚拟机网络配置
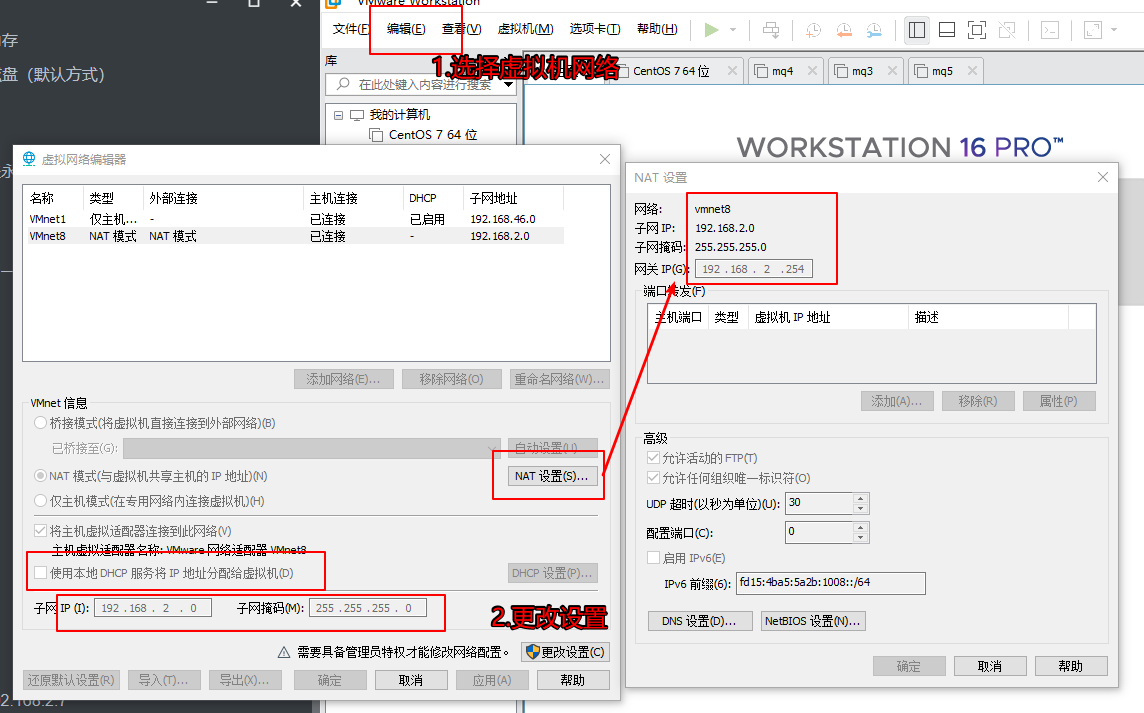
虚拟机系统网络
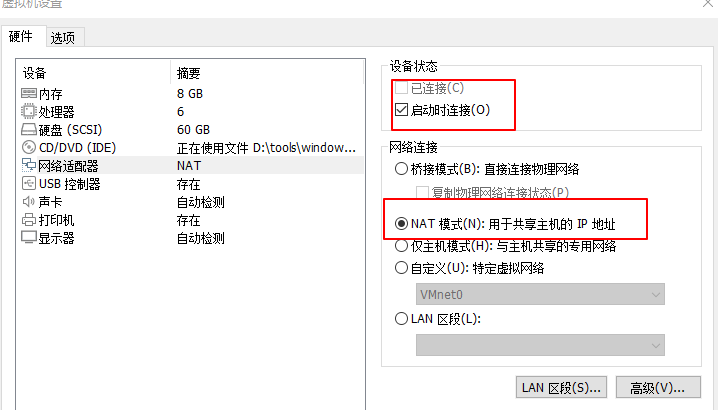
虚拟机CD设置
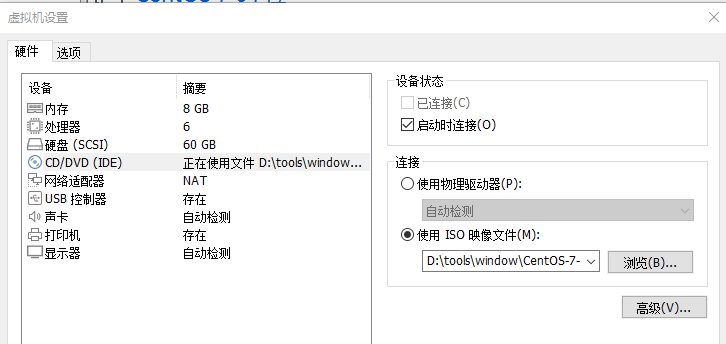
2、Centos系统配置
源
1 | sudo cp /etc/yum.repos.d/CentOS-Base.repo /etc/yum.repos.d/CentOS-Base.repo.bak |
详情请看附
1 | # 清空缓存 |
报错 RPM-GPG-KEY-EPEL-7
先设置 CentOS-Base.repo 中的 gpgcheck=0
1 | cd /etc/pki/rpm-gpg |
国内
1 | sudo sed -e 's|^mirrorlist=|#mirrorlist=|g' \ |
关闭防火墙
1 | systemctl status firewalld |
max file
修改
1 | sudo vim /etc/security/limits.conf |
添加
1 | * soft nofile 65536 |
或者直接执行添加
1 | echo -e "* soft nofile 65536\\n* hard nofile 65536\\n* soft nproc 65536\\n* hard nproc 65536" >>/etc/security/limits.conf |
执行
1 | sudo source /etc/security/limits.conf |
中文字体
方式1
1 | yum -y install fonts-chinese |
方式2
1 | yum -y install fontconfig |
在 <dir prefix="xdg">fonts</dir> 这一行下面插入:
1 | <dir>/usr/share/fonts/chinses</dir> |
1 | # 拷贝本地字体 |
网络
需要安装 net-tools
1 | yum -y install net-tools |
查看网络
1 | ifconfig |
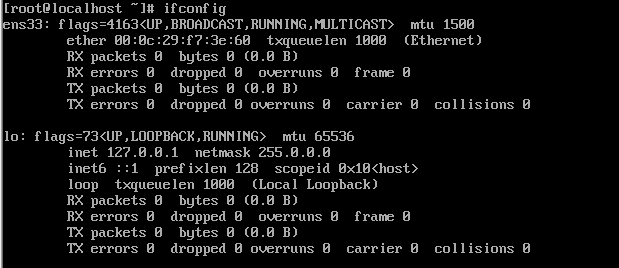
我这里的网络魏 ens33

编辑网络
1 | vim /etc/sysconfig/network-scripts/ifcfg-ens33 |
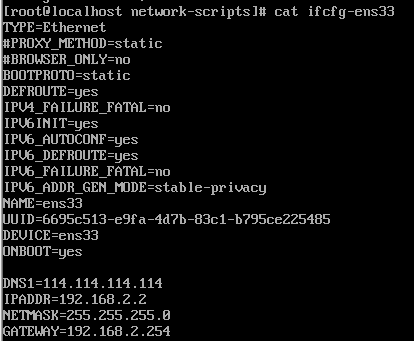
1 |
|
重启网略
1 | service network restart |
测试网络
1 | ping www.baidu.com |
设置hostname
默认hostname 为 localhost,所以这里做区分
1 | ssh root@192.168.2.3 "hostnamectl set-hostname host3;echo -e \"192.168.2.3 host3\\n192.168.2.4 host4\\n192.168.2.5 host5\\n192.168.2.6 host6\\n192.168.2.7 host7\" >> /etc/hosts;" |
3、关闭脚本
1 | greenplum |
4、gpinitsystem命令
| -a | 不提示用户确认 |
|---|---|
| - b < parallel_processes > | 要并行创建的段的数量。如果不指定, 该实用程序一次将启动4个并行进程。 |
| - c < gpinitsystem_config > | 必需的。配置文件的完整路径和文件名,其中 包含要配置和初始化的所有已定义参数 新的Greenplum系统。请参阅下面的初始化配置文件格式。 |
| - d | 设置日志输出级别为调试。 |
| - h < hostfile_gpinitsystem > | 可选的。包含主机的文件的完整路径和文件名 段主机的地址。如果没有在命令行中指定, 您可以使用MACHINE_LIST_FILE参数指定主机文件 在gpinitsystem_config文件中。 |
| Sets the default locale used by Greenplum Database. | 可选的。输入配置文件的完整路径和文件名, 定义Greenplum数据库成员和段使用 QD_PRIMARY_ARRAY和PRIMARY_ARRAY参数。输入配置 文件通常是通过使用gpinitsystem和-O output_configuration_file选项。您必须提供-c 或-I input_configuration_file . cluster_configuration_file选项 gpinitsystem选项。 |
| -l |
要写入日志文件的目录。默认为~ / gpAdminLogs。 |
| –max_connections= |
设置主服务器允许的最大客户端连接数。 默认为25。 |
| - s | 可选的。如果您希望配置备份主主机,请指定 使用此选项的主机名。必须使用Greenplum Database软件 已在此主机上安装和配置。 |
-e <password> |
password to set for Greenplum superuser in database [default su_password] |
  -a, don't ask to confirm instance creation [default:- ask]
  -D, set log output to debug level, shows all function calls
  -l, logfile_directory [optional]
      Alternative logfile directory
  -q, quiet mode, do not log progress to screen [default:- verbose output to screen]

  Configuration options:
  -b, shared_buffers per instance [default 128000kB]
      Specify either the number of database I/O buffers (without suffix) or the
      amount of memory to use for buffers (with suffix 'kB', 'MB' or 'GB').
      Applies to master and all segments.
  -B, <number> run this batch of create segment processes in parallel [default 60]
  -c, gp_config_file [mandatory]
      Supplies all Greenplum configuration information required by this utility.
      Full description of all parameters contained within the example file
      supplied with this distribution.
      Also see gpinitsystem_INSTRUCTIONS file for greater detail on
      the operation and configuration of this script
  -e, ,
  -S, standby_datadir [optional]
  -h, gp_hostlist_file [optional]
      Contains a list of all segment instance hostnames required to participate in
      the new Greenplum instance. Normally set in gp_config_file.
  -I, <input_configuration_file>
      The full path and filename of an input configuration file, which defines the
      Greenplum Database members and segments using the QD_PRIMARY_ARRAY and
      PRIMARY_ARRAY parameters. The input configuration file is typically created by
      using gpinitsystem with the -O <output_configuration_file> option. You must
      provide either the -c <cluster_configuration_file> option or the -I
      <input_configuration_file> option to gpinitsystem.
  -m, maximum number of connections for master instance [default 250]
  -n, <locale>, setting for locale to be set when database initialized [default en_US.utf8]
  -O, <output_configuration_file>
      When used with the -O option, gpinitsystem does not create a new Greenplum
      Database cluster but instead writes the supplied cluster configuration
      information to the specified output_configuration_file. This file defines
      Greenplum Database members and segments using the QD_PRIMARY_ARRAY and
      PRIMARY_ARRAY parameters, and can be later used with -I
      <input_configuration_file> to initialize a new cluster.
  -p, postgresql_conf_gp_additions [optional]
      List of additional PostgreSQL parameters to be applied to each Master/Segment
      postgresql.conf file during Greenplum database initialization.
  -P, standby_port [optional]
  -s, standby_hostname [optional]

  Return codes: