First
优点
由于服务器不保存 session 状态,因此无法在使用过程中废止某个 token,或者更改 token 的权限。也就是说,一旦 JWT 签发了,在到期之前就会始终有效,除非服务器部署额外的逻辑。
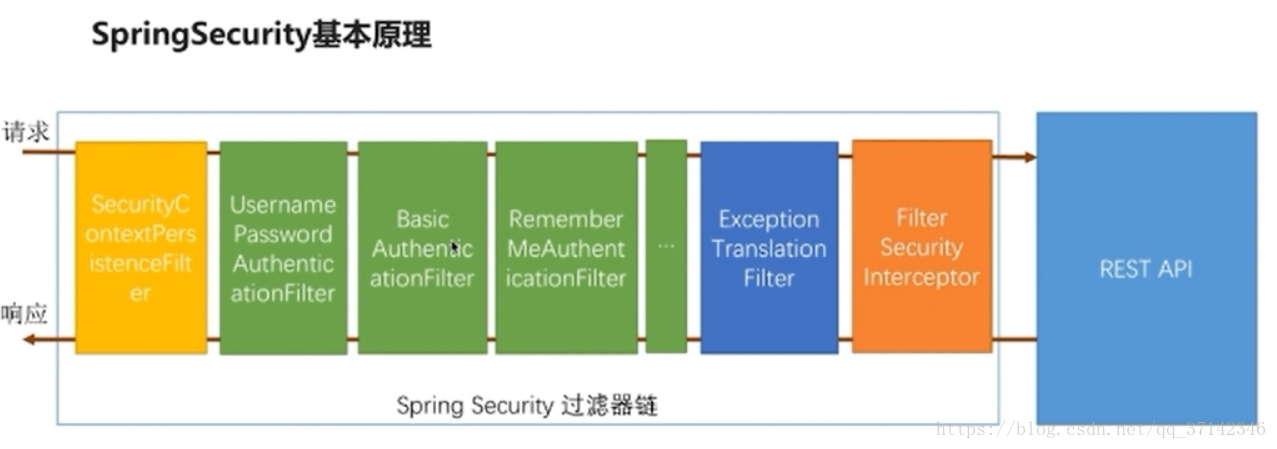
缺点 Security 基本原理 下面每个类或接口的作用,之后都会有代码.
了解 Token结构 Token是一个很长的字符串,中间用点(.)分隔成三个部分。
JWT 的三个部分依次如下。
Header(头部)
Payload(负载)
Signature(签名)
1
2
3
4
{ "alg" : "HS256" , "typ" : "JWT" }
alg属性表示签名的算法(algorithm),默认是 HMAC SHA256(写成 HS256);typ属性表示这个令牌(token)的类型(type),JWT 令牌统一写为JWT。
Payload(负载) Payload 部分也是一个 JSON 对象,用来存放实际需要传递的数据。JWT 规定了7个官方字段,供选用。
iss (issuer):签发人
exp (expiration time):过期时间
sub (subject):主题
aud (audience):受众
nbf (Not Before):生效时间
iat (Issued At):签发时间
jti (JWT ID):编号
除了官方字段,你还可以在这个部分定义私有字段,下面就是一个例子。
1
2
3
4
5
{ "sub" : "1234567890" , "name" : "John Doe" , "admin" : true }
注意,JWT 默认是不加密的,任何人都可以读到,所以不要把秘密信息放在这个部分。
Signature(签名) Signature 部分是对前两部分的签名,防止数据篡改。
首先,需要指定一个密钥(secret)。这个密钥只有服务器才知道,不能泄露给用户。然后,使用 Header 里面指定的签名算法(默认是 HMAC SHA256),按照下面的公式产生签名。
1
2
3
4
HMACSHA256( base64UrlEncode(header) + "." + base64UrlEncode(payload), secret)
算出签名以后,把 Header、Payload、Signature 三个部分拼成一个字符串,每个部分之间用”点”(.)分隔,就可以返回给用户。
思路
构建
导入 security 、 jwt 依赖
用户的验证(service 、 dao 、model)
实现UserDetailsService 、UserDetails接口
可选:实现PasswordEncoder 接口(密码加密)
验证用户登录信息、用户权限的拦截器
security 配置
登录认证 API
构建 1. 构建 创建个项目
2.导入 security 、 jwt 依赖 1 2 3 4 5 6 7 8 9 10 11 12 13 14 15 16 17 18 19 20 21 22 23 24 25 26 27 28 29 30 31 <project > <spring-security-jwt.version > 1.0.9.RELEASE</spring-security-jwt.version > <jjwt.version > 0.9.1</jjwt.version > <dependency > <groupId > io.jsonwebtoken</groupId > <artifactId > jjwt</artifactId > <version > ${jjwt.version}</version > </dependency > <dependency > <groupId > org.springframework.security</groupId > <artifactId > spring-security-jwt</artifactId > <version > ${spring-security-jwt.version}</version > <scope > compile</scope > </dependency > <dependency > <groupId > org.springframework.boot</groupId > <artifactId > spring-boot-starter-data-jpa</artifactId > </dependency > <dependency > <groupId > mysql</groupId > <artifactId > mysql-connector-java</artifactId > <scope > runtime</scope > </dependency > <dependency > <groupId > com.alibaba</groupId > <artifactId > druid-spring-boot-starter</artifactId > <version > 1.1.16</version > </dependency > </project >
3.用户的验证(service 、 dao 、model) model 1 2 3 4 5 6 7 8 9 10 11 12 13 14 15 16 17 18 19 20 21 22 23 24 25 26 27 28 29 30 31 @Accessors(chain = true) @Data @Entity @Table(name = "app_user", schema = "", catalog = "") @ApiModel(value = "用户表", description = "用户表") public class AppUser implements Serializable { private static final long serialVersionUID = -1L ; @Id @Column(name = "ID",unique = true) private Long id; @Basic @Column(name = "LIVE_ADDRESS") private String liveAddress; @Basic @Column(name = "LOGIN_NAME") private String loginName; @Basic @Column(name = "PASSWORD") private String password; }
dao 1 2 3 4 5 6 7 8 9 10 11 12 13 14 15 16 17 18 19 20 @Repository(value = "appUserRepository") public interface AppUserRepository extends JpaRepository <AppUser, Long>, JpaSpecificationExecutor<AppUser> { List<AppUser> findByLoginNameEquals (String loginName) ; }
service 1 2 3 4 5 6 7 8 9 10 11 12 13 14 15 16 17 18 19 20 21 22 23 24 25 26 27 public interface AppUserService { AppUser saveOne (AppUser appUser) ; AppUser findByLoginName (String loginName) ; }
1 2 3 4 5 6 7 8 9 10 11 12 13 14 15 16 17 18 19 20 21 22 23 24 @Service(value = "appUserService") public class AppUserServiceImpl implements AppUserService { @Resource(name = "appUserRepository") private AppUserRepository appUserRepository; @Override public AppUser saveOne (AppUser appUser) { return appUserRepository.save(appUser); } @Override public AppUser findByLoginName (String loginName) { List<AppUser> appUserList = appUserRepository.findByLoginNameEquals(loginName); return appUserList.size() > 0 ? appUserList.get(0 ) : null ; } }
Jwt 工具类 1 2 3 4 5 6 7 8 9 10 11 12 13 14 15 16 17 18 19 20 21 22 23 24 25 26 27 28 29 30 31 32 33 34 35 36 37 38 39 40 41 42 43 44 45 46 47 48 49 50 51 52 53 54 55 56 57 58 59 60 61 62 63 64 65 66 67 68 69 70 71 72 73 74 75 76 77 78 79 80 81 82 83 84 85 86 87 88 public class JwtTokenUtil { private static final String SECRET = "jwt_secret_gtboot" ; private static final String ISS = "gtboot" ; private static final long EXPIRATION = 1800L ; public static String createToken (String issuer, String subject, long expiration) { return createToken(issuer, subject, expiration, null ); } public static String createToken (String issuer, String subject, long expiration, Claims claims) { return Jwts.builder() .signWith(SignatureAlgorithm.HS512, SECRET) .setClaims(null ) .setSubject(subject) .setIssuer(Optional.ofNullable(issuer).orElse(ISS)) .setIssuedAt(new Date ()) .setExpiration(new Date (System.currentTimeMillis() + (expiration > 0 ? expiration : EXPIRATION) * 1000 )) .compact(); } public static String getProperties (String token) { return getTokenBody(token).getSubject(); } public static boolean isExpiration (String token) { return getTokenBody(token).getExpiration().before(new Date ()); } private static Claims getTokenBody (String token) { return Jwts.parser() .setSigningKey(SECRET) .parseClaimsJws(token) .getBody(); } }
4.实现UserDetailsService 、UserDetails接口 UserDetailsService 可以把角色相关禁用掉,然后修改参数.
我也会把角色相关操作,以及表的 sql 放到最后.
1 2 3 4 5 6 7 8 9 10 11 12 13 14 15 16 17 18 19 20 21 22 23 24 25 26 27 28 29 30 31 32 33 34 35 36 37 38 39 40 41 42 43 44 45 46 47 48 49 50 51 52 53 54 55 56 @Service("userDetailsService") public class UserDetailsServiceImpl implements UserDetailsService { private static final Logger logger = LoggerFactory.getLogger(UserDetailsServiceImpl.class); @Resource(name = "appUserService") private AppUserService appUserService; @Resource(name = "appRoleService") private AppRoleService appRoleService; @Override public UserDetails loadUserByUsername (String loginName) throws UsernameNotFoundException { UserDetails userDetails = null ; try { AppUser appUser = appUserService.findByLoginName(loginName); if (appUser != null ) { List<AppRole> appRoleList = appRoleService.findByUserId(appUser.getId()); Collection<GrantedAuthority> authorities = new ArrayList <>(); for (AppRole appRole : appRoleList) { SimpleGrantedAuthority grant = new SimpleGrantedAuthority (appRole.getConstName()); authorities.add(grant); } userDetails = new UserDetailsImpl (appUser, authorities); } else { throw new UsernameNotFoundException ("该用户不存在!" ); } } catch (Exception e) { logger.error(e.getMessage()); } return userDetails; } }
UserDetails
1 2 3 4 5 6 7 8 9 10 11 12 13 14 15 16 17 18 19 20 21 22 23 24 25 26 27 28 29 30 31 32 33 34 35 36 37 38 39 40 41 42 43 44 45 46 47 48 49 50 51 52 53 54 55 56 57 58 59 60 61 62 63 64 65 66 67 68 69 70 71 72 73 74 75 76 77 78 79 80 81 82 83 84 85 86 87 88 89 90 91 92 93 94 public class UserDetailsImpl implements UserDetails { private static final long serialVersionUID = 1L ; private AppUser appUser; private Collection<? extends GrantedAuthority > authorities; public UserDetailsImpl (AppUser appUser, Collection<? extends GrantedAuthority> authorities) { super (); this .appUser = appUser; this .authorities = authorities; } @Override public Collection<? extends GrantedAuthority > getAuthorities() { return authorities; } @Override public String getPassword () { return appUser.getPassword(); } @Override public String getUsername () { return appUser.getLoginName(); } @Override public boolean isAccountNonExpired () { return appUser.getExpiration() == null || appUser.getExpiration().before(new Date ()); } @Override public boolean isAccountNonLocked () { return appUser.getLockStatus() == null || appUser.getLockStatus() == 0 ; } @Override public boolean isCredentialsNonExpired () { return true ; } @Override public boolean isEnabled () { return appUser.getDelStatus() == 0 ; } }
5.可选:实现PasswordEncoder 接口(密码加密) 1 2 3 4 5 6 7 8 9 10 11 12 13 14 15 16 17 18 19 20 21 22 23 24 25 26 27 28 29 30 31 32 33 34 35 36 37 38 39 40 41 42 43 44 45 46 47 48 49 50 51 52 53 54 55 56 57 58 59 60 61 62 63 64 65 66 67 68 69 70 71 72 73 74 75 76 77 78 79 80 81 82 83 84 85 86 87 88 89 90 91 92 @Service("passwordEncoder") public class PasswordEncoderImpl implements PasswordEncoder { private final int strength; private final SecureRandom random; private Pattern BCRYPT_PATTERN; private Logger logger; public PasswordEncoderImpl () { this (-1 ); } public PasswordEncoderImpl (int strength) { this (strength, null ); } public PasswordEncoderImpl (int strength, SecureRandom random) { this .BCRYPT_PATTERN = Pattern.compile("\\A\\$2a?\\$\\d\\d\\$[./0-9A-Za-z]{53}" ); this .logger = LoggerFactory.getLogger(this .getClass()); if (strength == -1 || strength >= 4 && strength <= 31 ) { this .strength = strength; this .random = random; } else { throw new IllegalArgumentException ("Bad strength" ); } } @Override public String encode (CharSequence rawPassword) { String salt; if (this .strength > 0 ) { if (this .random != null ) { salt = BCrypt.gensalt(this .strength, this .random); } else { salt = BCrypt.gensalt(this .strength); } } else { salt = BCrypt.gensalt(); } return BCrypt.hashpw(rawPassword.toString(), salt); } @Override public boolean matches (CharSequence rawPassword, String encodedPassword) { if (encodedPassword != null && encodedPassword.length() != 0 ) { if (!this .BCRYPT_PATTERN.matcher(encodedPassword).matches()) { this .logger.warn("Encoded password does not look like BCrypt" ); return false ; } else { return BCrypt.checkpw(rawPassword.toString(), encodedPassword); } } else { this .logger.warn("Empty encoded password" ); return false ; } } @Override public boolean upgradeEncoding (String encodedPassword) { return false ; } }
6.验证用户登录信息、用户权限的拦截器
JwtAuthenticationFilter用户账号的验证JwtAuthorizationFilter用户权限的验证
JwtAuthenticationFilter继承于UsernamePasswordAuthenticationFiltertoken并调用 authenticationManager.authenticate() 让spring-security
这个操作有点像是shiro的 subject.login(new UsernamePasswordToken()),验证的事情交给框架。
7.security 配置 8.登录认证 API 配置文件 1 2 3 4 5 6 7 8 9 10 11 12 13 14 15 16 17 18 19 20 21 22 23 24 25 26 27 28 29 30 31 32 33 34 35 36 37 38 39 40 41 42 spring: datasource: driverClassName: com.mysql.cj.jdbc.Driver url: jdbc:mysql://127.0.0.1:3306/maxzhao_ittest?charset=utf8mb4&useSSL=false username: maxzhao password: maxzhao main: allow-bean-definition-overriding: true jpa: database: MYSQL database-plinatform: org.hibernate.dialect.MySQL5InnoDBDialect show-sql: true generate-ddl: true open-in-view: false hibernate: ddl-auto: update properties: hibernate: current_session_context_class: org.springframework.orm.hibernate5.SpringSessionContext dialect: org.hibernate.dialect.MySQL5Dialect gt: maxzhao: boot: multiDatasourceOpen: true datasource[0]: dbName: second driverClassName: com.mysql.cj.jdbc.Driver url: jdbc:mysql://127.0.0.1:3306/pos?charset=utf8mb4&useSSL=false username: maxzhao password: maxzhao datasource[1]: dbName: third driverClassName: com.mysql.cj.jdbc.Driver url: jdbc:mysql://127.0.0.1:3306/biz?charset=utf8mb4&useSSL=false username: maxzhao password: maxzhao
本文地址: SpringBoot+Security+JWT基础
gitee
推荐SpringBoot+Security+JWT基础 SpringBoot+Security+JWT进阶:一、自定义认证 SpringBoot+Security+JWT进阶:二、自定义认证实践
本文地址: https://github.com/maxzhao-it/blog/post/59134/